89 TBIRD
2nd Gear Poster
- Joined
- Sep 22, 2023
- Messages
- 83
- Age
- 60
- Location
- Woodbridge, VA
- Vehicle Details
- 1989 Thunderbird Base N/A V6
Original thread: 1989 Base Cluster Fu- ah Swap | TCCoA Forums (https://www.tccoa.com/threads/1989-base-cluster-fu-ah-swap.189491/#post-2053595)
I'll repost just the highlights here.
After 30 years of looking at my lame 3 gauge instrument cluster, it's time to upgrade. I obtained a sport cluster from a '93 Cougar, and the '89 and '93 EVTMs.
The '93 book has a very nice wiring chart, much more handy than the schematics.
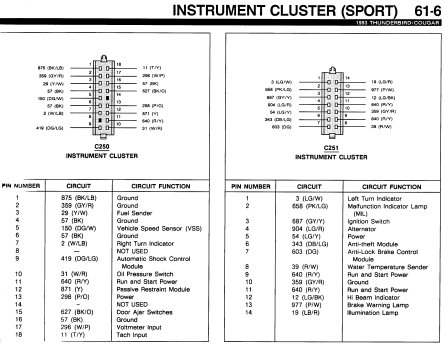
The '89 book has no such chart, so I did some copy/pasting on the '93 scan to depict the '89 wiring. This made it so much easier to switch the wiring around.
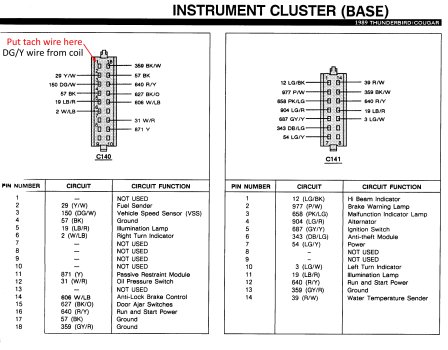
Notice the red text. My car has no tach, therefore no wire for it. The number 1 slot in that connector is empty, so I'll insert the tach wire there when it's added.
Since this is my only car I can't have it undriveable for very long. So just in case something goes wrong with the rewiring I have to be able to swap back to the original cluster while I figure out the problem. I decided to make an adapter harness, just like you would use for an after market radio. I picked up an extra cluster from an '89 SC. It was pretty beat up and missing the speedo, so it was cheap.
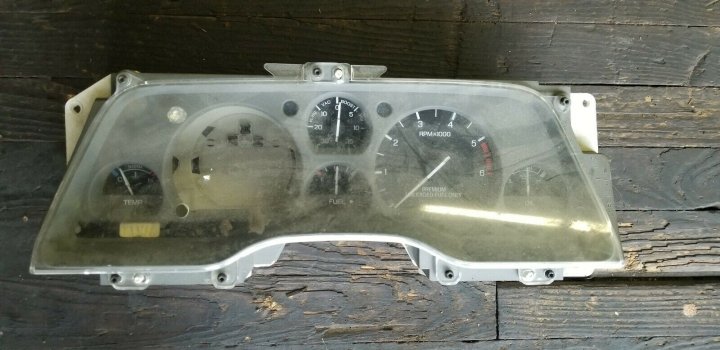
I cut the harness connector sockets from the back of the SC cluster. Then I made new circuit traces with 1/8" copper foil tape.
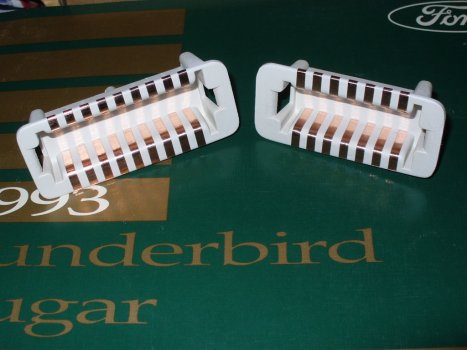
Copper tape https://www.amazon.com/dp/B01L0BTAX...olid=2EEWEMBS87FGW&psc=1&ref_=lv_ov_lig_dp_it
I tacked down the wires with super glue, to prevent the copper tape from being pulled up if the wires get tugged on. It also made soldering easier.
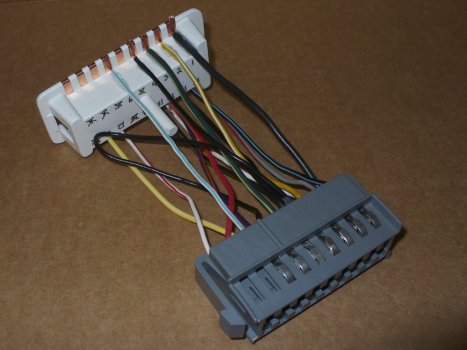
Then I soldered all the connections. Some wires had to be doubled up on one trace, and even triple on one.
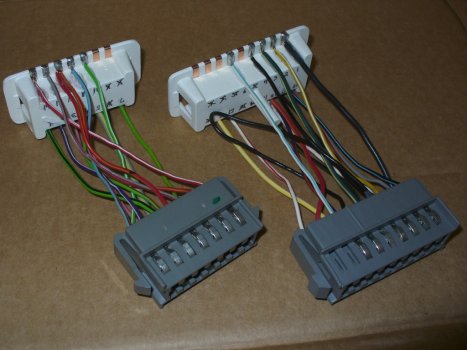
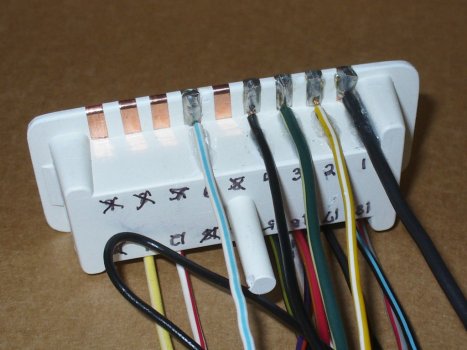
Now it's test time, glad I studied! I removed the old cluster.
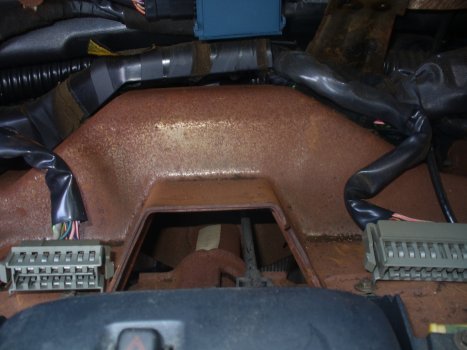
Plugged in my custom harness adapters.
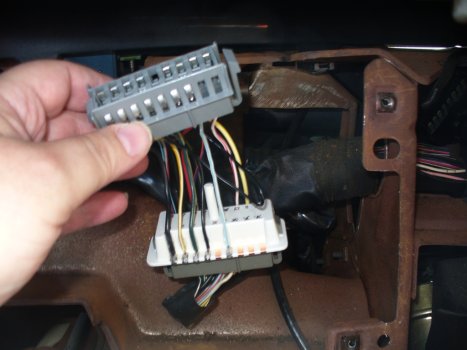
And hooked up the new cluster.
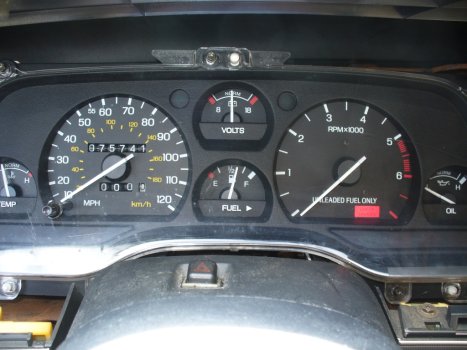
Tach and oil don't work as they are not wired to anything yet, I assume that's why the "Check Gauges" light is on. Everything else seems to work though.
The gauge lighting also works.
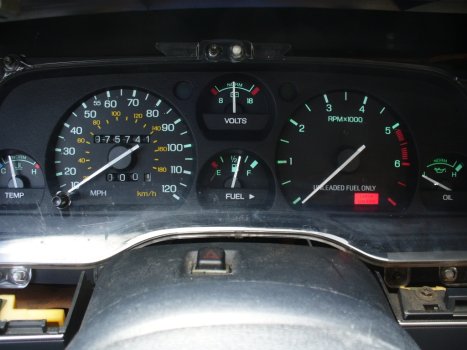
Even the speedo and turn signals work, which I verified with a trip around the block. It was cool to drive with the new cluster, almost like a different car (with the same squeaks and rattles though). But I didn't want to go too far with a busted odometer gear, so I'll replace that tonight. And reset the numbers to match the old one while I'm in there.
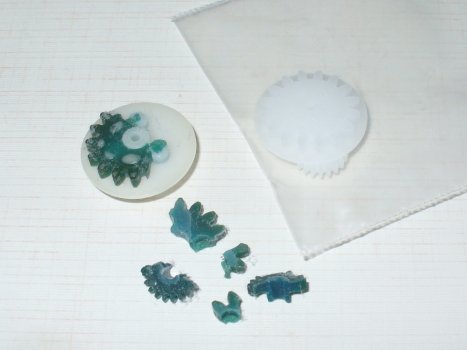
I got the new odo gears in, no need to cover it as it's well documented. I also reset the numbers to match my old odo, also documented but the picture links are dead on that thread. I looked at it for a while, trying to figure out how it goes together, and I noticed that one end of the axle pin for the number wheels is retained by what looks like a tang nut. The end of the pin protrudes past the nut, so a regular screw driver won't work. I don't have the appropriate tool but I managed to get it started with a pair of pointy hook-nosed tweezers. A few turns got the nut clear of the pin so I could finish with a screw driver.
Here's the nut. It got nicked a bit by the tweezers but no real harm done.
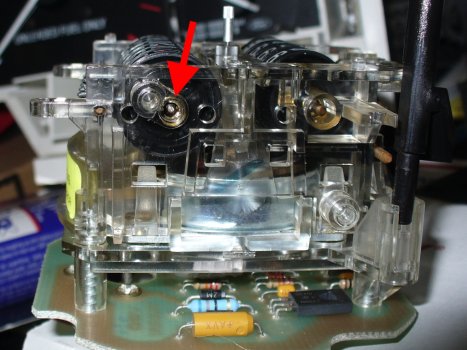
Removing the nut frees the axle pin to wiggle a bit in the hole, and allowed it to be pulled away from the wheels just enough to turn them one at a time to reset them. So the "new" 75k odo now matches my 142k original.
I'll repost just the highlights here.
After 30 years of looking at my lame 3 gauge instrument cluster, it's time to upgrade. I obtained a sport cluster from a '93 Cougar, and the '89 and '93 EVTMs.
The '93 book has a very nice wiring chart, much more handy than the schematics.

The '89 book has no such chart, so I did some copy/pasting on the '93 scan to depict the '89 wiring. This made it so much easier to switch the wiring around.

Notice the red text. My car has no tach, therefore no wire for it. The number 1 slot in that connector is empty, so I'll insert the tach wire there when it's added.
Since this is my only car I can't have it undriveable for very long. So just in case something goes wrong with the rewiring I have to be able to swap back to the original cluster while I figure out the problem. I decided to make an adapter harness, just like you would use for an after market radio. I picked up an extra cluster from an '89 SC. It was pretty beat up and missing the speedo, so it was cheap.

I cut the harness connector sockets from the back of the SC cluster. Then I made new circuit traces with 1/8" copper foil tape.

Copper tape https://www.amazon.com/dp/B01L0BTAX...olid=2EEWEMBS87FGW&psc=1&ref_=lv_ov_lig_dp_it
I tacked down the wires with super glue, to prevent the copper tape from being pulled up if the wires get tugged on. It also made soldering easier.

Then I soldered all the connections. Some wires had to be doubled up on one trace, and even triple on one.


Now it's test time, glad I studied! I removed the old cluster.

Plugged in my custom harness adapters.

And hooked up the new cluster.

Tach and oil don't work as they are not wired to anything yet, I assume that's why the "Check Gauges" light is on. Everything else seems to work though.
The gauge lighting also works.

Even the speedo and turn signals work, which I verified with a trip around the block. It was cool to drive with the new cluster, almost like a different car (with the same squeaks and rattles though). But I didn't want to go too far with a busted odometer gear, so I'll replace that tonight. And reset the numbers to match the old one while I'm in there.

I got the new odo gears in, no need to cover it as it's well documented. I also reset the numbers to match my old odo, also documented but the picture links are dead on that thread. I looked at it for a while, trying to figure out how it goes together, and I noticed that one end of the axle pin for the number wheels is retained by what looks like a tang nut. The end of the pin protrudes past the nut, so a regular screw driver won't work. I don't have the appropriate tool but I managed to get it started with a pair of pointy hook-nosed tweezers. A few turns got the nut clear of the pin so I could finish with a screw driver.
Here's the nut. It got nicked a bit by the tweezers but no real harm done.

Removing the nut frees the axle pin to wiggle a bit in the hole, and allowed it to be pulled away from the wheels just enough to turn them one at a time to reset them. So the "new" 75k odo now matches my 142k original.
Last edited:
