Tip #2844....

White Lincoln

6th Gear Poster
Birdcats Supporter
Joined
Oct 2, 2023
Messages
596
Location
New Mexico
Vehicle Details
1994 Mercury Cougar XR7, 3.8L, all stock
Country flag
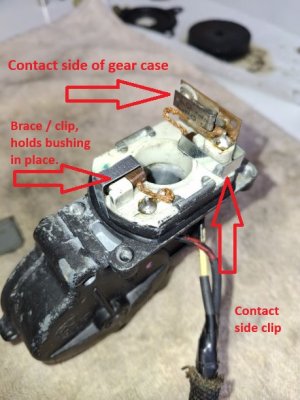
When re-assembling the stator and bushings, here are some tips I came across.

1. Make sure the stator and bushings are clean. The can get greasy over time. I used brake cleaner.
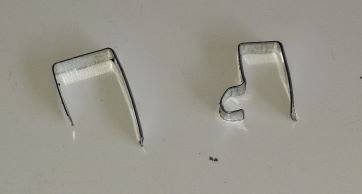
2. Find some sheet metal to make a couple braces/clips -whatever its called. I used hanger strap and cut the sides off to make a solid 3/8" piece (see pics).
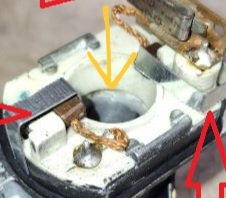
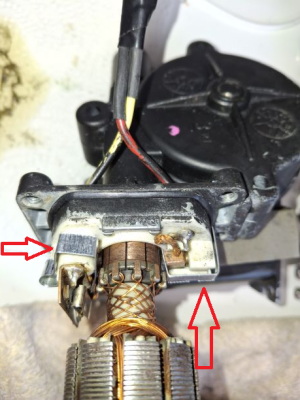
3. Put the bushing spring and bushing in the side that has the contact side of the gear housing (see pic). Hold it in place while you apply the bracket.
4. Insert the other spring and bracket and put a clip over it to hold it in place as well.
5. Put the stater in the gear housing.
6. Remove the clips slowly to endure the bushings set against the stator commuter.
7. Place the motor case (magnets) over the stator slowly while holding the stator in place against the gear assembly housing. Make sure the stator goes into the housing as the magnets are VERY Strong and it will not go in the case easily.
The rest is the same way it came apart.
bushing clips.png

Clips2.jpg


case2.jpg
 
1.
Where were you two days ago when I did this?

2.
I actually ended up doing it a bit differently.
I pulled out this white plastic ring:
case2.jpg
I put it back in, but let it stick out just enough to hold the springs and metal blocks (bushings?) in place.
Then, when you push the rod through, that round thing (stator?) pushes the ring in and the blocks land in their place.
 
1.
Where were you two days ago when I did this?
Probably at the bar.... just kidding.

So, I did not mention that I spent over an hour trying to put these in without any "tools" I gave up, went to bed and then thought of the clips the next day. And they worked! I was surprised cause that bushing spring is rather strong when compressed.

Mind you - this should ONLY be done under adult supervision!
 
Passenger side. I opened it up because it operates more slowly than the recently cleaned out driver side.

These plastic pieces have been in there about a year - and they're already cracking. They're Autozone Dorman brand units; I'm not sure if OEMs exist and if so, if they'd be any better.

20240725_112505.jpg
 
The rebuild kit for the alternator comes with pins in the brushes "block"; They work almost everywhere I've needed them. Look for a small hole, that lines up when the brush is pressed in. It looks kinda like the pin that holds the ratchet in place, on an iron valvechain tensioner.
 
I replaced the broken plastic bushings in a 1995 poopstang power window motor with small metal nuts.
I forget the size, and if they will in fact also work on this one.
 
3/8", iirc. It just shifts the breakage to something else. The window not sliding up and down easily is the cause; the pucks are also 3/8". A foot long rod of nylon is cheap on mcmaster or MSC. Teflon is too soft, lol.
 
Has anyone ever actually broken something else after using the nut solution though? I agree that you should look into the why is the window having trouble going up and down freely in the first place but I also say ditch the chintzy sacrificial hardware the engineers were forced to use for safety/bean counting purposes.
 
I don't think it is something on the car that will break, it will be fingers, throats etc.
I believe that is the purpose of the brittle plastic.
 
I mean I haven't actually inspected the regulator in detail, but my windows are moving very quickly and at a consistent speed over the entire travel.

I have always attributed the wear on the plastic pucks to the window hitting the end of its travel. That's why I always release the button just before they're all the way down. On closing, evidently you want to close them fully, but I sometimes try to close them in small increments at the top of travel.
 
I’ve never once heard of anyone breaking that gear. The nut solution is nothing new either, I feel like if they moved the chain of failure down the mechanism there’s be stories about it, but I just haven’t heard it.

I mean I haven't actually inspected the regulator in detail, but my windows are moving very quickly and at a consistent speed over the entire travel.

I have always attributed the wear on the plastic pucks to the window hitting the end of its travel. That's why I always release the button just before they're all the way down. On closing, evidently you want to close them fully, but I sometimes try to close them in small increments at the top of travel.

FWIW I have never touched these in MY car, 30 years old and they’re original bushings/original grease. I use my power windows every time I drive, even if I’m using AC on a brutally hot day I’ll start the drive with the windows down. I don’t see them lasting any longer if I walk the window button on eggshells when I close it. Our mechanisms aren’t that delicate, in fact other than those pucks I think they’re basically bulletproof.
 
I use my power windows every time I drive, even if I’m using AC on a brutally hot day I’ll start the drive with the windows down. I don’t see them lasting any longer if I walk the window button on eggshells when I close it. Our mechanisms aren’t that delicate, in fact other than those pucks I think they’re basically bulletproof.
This is actually why I think yours haven't failed. The problems that arise with these kinds of plastic mechanisms and hearings is not over-use, but rather lack of use. Plastic will contract and fuse if it never gets moved. My car sat for two years before I bought it and started driving it. The window mechanisms promptly died after working just fine the day I bought it.

Using them regularly is what's keeping it from tearing up.
 
Interesting conversation here.... I try to be easy with most of my stuff so it will last longer, but I think Derphound has a good point and XR7 kinda proves it. Use the crap as much as you want, just don't beat on it and use it like a weapon of choice"

My bushings, cylinders, plastic thingy's... whatever they are called where no longer round after a few years of use. But, they were not cracked or smashed or broken into little pieces (the ones in the Mark VII where in pieces) and I use my mirrors all the time as well. And pisses me off to no end when they don't work.

Now, my drinker side mirror is acting up...SOB, I just replaced that a few years ago when it fell victim to my impatient driving and mated with some ladies rear blinker assembly. Long story... don't get me started....
 
My bushings, cylinders, plastic thingy's... whatever they are called where no longer round after a few years of use.

The pic I posted above, which shows one beginning to crack and the other two somewhat deformed, is after one year of use with Dorman plastic thingys. I open my windows on essentially every drive.
I will say that during initial installation, these things are in there extremely tight! One could think they were ever so slightly too large; or maybe it's supposed to be this tight (?).

Now last year, when I installed them, the original factory pieces were indeed in a million tiny flakes. Nonetheless, the window still operated in both ways; but at the end of travel, the motor just kept running.
Maybe your window regulator is a bit off or the window guides need to be lubricated. The gear is essentially working overtime if it is fighting either of the aforementioned. You can tell by pulling the window up and down without the motor in place. Just a thought.

PS: I am NOT a fan of Dorman products.
 
This is a truck pw motor,
He used too small of a size ball bearings, but shows it with one nut, though three is what you need...
Forward to 5:50.
They are essentially captive in their spots once you assemble it.
 
I don't know... Maybe its the protestant in me... but I would spend the $15 and buy the replacement kit.

I have three of these kits sitting in my garage. They are the 747-412 kit.
 
Guess I'll be checking mine before going in. I do have aa spare set of motors, so there's that.
 
The ac delco ones I bought had a different lube in them, a bag of blue stuff. They've been in the red car for 15 years,but it hasn't been driven in 14, lol.
 
Mine where in the car since I bought it and a couple years ago, the bushings went out.

needs bushings 2.JPG

For some reason, it reminds me of a half eaten doughnut at work....
 

Similar threads

Back
Top