- Joined
- Oct 2, 2023
- Messages
- 1,667
- Location
- New Mexico
- Cars in Garage
- 1
- Vehicle Details
- 1994 Mercury Cougar XR7, 3.8L, all stock
My passenger side door lock switch was acting up and not locking the door. It would unlock the door, but had issues trying to lock it. After a long time of searching for a replacement and coming up empty (without paying an exuberant amount of money), I decided to tackle the switch one-on-one. I pulled the door lock switch out of the door and this my story....
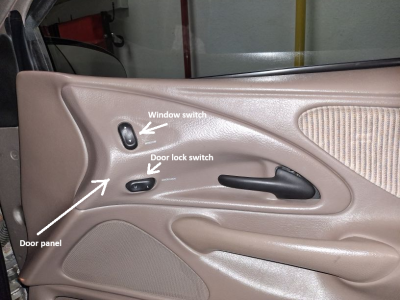
1) Using a plastic body tool or similar, pop the window / door lock switch panel by pressing under the front of the panel. Pull it out enough to undo the wiring panels to the switches. Remove the panel. There are no screws to remove, just pop the panel out from the front and slide it towards the dash to remove it.

2) Remove the door lock switch with a plastic body tool or similar. There are two tabs, one on each side of the switch box that is molded into the panel.
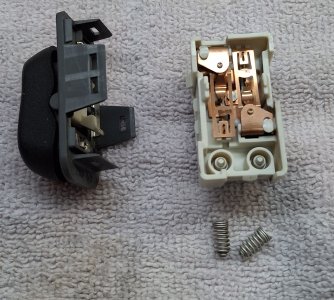
3) With the switch removed, using small screwdrivers or similar, slowly and delicately pry up the overlapping tabs that hold the switch together. I had to play with this to get it right without breaking the tabs. Don't break the tabs or you will be trying to glue the switch back together. Heating the switch might help the tabs be more flexible.
Note: There are two springs that make contact from the switch electrical plate connectors to the lamp inside the upper part of the switch. DO NOT lose these springs.

4) Once the switch is opened, using a very small slice of 400-grit sand paper (I used 400 because I did not want to sand the crap out of the contacts) and a metal "stick" to keep the sand paper ridged, open the contact and sand the two round contacts on the top. Then sand the two lower contacts on the bottom. Sand just enough to see that they are clean and not built up with crud.
Tip: I used a pair of needle nose pliers to hold the "stick" and sand paper while sanding the contacts.

Note: You'll need a magnifying glass to get a good look at the insides of the switch.


5) Blow out the excess dust and debris from sanding, snap the switch back together (including the springs) and test the switch by connecting it to the wire panel to see if it will lock and unlock the doors. I had to do this twice (tear down, sand and re-assemble) because I did not realize there are 2 sets of contacts - upper and lower. The lower ones were the ones with the most buildup.
6) Assembly of everything else is reverse of removal.
1) Using a plastic body tool or similar, pop the window / door lock switch panel by pressing under the front of the panel. Pull it out enough to undo the wiring panels to the switches. Remove the panel. There are no screws to remove, just pop the panel out from the front and slide it towards the dash to remove it.
2) Remove the door lock switch with a plastic body tool or similar. There are two tabs, one on each side of the switch box that is molded into the panel.
3) With the switch removed, using small screwdrivers or similar, slowly and delicately pry up the overlapping tabs that hold the switch together. I had to play with this to get it right without breaking the tabs. Don't break the tabs or you will be trying to glue the switch back together. Heating the switch might help the tabs be more flexible.
Note: There are two springs that make contact from the switch electrical plate connectors to the lamp inside the upper part of the switch. DO NOT lose these springs.
4) Once the switch is opened, using a very small slice of 400-grit sand paper (I used 400 because I did not want to sand the crap out of the contacts) and a metal "stick" to keep the sand paper ridged, open the contact and sand the two round contacts on the top. Then sand the two lower contacts on the bottom. Sand just enough to see that they are clean and not built up with crud.
Tip: I used a pair of needle nose pliers to hold the "stick" and sand paper while sanding the contacts.
Note: You'll need a magnifying glass to get a good look at the insides of the switch.
5) Blow out the excess dust and debris from sanding, snap the switch back together (including the springs) and test the switch by connecting it to the wire panel to see if it will lock and unlock the doors. I had to do this twice (tear down, sand and re-assemble) because I did not realize there are 2 sets of contacts - upper and lower. The lower ones were the ones with the most buildup.
6) Assembly of everything else is reverse of removal.