Down shift issue

White Lincoln

6th Gear Poster
Birdcats Supporter
Joined
Oct 2, 2023
Messages
697
Location
New Mexico
Vehicle Details
1994 Mercury Cougar XR7, 3.8L, all stock
Country flag
Hey everyone, it's me again. Now that i got my engine running real well, I can work on other issues with the car. This could still be engine related, but I am thinking not. I put a new tranny in 6 years ago and it has about 6k miles. It was a rebuilt from RockAuto, but seems to have always had some issues.

1) when I come to a stop, the car does not drop down to the lowest gear all the time and when I take off, I need to gas it to get it to drop down. A/C was running.
2) Hard shifts, especially down shifting from 3rd to 2nd (I believe).
3) Hard shift when going into passing gear.

Oil level is correct, tested it the right way a while back.
I have a tranny cooler.
I had a friend install the tranny as I did not have a tranny lift.
The torque convertor is supposed to be new or rebuilt, they don't tell you which one you get.

Any suggestions would be helpful.
 
If you slow down fast, it may not hit first in time not to kill the engine. iirc it downshifts at 8mph.
If the fluid is 6yo, change it. You want hard shifts. that's the jmod, most likely.
 
Sorry to take so long to get back to this, and thank you for the responses. I got to thinking about my tranny issue and I do not think this tranny was rebuilt. I think they ran some tests and found it acceptable to sell, but never replaced the 1-2, 2-3 shift spring / accumulator or other parts. The more I thought about it, I am defiantly going to check the TRS / TPS and whatever else abbreviations there are for the tranny position sensor since my friend did the work. Do that first since i have it up on jacks now, then start doing some research, but this time based on current issues with the tranny.

As for slowing down and not shifting, I am talking about slowing down to a stop. Pause at idle and then take off. It is not starting in first all the time. IT's not the same symptoms as a broken accumulator spring (normal for this year of 4r70w) but the accumulator springs could be week.

If I ever find anything conclusive, I will update. Could be a while, I have a battery cable to put back in, injectors to clean and replace and, and, and the fun never ends with this car! My Town Car gets so lonely.
 
TPS = throttle position sensor

Attached to the throttle body. Tells the PCM how heavy your foot is - the further down it goes, the more aggressively the trans shifts. :)

As to your revised description - a noticeable delay shifting from 2-1 as you slow to a stop is a slow direct clutch exhaust. If you haven't J-modded your trans, this is hole #3 in the article and will help with that.

FWIW these were my hole sizes/notes for when I J-modded my 94 3.8 WBW. I went very conservatively - I bought that car to use as a winter DD, and did NOT want abrupt shifts causing the rear end to kick out on snow/ice covered roads.

Hole 1: .160" #20
Hole 2: N/C (or .081, #46) Intermediate Clutch Feed (1-2 shift speed)
Hole 3: .180" #15 2-1 Exhaust
Hole 4: .081 #46 Direct clutch feed (2-3 shift speed)
Hole 5: .081 #46 Direct clutch feed (2-3 shift speed)
Hole 6: .125" 1/8 Direct clutch exhaust
Hole 7: .125" 1/8 Reverse Servo (Manual 2-1 shift speed)
Hole 8: .238" "B" Forward clutch exhaust (3-4 sag)
Hole 9: .081" #46 Power-on forward clutch feed (3-4 shift) *** ADD HOLE ***
Hole 10: .076" # (or 0.81 #46) Reverse engagement
Hole 11: .081" #46 Power-off forward clutch feed (3-4 shift)
 
Yep, I still have all my notes from when I did my J-Mod the first time. All the bolt holes, drill bit sizes, types of actuator's to use, etc, etc. This is what started the J-Mod the first time...

MVC-124F.JPG

BTW: TRS = Transmission Range Sensor = Throttle position sensor = if it aint set right, you have issues.

I found this in my notes:

4r70w Lessons learned

  • Use a large 28qt basin to drain the transmission into.
  • Don’t use a power tool to remove the bolts from the valve body (oil flies everywhere)
  • Follow the instructions from a Service manual
  • Inspect your parts for wear and damage.
  • Replace parts with OEM if possible.
  • Raise the vehicle at least 17” above the ground, 19”-20”is preferable.
  • Put an oil drain plug in the tranny pan.
  • Don’t leave a towel on the exhaust.
  • Use a 3 ton floor jack if possible. A 2 ton has issues with lifting a Cougar to full height.

I don't know I wrote these or I copied it from some forum.... but I thought it had some humor.
 
As to your revised description - a noticeable delay shifting from 2-1 as you slow to a stop is a slow direct clutch exhaust. If you haven't J-modded your trans, this is hole #3 in the article and will help with that.
Thanks for the tips Terminator, much appreciated.
 
I found this digging around my tranny notes:

TSB
97-11-11​
TRANSMISSION - 4R70W - ERRATIC OR PROLONGED 1-2 SHIFT
TRANSMISSION - AODE - ERRATIC OR PROLONGED 1-2 SHIFT
Publication Date: MAY 27, 1997


FORD:1992-1997 CROWN VICTORIA
1994-1997 MUSTANG, THUNDERBIRD
LINCOLN-MERCURY:1992-1997 GRAND MARQUIS, TOWN CAR
1993-1997 MARK VIII
1994-1997 COUGAR
LIGHT TRUCK:1994-1997 ECONOLINE, F-150
1996-1997 EXPLORER
1997 EXPEDITION, MOUNTAINEER
ISSUE:

Some vehicles may exhibit an erratic or prolonged 1-2 shift. This may be caused by early Accumulator Seal wear which may occur during repeated 1-2, 2-1 shift cycling. The Accumulator side loads in the Case Accumulator Bore and causes the Case Bore to become scuffed. Bore scuffing leads to premature seal wear and eventual intermediate clutch pressure loss, which leads to the loss in 1-2 shift.

ACTION:

Replace the cast aluminum piston with the one-piece stamped steel piston with bonded lip seals and replace the top Accumulator Spring. These revised parts allow for increased durability. Refer to the following Service Procedure for details.

SERVICE PROCEDURE

NOTE:TRANSMISSION CASE REPLACEMENT IS NOT REQUIRED DUE TO 1-2 SHIFT ACCUMULATOR BORE SCUFFING. THE REVISED PISTON ASSEMBLY CAN BE USED WITH SCUFFED SEAL BORE.
With the vehicle on a hoist, remove the transmission pan and gasket. Using the Snap Ring Removal Tool, remove the 1-2 Accumulator Piston Retainer. At this time, the spring load will pop the cover and bottom Accumulator Spring out of the bore.

Remove the piston and top Accumulator Spring.

Replace the piston and top Accumulator Spring with the new bonded Piston (F7AZ-7F251-AA) and spring (refer to Figure 1 for applications). If not damaged, reinstall the bottom Accumulator Spring and cover


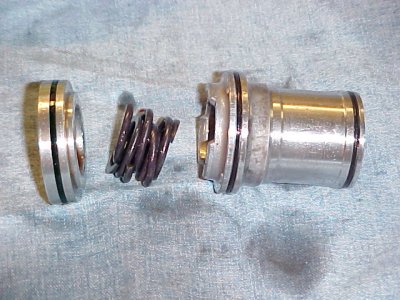
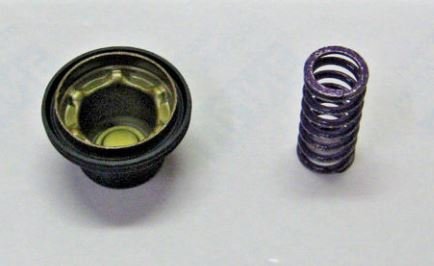
This is the replacement piston for the aluminum one I showed above:

ford eoaz7f285a.JPG

In case anyone was wondering.
 

Similar threads

Back
Top