- Joined
- Sep 12, 2023
- Messages
- 2,470
- Location
- North Ridgeville, OH
- Cars in Garage
- 2
- Vehicle Details
- 1997 Thunderbird 4.6, 1998 Mark VIII LSC
Back in 2013 I got my hands on a factory subwoofer box from a 92-94 SC which had a blown speaker (like almost all do). To my knowledge the original is a 6.5" JL driver, but it's fairly easy to retrofit a slightly larger 8" into the box with minimal modifications.
To repair my sub, I purchased a JL 8W1V2-4 driver, some polystyrene glue from Home Depot, a pack of pan-head machine screws and nuts, and used an extra 1/2" styrofoam insulation sheet I had laying around. I opted to use 14 AWG stranded wire, but depending on the power handling ability of your amp and speaker you may need to go up to 12 AWG.
Step one is getting the box opened (remove the 7 screws and gently pry apart the seam) and removing the old speaker driver. Once that's done, set aside the green foam batting that is inside - we will need it later.
Place the speaker driver over a scrap piece of cardboard, then mark and cut the cardboard to the perimeter of the driver up to the housing (it will be about 8") to make a template. Center that cardboard over the outlet of the enclosure. Chances are the template will bump up against some contours in the molding - don't worry about that for now. Once it's centered, mark it with a marker that is clearly visible on the black plastic. I used a silver leaf Sharpie.
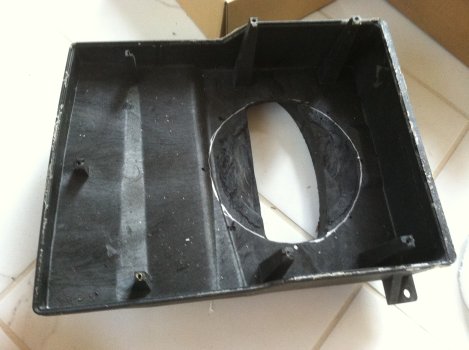
Once you've marked the template on the box, use a rotary cutting tool (Dremel or similar) to cut away the extra plastic in the outlet so that the hole is as wide as the speaker diaphragm. See below for what you should end up with:

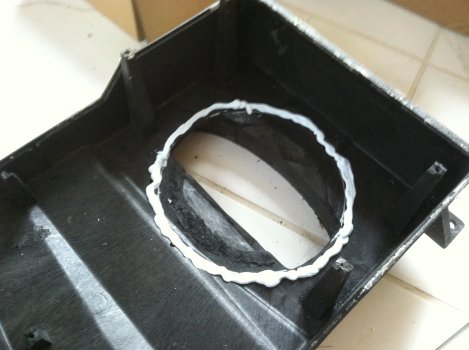
Next we'll tackle the problem of that plastic lip that the speaker bumps into. This is where the styrofoam comes into play. Use the cardboard template from before to mark a circle, then using the speaker itself as the template, center it on the template and then mark the perimeter of the speaker driver cone. Cut out the resulting styrofoam ring, then dry fit it against the mark/hole in the speaker. You will notice a couple angled sections in the box that the foam needs to be clearanced a bit to fit over, so cut away (at an angle) the sections that bump up against the contour of the housing. The goal is to make the styrofoam sit flush up against all surfaces in the box, as it will be what we use to get a tight air seal from the flat speaker against the uneven contours in the box. You should end up with a ring that looks like this:

Next, set the styrofoam ring on the speaker and push the machine screws through the mounting holes and the foam. Take the foam collar off the speaker and use the holes now punched through foam as a template to mark the location of the new screw hole locations to drill into the top of the enclosure, then drill them out. Test fit everything to be sure the foam sits flush against both the enclosure and speaker and will form a tight seal when screwed in.
Once you're satisfied that everything fits, apply some styrofoam-safe glue to the box, and affix the ring to it.

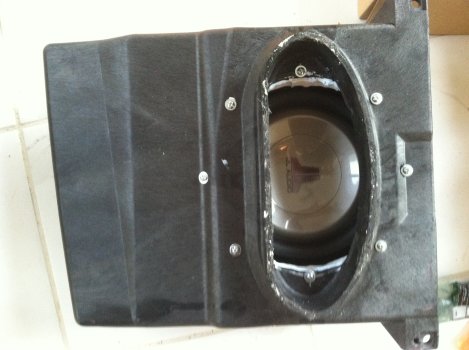
Place the speaker on the ring and screw it into place. Avoid over-torquing the screws so much as to deform the foam collar - just enough to compress it slightly to form a seal.

Route your speaker wire through the side of the box, then reinsert the green batting. This increases the density of the interior of the enclosure and mimics a larger volume of sub box without any filling. This lowers the resonance frequency and improves acoustic performance of the box while keeping it compact.
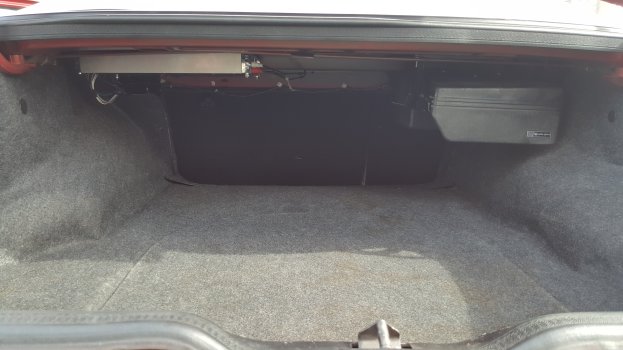
Seal the edges with more glue if desired, then close up the box. Lastly reinstall with the amp of your choosing! I mounted mine under the passenger seat, though a small enough amp may fit in the recess on the underside of the sub box.


To repair my sub, I purchased a JL 8W1V2-4 driver, some polystyrene glue from Home Depot, a pack of pan-head machine screws and nuts, and used an extra 1/2" styrofoam insulation sheet I had laying around. I opted to use 14 AWG stranded wire, but depending on the power handling ability of your amp and speaker you may need to go up to 12 AWG.
Step one is getting the box opened (remove the 7 screws and gently pry apart the seam) and removing the old speaker driver. Once that's done, set aside the green foam batting that is inside - we will need it later.
Place the speaker driver over a scrap piece of cardboard, then mark and cut the cardboard to the perimeter of the driver up to the housing (it will be about 8") to make a template. Center that cardboard over the outlet of the enclosure. Chances are the template will bump up against some contours in the molding - don't worry about that for now. Once it's centered, mark it with a marker that is clearly visible on the black plastic. I used a silver leaf Sharpie.
Once you've marked the template on the box, use a rotary cutting tool (Dremel or similar) to cut away the extra plastic in the outlet so that the hole is as wide as the speaker diaphragm. See below for what you should end up with:

Next we'll tackle the problem of that plastic lip that the speaker bumps into. This is where the styrofoam comes into play. Use the cardboard template from before to mark a circle, then using the speaker itself as the template, center it on the template and then mark the perimeter of the speaker driver cone. Cut out the resulting styrofoam ring, then dry fit it against the mark/hole in the speaker. You will notice a couple angled sections in the box that the foam needs to be clearanced a bit to fit over, so cut away (at an angle) the sections that bump up against the contour of the housing. The goal is to make the styrofoam sit flush up against all surfaces in the box, as it will be what we use to get a tight air seal from the flat speaker against the uneven contours in the box. You should end up with a ring that looks like this:

Next, set the styrofoam ring on the speaker and push the machine screws through the mounting holes and the foam. Take the foam collar off the speaker and use the holes now punched through foam as a template to mark the location of the new screw hole locations to drill into the top of the enclosure, then drill them out. Test fit everything to be sure the foam sits flush against both the enclosure and speaker and will form a tight seal when screwed in.
Once you're satisfied that everything fits, apply some styrofoam-safe glue to the box, and affix the ring to it.

Place the speaker on the ring and screw it into place. Avoid over-torquing the screws so much as to deform the foam collar - just enough to compress it slightly to form a seal.

Route your speaker wire through the side of the box, then reinsert the green batting. This increases the density of the interior of the enclosure and mimics a larger volume of sub box without any filling. This lowers the resonance frequency and improves acoustic performance of the box while keeping it compact.
Seal the edges with more glue if desired, then close up the box. Lastly reinstall with the amp of your choosing! I mounted mine under the passenger seat, though a small enough amp may fit in the recess on the underside of the sub box.


