- Joined
- Sep 12, 2023
- Messages
- 2,067
- Location
- North Ridgeville, OH
- Cars in Garage
- 2
- Vehicle Details
- 1997 Thunderbird 4.6, 1998 Mark VIII LSC
Things you should think about before performing this upgrade:
- This brake conversion will give your car improved braking performance, but will NOT give you ABS. ABS is most commonly installed in cars that had factory 4 wheel disc brakes, and is not something that is simple to install.
- This conversion includes details about rear bearing replacement, pad replacement, and rotor replacement. Although I feel that it is important to replace these parts with NEW items, it is not always necessary for the conversion.
- After the conversion you may want to have the vehicle aligned. After the installation my Tbird was not far off, but it is still a good idea.
- For you V6 N/A guys, this is also a good time to upgrade your half-shafts and 7.5" differential to an 8.8".
- This conversion took me Approx. 8 hours of down time, and 3 hours of prep time before the install (bearing and hub install). In that 8 hours of down time, I also swapped in a 8.8" differential and the SC half-shafts. Time will definitely vary with experience.
Parts:
- Left and right rear spindles. *
- Left and right rear wheel hubs (You can re-use these from your old car).
- Left and right rear wheel bearing (About $37 EA new, but you can re-use yours).
- Left and right rear parking brake cables for disc brakes. *
- Left and right brake lines (early vehicles used 11mm 1.0 bubble flare; later cars used an invert flare). *
- Left and right rear rotors (About $40 EA new).
- Left and right rear brake pads (About $20 for the set new).
- DOT 3-brake fluid ($5 for a bottle).
- Proportioning valve (In some cases).
Tools:
- 36mm Socket wrench for half-shaft removal.
- Pair of Channel Locks for E-brake cable and to rotate rear caliper piston
- Floor Jack (pref. hydraulic)
- 13/16in and 18mm Sockets for spindle removal
- 10mm socket for brake line for brake line removal.
- 1/2 inch open end wrench for brake line removal.
Procedure:
REMOVAL:- Remove the rear wheel center cap to expose the half-shaft retaining nut. Loosen this nut with the proper sized socket (36mm). It is a right hand thread on each side and will be TIGHT. Ford recommends not re-using this locking nut. Loosen lug nuts. Do not completely remove any bolts until the car is up on jack stands!!!
- Jack-up the car, and remove lug nuts and the wheel completely.
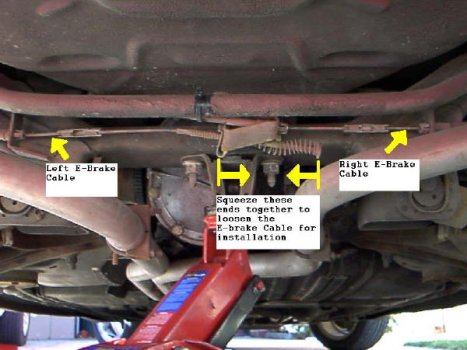
- Remove parking brake cables from car. You can leave them attached to the drums since you will not be reusing these cables. The cables should be detached under the middle of the rear end, by unbending locking clips from the cable. You can leave the center section and spring alone because you will reuse those.
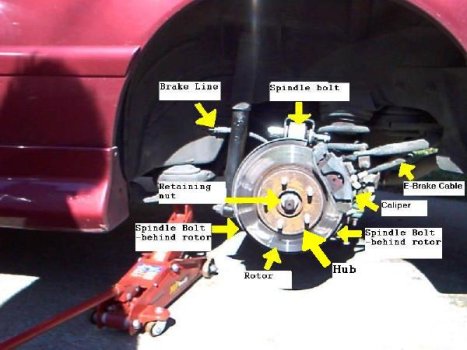
- Remove the brake line from the inner fender. Be careful not to bend or damage the fitting on the inner fender, your disc brake lines will bolt up in the same location.
- Remove the nut and bolt that hold upper control arm to the spindle and support it with something (I stuck a box under the spindle to keep it from hitting the floor)
- Push the end of the half-shaft out of the hub, and swing the spindle forward. Pull half-shaft free of hub and spindle.
- Remove two bolts that attach spindle to lower control arm. Be careful that the springs have enough tension to remain seated. Pull the spindle off the car.
Notes before starting: There is a black spring on each caliper that is used for the parking brake mechanism. It is not necessary to remove this spring for any part of the brake installation. Removing it will cause you much frustration when it comes time to put it back on!
 Do NOT use a caliper compressor or a C-clamp on the rear calipers. This will damage them! To compress the rear pistons a special compressing/rotating tool must be used; this can be rented from most big-box auto parts stores.
* Items below explain replacing the rear bearings. These steps can be done at your local automotive or machine shop for $15-25 (labor) each. The bearings will cost you $35-50 each, but are much easier to replace now than later. If you do not have a press and good mechanical knowledge of using it, it is not suggested that you do the bearing replacement yourself. Without the proper tools the light aluminum spindles can be easily damaged.
- Remove drum from used spindle.
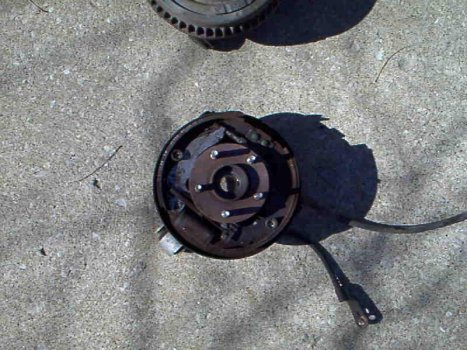
- Remove circlip from the back of the spindle (holds bearing in place). From rear of spindle, press hub out of the bearing. From front of spindle, press the bearing out of the spindle.
- The hub you just removed can be installed in your new spindles in the steps below.
- At this point, you are done with your old spindles, old brake lines, and old E-brake cables. Everything from here on will be referring you the new parts.
- From the back of the new spindle, press the new bearing all the way in until it is firmly seated. From the front of the knuckle, press the hub back into the bearing until it is firmly seated. Be careful not to push the bearing out of the seated position when you press in the hub. Also, be cautious not to damage the grease seals on the bearing when supporting it while the hub is being pressed in. There should be no "play" when you wiggle the hub after installation. Install the large circlip back into the groove.
- Once bearing and hub are installed, proceed to test fit rotors, brake pads and caliper. You will probably need to adjust the piston on the caliper to get the pads to fit. In order to adjust the piston on the caliper, you must rotate the whole piston clockwise. You can either grip the piston from the center with a needle nose pliers, or use a set of channel locks and rotate it slowly. You must be careful not to catch or tear the boot around the piston while rotation it.
- If everything has been fit together, you are ready for the installation. Don't bolt down the caliper yet, because you will need that off to install the E-brake cable.
- Clean the splines on half-shaft and insert it into splined hub. Install bottom bolts from the spindle to the control arm. Tighten lower bolts. Install and tighten upper bolt. (Upper and lower bolts 118-148 ft/lbs).
- Hand tighten the retaining nut.
- Install new parking brake cables under car. They will install in place of the old E-brake cables. You can re-use the center section, simply remove the aluminum clips and slide the old cables out. The new cables will lock in the same clips. If you need to adjust the center-section of the E-brake cable, I found it best to use a pair of channel locks to adjust it.
- Install rotor and temporarily use 3 lug nuts to hold rotor in place.
- Attach parking brake cable to caliper and install caliper to spindle (23-26 ft/lbs). You will need to work caliper into place, while keeping e-brake cable attached.
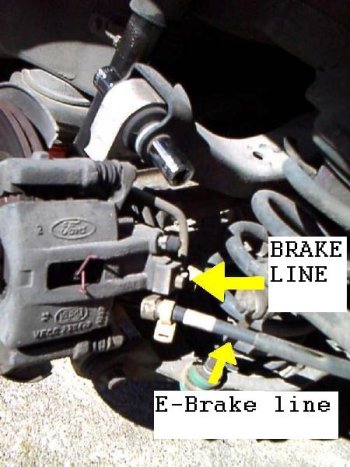
- Once caliper is installed, attach brake lines to block inside of fender. Make sure that bolts are threading straight and are sufficiently tight. Lower car back on to the ground. Torque half-shaft retaining nut to specifications (250 ft/lbs).
- Install wheel and hand tighten lug nuts.
- Torque lug nuts to specification (85-105 ft/lbs) and re-install center cap.
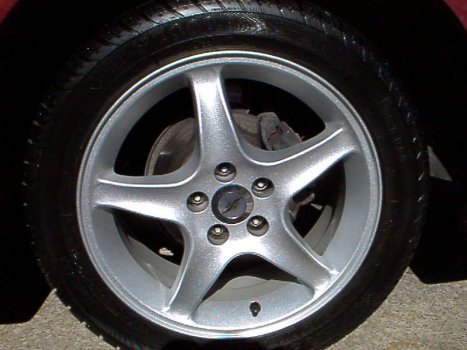
Here is what the final product looks like behind superior 17" wheels
