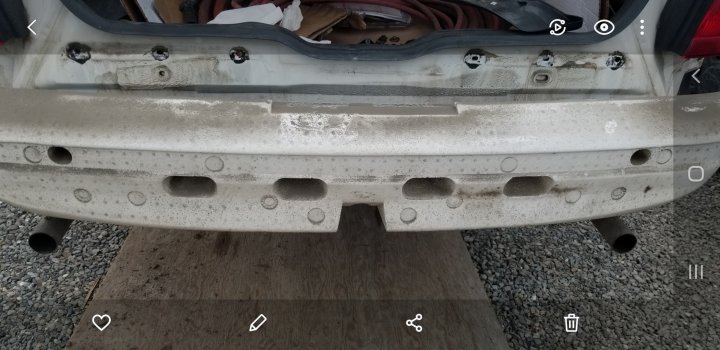
Rear exhaust hanger bolts pushed and/or pulled out. What to do?

GRWeldon

5th Gear Poster
Joined
Oct 5, 2023
Messages
444
Location
Alabama
Country flag
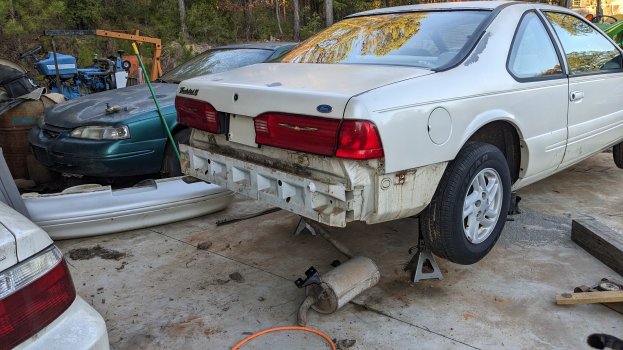
Good day folks. So I had to replace a fuel pump on my 96 Thunderbird. When I removed the exhaust, the top two studs pushed in to the holes never to be seen again. When trying to reinstall, one of the bottom studs pulled out of the hole when I tightened it. So now I have one stud left on the bottom drivers side. Has anybody experienced this before and if so, how did you correct the situation?

I'm thinking of just getting some large hex-head self-tappers and going in the original hole. Recommendations for or against? I suppose if I really wanted to go to the trouble of removing the rear bumper cover, hopefully gaining access to the other side of the studs (?) I could spot-weld them back in with a tiny rod in my arc welder. Not sure if I really want to go to all that trouble. Again...recommendations?

Also, while I'm talking about it, one of the three rubber dog-bone isolators has broken in two and the other two are deteriorated and need to be replaces. Is there an aftermarket source for these or are the originals available from Ford? I'm guessing not but if they are, anybody have part numbers?

Thanks again,
Glen
 
I'd pull the bumper cover off and fish them out. Those studs pull double duty not just holding on the exhaust hanger brackets but half of the the crash bumper itself
 
I destroyed mine removing the hanger also. I ended up removing the bumper cover and drilling the old holes out to accept old intake manifold bolts and some nuts.
The old studs were connected to the hanger nuts pretty much.
 
I usually hit the rubber with white grease spray, and pop the hanger out of he rubber. Autozone, ra, or advanced will have the rubber pieces. We aren't the only ones using those. Walk in with the pieces, and the counter guy will go, yeah we got those...
 
I usually hit the rubber with white grease spray, and pop the hanger out of he rubber. Autozone, ra, or advanced will have the rubber pieces. We aren't the only ones using those. Walk in with the pieces, and the counter guy will go, yeah we got those...
My rubber hangers were so deteriorated that they didn't survive the process you describe. The only one I usually remove is the one in the center but since I have to replace them all, I'll not put them back in that way I don't believe.
 
I agree with pulling the bumper cover and fixing it properly. The rear bumper cover is very easy to remove.
So I don't have a problem with removing the cover, it's putting it back that I'm concerned with. I generally am not able to get body parts to look as good as they did before pulling them off then putting them back on! I suppose that's what I'll do...
 
The bumper covers aren't really that adjustable in position like hanging a door so it's pretty hard to screw up.
 
To hold the heads of the bolts you are using to reattach the bumper and exhaust hanger, i had to tape 2 wrenches togerher as there are no access holes in the steel bumper. You have to go through the end of the bumper.
 
To hold the heads of the bolts you are using to reattach the bumper and exhaust hanger, i had to tape 2 wrenches togerher as there are no access holes in the steel bumper. You have to go through the end of the bumper.
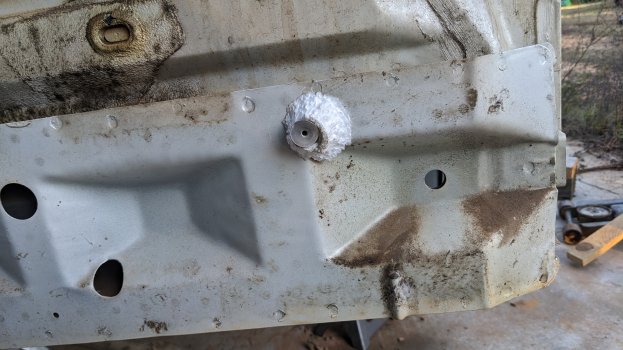
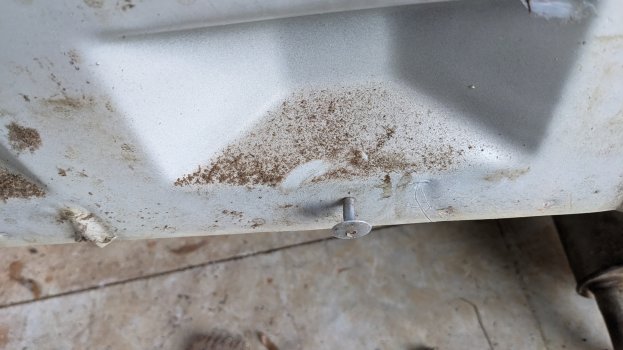
Yeah, So I was about to post some images of what I found after the bumper cover was removed. First off, the foam cushion is riveted on with long, large-head rivets. Thinking that I had access to the muffler mount studs underneath, I had to break off the cushion, only to find that there IS NO ACCESS to the holes where the studs go.

I'm thinking of drilling holes from the muffler side through the unibody to install new hardware. I'm still thinking the best way to deal with this is to attach the muffler mounting brackets to the unibody with large self-tapping screws but I'm having trouble finding some that are 3/8 in diameter. I WON'T be taping wrenches together and using stickem or whatever to hold the nut in the wrench. WAY too much trouble. It's not like the car is going to be an all-original showcar or anything like that...

If I had known that there were not any access to what I needed to do I would have never removed the bumper cover. First time I have been given incorrect advice on this generation Thunderbird enthusiasts forum.

PXL_20231206_220146652.jpgPXL_20231206_215535369.jpgPXL_20231206_215527748.jpg
 
I had to tape mine back on before i put the cover on. I tried self tapping screws throughbthe hanger side and they snapped off in what was left of the bumper side stud nut. If you dont want to tape 2 wrenches together to be long enough, Just drill the bumper where the bolts are. If it isnt folded there or anything. I just went through this within the last couple years.
 
Screenshot_20231207-154834_Gallery.jpgScreenshot_20231207-154809_Gallery.jpg
The holes on the steel bumper are not lined up.with the hanger studs. On the other side. These were not designed to come apart, and i regretted not working harder to pull the rubber hanger off or cut it off.
Created a lot of work for myself that day.
 
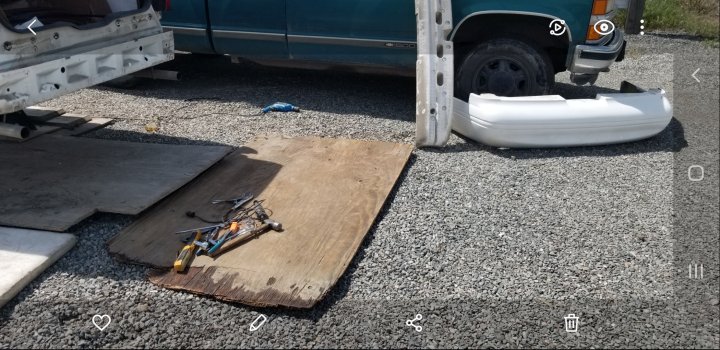
All those neanderthal tools above is what i needed to use to get all 4 studs removed and ready to replace with nuts and bolts.
Which are farther in through the end of your bumper than your wrench likely is long.
You may have better luck than me though. It wouldnt be too difficult to figure out where to drill the bumper for direct access to the rear of the studs, but you are still likely going to have to fight with them.
 
Well the styrofoam bumper support is designed to be removed. but you do have to drill the rivets out.
There are 4 fasteners on each side left and right for the impact bar. Two on each side are the ones that are the studs and nuts that also hold the exhaust hangers. The other two are in those holes in the impact bar that are revealed when you remove the styrofoam piece. All have to be removed and the impact bar will come off.
 
Agreed. “Correct advise” isn’t use sheet metal screws in place of bumper mounting hardware, the right way of doing things isn’t necessarily the easiest. I did it the same basic way @3_97_Sports said when I redid my exhaust.
 
I drilled the rivets for the foam out and got the correct rivets and riveted it back on. It takes longer and isn't always convenient to do it the right way but I'm usually much happier with the job in the end.
 
Being in the manufacturing sector most of my career...approaching 40 years now, I've come to understand that there are multiple ways of doing things "correctly". As a manufacturing engineer you get a broad-based exposure to many different methods of fixing different things. I just now came back to this thread since my last post. In the meantime, before I read all of the banter, I had decided to install rivet inserts where the exhaust mounting studs were supposed to be. This required drilling 33/64" holes at each of the former stud holes and inserting a collapsible aluminum "round nut" for lack of a better term with a 5/16-18 thread in them. A small hex-head tool in conjunction with a standard hex-head bolt is used to pull or squash the read of the nut toward the bolt head. This in turn mushrooms out the insert like a rivet and firmly secures the insert in the sheet metal. I then used 5/16" hex bolts with washer to secure the hangar brackets. It works quite well and I consider this to be a proper repair. I neglected to take a picture of the insert from the hanger side but I have yet to replace the bumper cover. I'll see if I can get a shot from inside the unibody bumper openings and post it.

As to whether or not I was given incorrect advice... however well-meaning... let's just say that would be open to interpretation @3_07_Sports

If what people were recommending was impossible it would be incorrect advice, but we have pulled off getting the hardware back in place in the factory correct manner. Yeah, it's a little tedious, but in the end it's back together the way it was before I screwed up, which I consider the standard for which is correct. I can't read someone's mind when it comes to their interpretation of the definition of "correct". There are "fixes" on my own car that are simply zipties, but I'm not going to tell people that's correct when I know full well it was a convenient shortcut I made.

By the way, had you removed the exhaust the correct way, slipping out the hangers from the rubber, rather than your interpretation of correct via unbolting the brackets, you would have avoided this issue entirely. I'm not slinging mud saying that(like I said, been there), but that it's an example of why there are correct, or should I say "more correct", ways of doing things, it helps avoid the unforeseen consequences of the path less taken.
 
Last edited:

Similar threads

Back
Top