- Joined
- Sep 12, 2023
- Messages
- 2,009
- Location
- North Ridgeville, OH
- Vehicle Details
- 1997 Thunderbird 4.6, 1998 Mark VIII LSC
MARK VIII AIR SUSPENSION BASICS
adapted by BirdCats.com staff from an article by American Air Suspension
Normal Operation Summary
adapted by BirdCats.com staff from an article by American Air Suspension
Normal Operation Summary
After starting the Mark VIII, you'll notice the compressor coming on. This is the air suspension inflating the front and rear air springs to bring the vehicle to "city height". The additional ground clearance aids negotiation of city obstacles such as speed bumps, potholes, debris etc. If you were to turn off and exit the vehicle, this extra air would be vented from the springs and the car lowered back down to "curb height". On 1993 and 1994 model years city height is .8" higher than curb height, reduced to a .5" difference starting with the 1995 model year.
The Mark VIII maintains a consistent ride height, compensating for weight added or removed. It also adjusts the height depending on speed. When the vehicle speed is 55 MPH or faster for at least 30 seconds, the car is lowered back down to curb height. This provides improved aerodynamics (from a .34 to a .33 drag coefficient) and better handling due to the lower center of gravity. If vehicle speed then drops to 45 MPH or less for at least 10 seconds, the vehicle will automatically pump back up to "city" height.
Component details:
MODULE
The suspension control module makes any height changes necessary based on the data from the vehicle's 3 height sensors and the vehicle speed sensor. This module also handles the EVO (Electronic Variable Orifice) for the variable assist power steering. It is located above the RF kick panel and can be seen by lowering the glove box. The air suspension/EVO module is the one that has 2 connectors going to it. One is black and the other is gray.MODULE
SENSORS
The ride height sensors are the eyes, so to speak, for the module. The sensors let the module know the height of the vehicle. These sensors are attached to the suspension by way of a ball stud at each end. The sensors can be disconnected by pushing down on the metal retaining tab and pulling off the ball stud.The Mark VIII has what is known as a 3 channel system. In other words, there are 2 sensors in front and only one in the back. The one in the back is for both sides as an average and is on the driver's side. The rear air solenoids are wired together, so when one gets signaled to open, the other will too. This is why the Mark VIII may sometimes get out of kilter when the car is parked in an unlevel area.
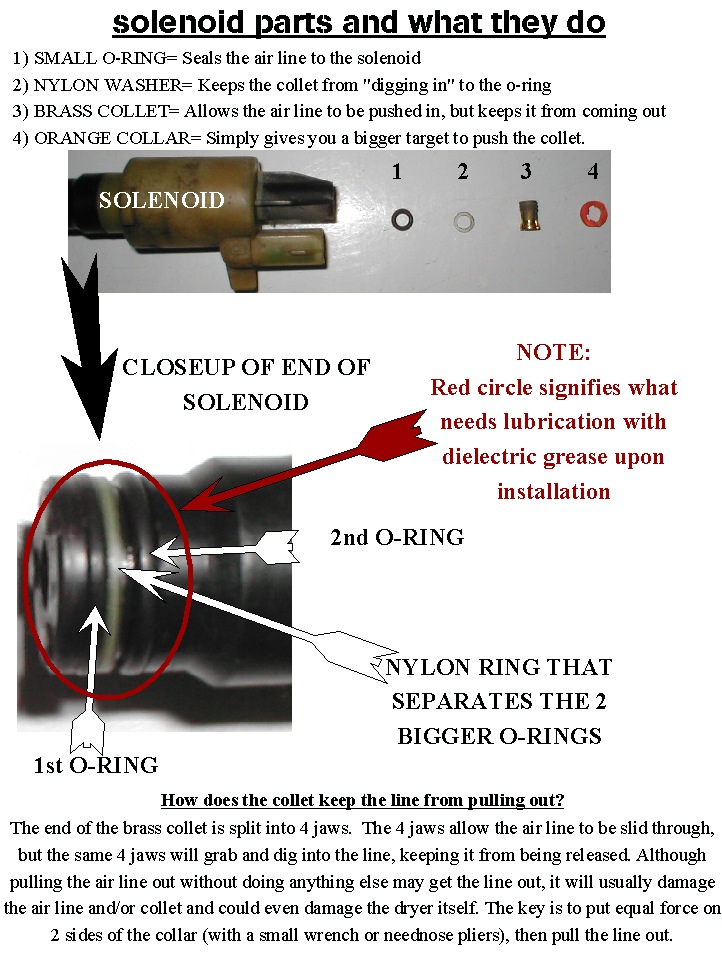
AIR SPRING SOLENOID
The air line is held in the solenoids by way of a collet. The air line can be disconnected from the solenoid by pushing in on the orange plastic ring and pulling out on line.
If the module determines the front or rear of the car should be raised, the air compressor will come on and the solenoids will be opened. Air from the compressor/dryer flows through the air lines and into whichever air spring until the desired height has been reached. When this height has been reached, the solenoid(s) will close and the compressor will shut off.
If the module determines the vehicle should be lowered, the solenoid(s) on whichever air spring will be opened up, along with the vent solenoid in the air compressor. The vented air will pass out of the spring, through the air lines, through the compressor/dryer, then to the atmosphere. Once the vehicle has reached the desired height, the solenoids on the air springs and compressor will close.
The module is programmed to only try to raise the vehicle for up to 90 seconds. The module is also programmed to only try to vent the vehicle for up to 45 seconds. If the vehicle has not reached the desired height in the allotted time, the module will time out. This means it will turn on the check suspension message and shut down the system. The vehicle will not try to make any height adjustments until after the ignition has been turned off then back on again. Once the ignition is turned back on, it will then try again until either the desired ride height is reached, or the system times out again.
While these solenoids don't go bad that often, they do need to be resealed when removed. Click HERE for instructions on this.
COMPRESSOR/DRYER ASSEMBLY
The compressor supplies air to the air springs. The compressor on the Mark VIII is the biggest and most powerful in the Lincoln line. It is mounted in the RF fenderwell. It has 4 air lines coming out of the dryer which go to each solenoid on each air spring. It does not matter which line goes into each hole in the dryer. You may find that the lines are molded and one line may fit better when it's inserted into a certain hole, but it won't make any difference when adding or removing air from the system.The dryer is a common manifold. In other words, the compressor/dryer assembly doesn't know what corner(s) the adjustment is being made on, it only knows to come on when told to do so, or to vent when told to do so. Again, the module controls that by opening the appropriate solenoid(s).
Any air compressor produces moisture, so a dryer is needed to trap and absorb the moisture BEFORE it gets to the springs. The dryer consists of moisture absorbing silica gel beads and 2 metal plates. These plates can rust very badly and actually turn to powder. This powder can then clog up the dryer and even make its way to the vent solenoid and clog it too. In this case, what started out as a dryer problem has turned into a compressor and dryer problem.
The dryer is the only part of the compressor/dryer assembly that is serviced separately.
The compressor is fused by way of a 50 amp fuse in the engine compartment. Although possible, it is VERY RARE to see this fuse blown. This compressor is so powerful, it will actually break the piston rod when it gets worn.
NOTE: When these compressors start going bad they will draw a lot of current. This is extremely hard on the compressor relay and may cause it to fail. While a new relay may get you going again, the compressor is most likely what caused the relay failure to begin with. Replacing one without the other is usually not a wise move.
COMPRESSOR VENT SOLENOID
The vent solenoid on the compressor is used as a "vent to atmosphere" solenoid. When the module gives the command to vent the car down, this vent solenoid, along with whichever solenoid on the spring that the module needs to vent, opens up and vents air out of the system. This vent solenoid is usually one of the first things to go bad on the Mark VIII compressor assembly. This is due to excessive moisture in the system that allows the piston in the solenoid to rust and corrode. The main reason this solenoid has such a hard time with moisture is because the compressor is mounted on its side. If there's any moisture in the general area of the compressor, the moisture will find its way to the vent solenoid just from gravity.NOTE: The piston inside the solenoid is metal, so it can't deal with moisture very long before rust starts setting in.
COMPRESSOR RELAY
Since the compressor draws a lot of current, it is powered by a dedicated relay. The relay can be found on the black metal frame the compressor is mounted to. This relay is a solid state relay and is very tricky to test.NOTE: You can test the old relay by swapping it with the ABS relay. It is the exact same relay. If the compressor goes bad and in turn draws too many amps, this relay will usually go bad.
What problems usually happen on the Mark VIII?
LEAKING AIR SPRINGS
With age, the rubber air bladders of the air springs will dry rot and eventually leak air. The leak will almost always be on the fold of the rubber. This is where the rubber rolls over itself - that area changes with vehicle height. Upon inspection, you may not see any visible cracks until the ride height has been set to where the car has sat most of its life. Once this area has been found, cracks will magically open up on the fold. Click HERE for pictures of this.
Early in the stages of a leak, the air springs will only leak while being driven. Remember that the system is all automatic, so if there is a leak you probably won't realize there's even a problem until one of two things happen:
- The leak gets so bad that it leaks more air out than the compressor can put back in.
- The compressor is damaged and can't keep up with the load.
Even driving the car, the leak will get progressively worse, eventually to the point where you can't drive the car.
REMEMBER THIS:
ANY air compressor produces moisture. When a system has a leak and the compressor has to run several times more often than it would normally, the compressor will produce several times more moisture than it would normally.
MOISTURE PROBLEMS
In time, the moisture absorbing gel beads in the dryer lose their ability to remove the moisture from the incoming air. Moisture is then able to make its way into the rest of the system, turning every low-lying area into a moisture reservoir.
The dryer itself also turns into a reservoir for water. In other words, when the compressor vents, moisture will be blown back through the compressor. This is very hard on a part that was designed to be operated dry. These problems include, but are not limited too:
- Swelling of the piston rings, which makes the electric motor have to work that much harder to do the same job, also increasing the heat made by the compressor, which is hard on any sealing o-rings in the high heat area.
- Rusted and corroded compressor vent solenoid
- Rusted and corroded end plates inside the dryer
- Rusted and corroded intake & exhaust valves in the compressor
- Damaged armature & brushes
WHAT CAN BE DONE?
Because so many problems start with a leak, we recommend doing a leak test once a month on any car with air springs over 5 years old. This way, you will find the leak that is at most one month old before it has had a chance to do any prolonged damage.
You can do a leak test without even getting your hands dirty. See HERE for instructions.
In our opinion, about 80% of Mark VIIIs will encounter an excessive moisture problem at one time or another. This is sometimes caused from being operated in a high humidity area and/or an area that is known for lots of rainfall. As was stated before, it can also start from a leak in the system. If you find out you have an excessive moisture problem, you can replace the dryer every couple months.
The faster you find and repair a leak, the smaller your parts & repair bill will be!
Last edited: