And THIS is why I HATE working on 28 year-old plastic pieces

GRWeldon

5th Gear Poster
Joined
Oct 5, 2023
Messages
380
Location
Alabama
Country flag
Working on replacing the clockspring. I'm not even REALLY sure if I had to remove it but I was having MUCH difficulty getting to and uncoupling the clockspring wires. I think I cracked it on the left side just by pulling out the trim piece below the steering column.

I suppose this trim piece is unobtanium...right?


smaller.jpg
 
@1997ThunderbirdLXV6 might have one for sale.

This is why I always recommend dropping the column to remove that piece, removing those 4 nuts and a vent tube is well worth the extra 10 minutes.
Well, that would have helped. I think I initially cracked the LH portion when I pulled out the lower column trim. At least I'll know for next time. If I find another one, I'll have to do as you recommend to get the replacement in. I see where there are a few available but they are wanting between $225 and $325. I just had a feeling I was going to have an issue with broken, hard to find plastic pieces.
 
Unfortunately I broke a few like that too, believe it or not when these pieces were up to like 15 years old they really could be flexed like rubber, but they all seemed to harden at the same time around 20.

I don’t know how the self service junkyard situation is in your parts but if you find a 94-96 with one they usually charge $10-15 tops(some of these $200 figures are highway robbery, semi-justified on less common 97s but still)
 
Unfortunately I broke a few like that too, believe it or not when these pieces were up to like 15 years old they really could be flexed like rubber, but they all seemed to harden at the same time around 20.

I don’t know how the self service junkyard situation is in your parts but if you find a 94-96 with one they usually charge $10-15 tops(some of these $200 figures are highway robbery, semi-justified on less common 97s but still
I have a semi-local Pull-a-Part about 30 miles from me. I've been on the notification list for 94-97 Birds or Cats for over 5 years and I have NEVER had a notification for one. I get them all the time for the Acuras that I work on but never for a Thunderbird or Cougar. It sucks since I have three Birds and all of them need parts, especially dash trim.
 
Damn! I was apparently lucky when I pulled Lazarus's stuff to do the odo gears. I was going to do the red cougar's gage faces, and preemptively replace the gears, but I'll wait until the middle of summer when the plastic is at it's maximum flexibility. They are a jy only part at this point. And they are as fragile as yours was.
 
I think I initially cracked the LH portion when I pulled out the lower column trim. At least I'll know for next time. If I find another one, I'll have to do as you recommend to get the replacement in. I see where there are a few available but they are wanting between $225 and $325.

I'm a junkyard regular, and when I find them I charge less than that. I think I sold the last one for <$150; that was a pretty worn unit.

Currently there aren't any around locally. If you're open to painting one from a Cougar, that would expand your options; they come in grey, beige, etc. You can easily match the black finish of the Thunderbird with PlastiDip. I haven't tried Duplicolor Vinyl paint on these pieces, but I imagine that would work, too, and be more durable than PlastiDip.

Pulling the lower dash trim or lower column trim should not cause this. This trim is attached to the structure behind the lower dash trim. However, you might have hit this piece by trying to pry out the lower dash trim (?); that would do it.

If I find one, I can let you know before putting it up for sale. Let me know if you're open to painting a non-black unit. Also be aware that shipping these is expensive due to size and tons of shipping material plus you need to insure the shipment. USPS broke two of them for me... :-(

I do lower the column when I pull them in the yards. That said, I never do that on my car; the '97s come out a bit more easily.
General rule for installation: use rubber washers and/or fasten screws just barely. Tightly fastened screws cause the screw holes to break during changing temperatures. The upper screw holes are almost always broken; you can still fasten those screws by placing an appropriately sized rubber plug or cork stopper into those holes, then drive the screw through it.
The bottom screw holes are usually at least partly intact; you work with what you have.
The clip left and the three clips right are usually intact and not terribly fragile.
The screw holes for the defrost switch are fragile. Fasten screws gently! At removal, the defrost connector can be hard to disconnect; in that case, instead of disconnecting it, remove the defrost switch screws, remove the trim piece, and then remove the switch from the connector.
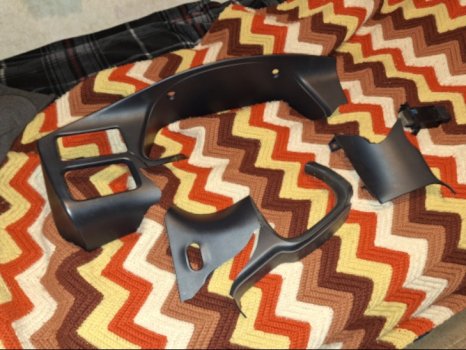
 
I removed my cluster surround panel in 2010 to install Scott's custom gauge faces. A few mounting tabs on the back side broke off in the process, but I recovered those and put them away in a plastic bag for safe storage to be epoxied back together one day. I put the panel in a bedroom closet and later decided I won't put it back on again until all the interior work in the car is completely done. I've gotten quite used to the look at this point; it just keeps me from taking the car to a car show or taking any passengers to whom I don't feel like explaining the elastic endurance of 27-year-old ABS plastic.

The same goes for that near mint condition center stack trim panel with the Premium Sound badge that I posted about in another thread. It's also stored in a closet waiting for the day I'm done messing around with the interior. I'm still running my original one which has picked up a few relatively minor scratches over the years largely due to my carelessness when I was younger from removing and reinstalling the head unit and climate control so much. I also have an extra driver side door switch and handle surround panel in near mint condition, although those are far easier to find.

If there are any interior pieces I really don't feel complete without having multiples of, it's cluster and center stack surround pieces. Realistically, I probably won't put my cluster surround panel back on until all the interior projects are done and I also obtain a second '97 panel in excellent condition.

Every now and then, someone in the community floats the idea of 3D printing these pieces, but it never goes anywhere. It's obviously not going to be a significant revenue generator to do a batch of them, but it's all just idle daydreaming until someone actually creates the first one.
 
Last edited:
I'm doing the same as you, Irv. I'm storing my good pieces for when the interior is done. Then I'll install them.
 
I have a mint 94-96 bezel in a padded box. I'd be willing to ship it to someone who can 3D scan and CAD it into a .STL file (provided I get it back in the same condition). After that I can prep and slice the file for 3D printing.

I also have a 3D printer but it isn't big enough to print a bezel.
 
It can be 3d printed in nylon, and it would be more durable than the original. A guy at work made a cpu delidding tool out of nylon, and it worked perfectly in a vice.
 
One of our larger clients has spent hundreds of thousands on advanced STEM equipment, including 3D printers, laser engravers, plotters, 3D scanners, etc. etc. I was told that the first thing they did with the 3D scanner was scan the teacher and print miniature versions of him.

I'll look to see if I can get a better scan of the one I have (and maybe prototype a miniature reproduction on one of their printers as a proof-of-concept) before we run too far with the idea. I'm remembering what happened the last time I got this idea.... :leftright:
 
  • Like
Reactions: Irv
I started to build one before I had the stroke; all the parts are available cheap.Total cost would be a couple of hundred bux. Acme screw is available up to 96" long. the surplus site I love has pieces for sale cheap.
 
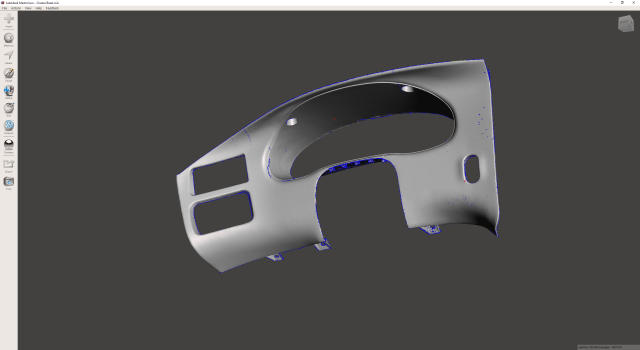
I scanned it at CWRU using their open-to-the-public makerspace scanner, and saved it at too high a resolution. The result was a massive 3D model with lots of "holes" and other imperfections that made it all but impossible to render for printing.

All the blue lines are holes. Zoom in and they're everywhere... :(

1706822855284.png
 
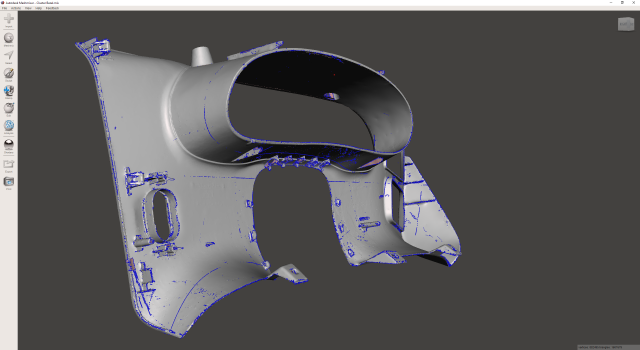
Another perspective. As with the original attempt, any 3D model experts are more than welcome to try and make it printable if they want a copy of the STL.

1706823597265.png
 
I did the same thing with a flatbed scanner doing photo's.Dealing with 1200 dpi pix, at 36 bit resolution was hard to do on computers with 20 megabyte hard drives, lol.
 
If you can get a good scan, i can ask if one of the guys on TRF (The rocketry forum), Would print it for us.
there are several people that print rocket parts of all sizes. IDK what it would cost, but I can ask. :zshrug:

Cheap parts are here:https://www.mpja.com/Misc-Stepper-Motors-and-Components/products/524/

I'm working on one, but my manual dexterity is limited. But I'm improving. :) Matt, I would think this would be something you'd be interested in, given your artistic and detailed guitar work. Custom covers and stuff might be cool. It's possible for more elaborate extruders and controllers, so that multicolor prints are possible.
 
@theterminator93 Thanks for reminding me! My friend who was helping me on this never got around to it. Life just happens and we never got around to it further than my friend working out the model a little further than what you already had done :2confused:.

1706856406035.png
 
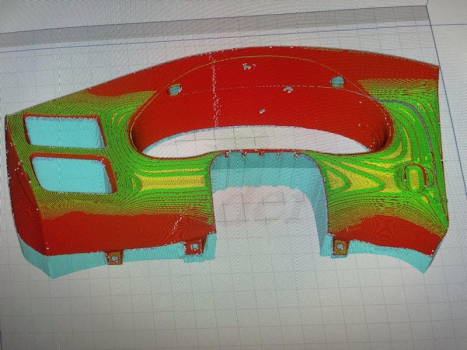
I'lll ask around where I can. The holes seem like artifacts, this isn't intricate beyond what's scanned, and we appear to have the most of it. What happens if a contact drums up a price
 
I'm sure people would buy them. Nylon was the most durable, abs is good too. Some of the other materials were brittle, and we broke the crap out of them. I delidded some processors for overclocking with a nylon 3d printed piece; The vice destroyed the other stuff. The nylon tool even removed a lid that was soldered, lol.
 
In theory, if it could be gotten close, the final product could be sanded and wrapped with black vinyl to hide any imperfections from the scanner.
 
I'd like to get a copy of that file to tinker with.
 
In theory, if it could be gotten close, the final product could be sanded and wrapped with black vinyl to hide any imperfections from the scanner.
And mine would be fuzzy anyway so it would cover a lot of minor imperfections.
 

Similar threads

Back
Top