- Joined
- Sep 12, 2023
- Messages
- 2,424
- Location
- North Ridgeville, OH
- Cars in Garage
- 2
- Vehicle Details
- 1997 Thunderbird 4.6, 1998 Mark VIII LSC
PBR Dual Piston Caliper Install
(using '99-'04 Mustang hardware)
(using '99-'04 Mustang hardware)
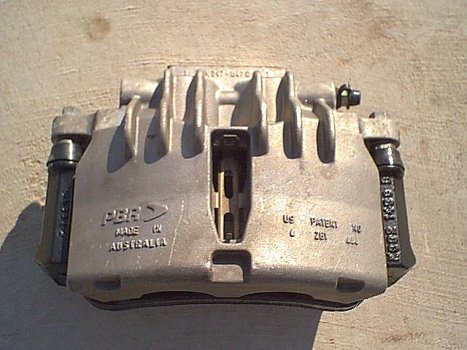
This page outlines the installation of the factory aluminum dual piston PBR calipers found on '99-'04 Mustangs onto an MN12 Thunderbird/Cougar with '93-'97 spindles. The MN12 brakes were derived from the Sable/Taurus platform with their 10.87"diameter rotor. Subsequently the SN95 Mustangs adapted MN12 style front spindles and brakes. SN95s up through '98 used a similar single piston steel caliper using the same rotor with different bolt circle. For the '99 model year the stock brakes were changed to PBR (Australian Company) dual piston aluminum calipers. For a complete Mustang makeover you can actually put the Mustang hubs on MN12 spindles and use Mustang rotors (and wheels) with their 4.5" bolt circle.
Since this upgrade uses the stock 10.8" rotors, it can be done to improve braking effectiveness on all MN12 and FN10 models with 1993+ front spindles and 15" or larger wheels.
There were also PBR calipers manufactured for use with 13" rotors on 99-04 Cobra and Bullitt Mustangs, but they require a minimum of 17" wheels. The process for installing these calipers is not contained within the scope of this writeup - just be aware that they exist and are not the same as the calipers used in this article.
Parts list:
(2) 99-04 Mustang Caliper Brackets
(2) 99-04 Mustang Aluminum Calipers*
(4) Caliper to bracket bolts
(4) Replacement Crush Washers
(1) Set of 99-04 base/GT Mustang Pads
(2) Mustang Banjo Bolts*
(2) Non-sport 10.8" MN12 rotors
Adequate DOT3 brake fluid
3/8"x2' rubber tubing
Shop towels
Drain pain
OPTIONAL: Set of StopFlex stainless brake hoses from Classic Tube
* 99-02 PBR calipers use a fine-threaded M10x1.0 banjo bolt, which is different than the factory MN12 theading. The 03-04 calipers use a coarse-threaded banjo bolt and you may re-use your stock MN12 banjo bolts with these calipers.
Tools:
Metric Socket set
Hacksaw or grinder (a Dremel is fine)
Jack stands
Brake parts cleaner
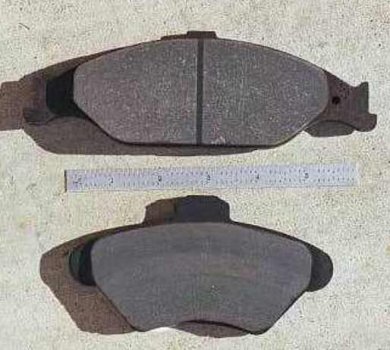
Here is a comparison of the two different pads. The MN12 (T-Bird) pad is on the bottom. The top Mustang pad is larger and provides better heat dissipation and less heat generation due to its larger size.
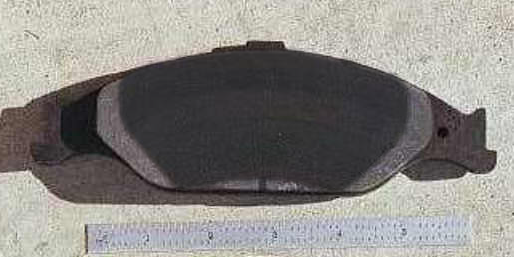
In this image, the lining of the MN12 pad has been laid over the Mustang pad to more clearly illustrate the size difference.
1) After acquiring the needed parts, loosen the lug nuts on your wheels.
2) Raise the car and block it using the proper supports.
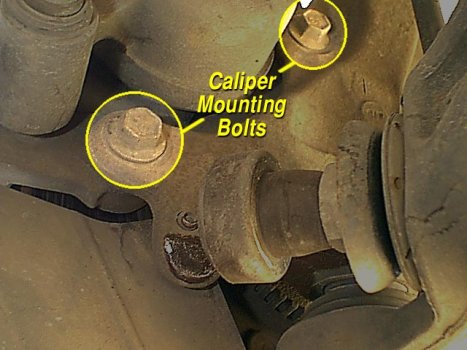
3) Remove one caliper at a time. The caliper is held onto the spindle via a bracket. Two bolts may be accessed from behind the bracket. They are 15mm socket size. Support the caliper/bracket assembly while removing the factory flex hose and hose mount from the fender apron mount. A plug or other temporary item should be used to prevent the fluid from draining.

CAUTION: If equipped with Anti-Lock Braking System, allowing the system to run dry will require a factory-type brake bleed procedure to ensure no air has entered the system.
4) Take the Caliper assembly with its hose still attached to the workbench. Remove the banjo bolt holding the hose mounting block to the caliper and set aside the hose for re installation.
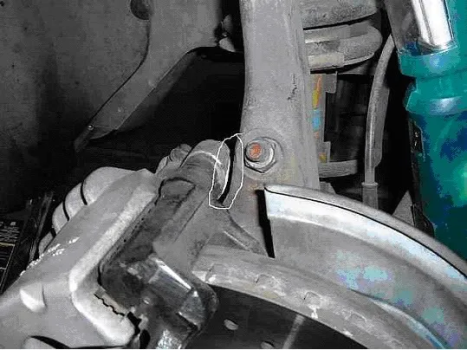
There is a clearance problem on the top of the PBR caliper at the spindle. You must remove a small amount of material from the caliper for the best results. You will need to remove about .03" from the area circled in white. Temporarily hold the caliper in place and mark the area of closest contact.
5) If you are upgrading to the stainless StopFlex brake hoses, you can skip this step. Once removed, you may notice that the hose mounting block is configured differently. You must modify the hose block or the Mustang caliper to use the MN12 hose. The Mustang hose fitting for the brake line is different thread and style of connection and would require the modification of the lines end to mate.
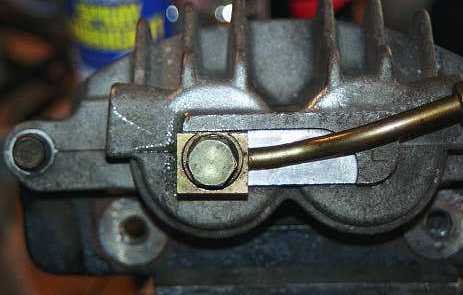
Shown above is the factory hose for the Mustang installed on the Mustang PBR caliper. Notice the top of the mounting block rests very close to the edge of the machined shoulder of the caliper.
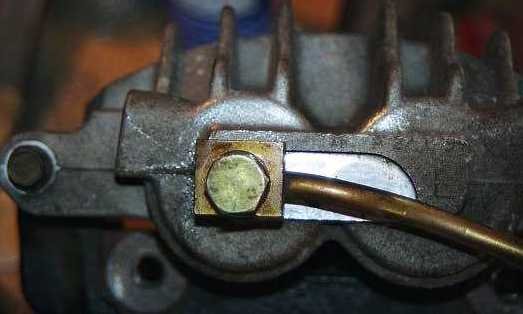
This picture shows that the top of the MN12 mounting block interferes with the machined shoulder of the caliper. The block's hole is offset the opposite direction from the Mustang factory hose. The needed clearance can be provided by either cutting the block just inside of the shoulder dimension, or carving a bit of the shoulder away on the caliper to clear the block.

This is a picture of what carving out the caliper's shoulder boss would look like. Care must be taken not to gouge the mounting surface of the crush washer for sealing. This configuration prevents the block from rotating and loosening the hose mount. If you are not comfortable grinding away at the caliper, you can grind away the thick part of the block on the brake line.
If you are installing StopFlex stainless brake hoses, no grinding is required. These brake lines will bolt up to the PBR calipers with no additional modifications.
6) Clean all parts with brake parts cleaner and install new crush washers and the appropriate banjo bolt, then torque the bolt to 30-40 lb-ft. Notice that each caliper is set up to mount on either side. You must install the caliper so that the bleed screw is on top, pointing up, so take care to install the correct brake line in the correct orientation for each side.
7) Install the caliper onto the caliper bracket and torque the bolts to 23-26 Lb-Ft. Install the pad retaining clips into the caliper and install the pads. The factory pads have a bonded anti-squeal material. Some aftermarket pads may require the use of an anti-squeal compound.
8) Install the rotor onto the hub and temporarily hold it in place with a couple finger-tight lug nuts.
9) Work the pads as they are mounted in the caliper assembly over the rotor and install the caliper mounting bolts. Torque to 90-95 Lb-Ft.
10) Connect the brake hose to the brake line and remount it to the fender skirt.
11) Repeat the previous steps for the other side.
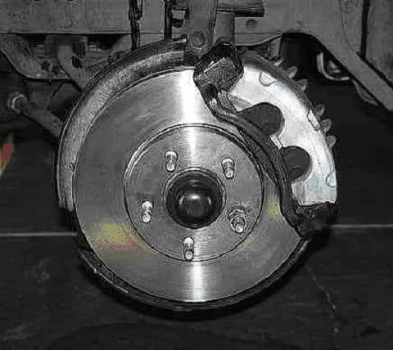
12) Once both calipers are installed, purging any air from the calipers and brake lines is required. Pour brake fluid into the master cylinder reservoir so that it stays full enough to prevent air from entering the lines as you bleed. Install the rubber hose and open the bleeder screw. Watch the hose for fluid flow as gravity pulls the fluid into the caliper and forces out the air. Close the bleed screw when fluid begins to appear. Bleed the brakes as normal. If you don't have a helper, an easy way is to use a handheld vacuum pump set up at the caliper to draw out the fluid which in turn clears air from the system.
DO NOT let the reservoir run dry.
13) Reinstall the wheels and torque the lug nuts in a star sequence to the spec of 85-105 Lb-Ft.
14) New rotors and brake pads should be bedded in carefully to prevent warping of the rotors. Gentle braking for the first 500 miles is one way to achieve this, or you can follow the article on bedding in brakes if you want to get it over with quickly.

