MadMikeyL
Administrator
Most MN12s have an oil pressure gauge on their clusters, but it's not an actual pressure gauge because the pressure sensor is just a switch and not a sender. The gauge moves to somewhere near the center of the range as long as there's at least 6-7 PSI. Increased or decreased oil pressure will not show any change in the position of the needle on the gauge. Anywhere from 7-100psi will go to the middle, and anything less than 6psi will go to the bottom.
However, you can modify the gauge to display the actual oil pressure! All you need to do is replace the sending unit with one that gives a variable output depending on pressure, and bypass a resistor on the back of the cluster. No wiring changes needed!
There are 2 senders you can choose from:
Standard Motor Products: PS-60 Echlin: OP6091
Motorcraft: SW-1547-B, E4ZZ-9278-A
1) Remove the old oil pressure switch. There are sensor sockets that will grab that flange, however since this piece is not being re-used, if you don't have that socket, feel free to spin it off with a pair of vice grips or channel locks. It shouldn't be on there too tight.
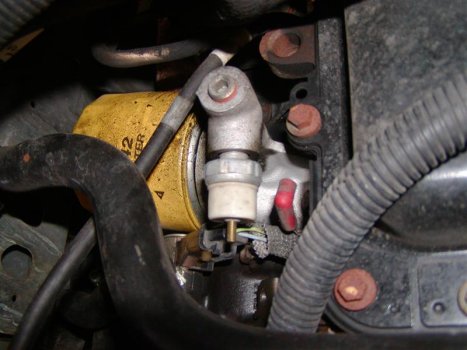
Wrap teflon tape, about three turns, around the thread of the new sender. The Motorcraft one came with teflon tape already on the threads. Use an open end wrench to snug it down. It should be either 1/2" or 9/16".
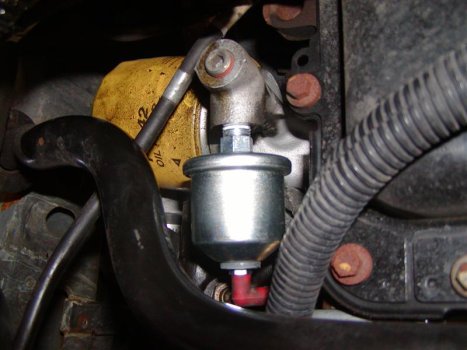
Reattach the sender lead, shown in red.
Note: 4.6L engine is shown in photo. For 3.8L and 5.0L engines, the oil pressure switch is not on the oil filter adapter, but on the block near the timing cover, and there is insufficient clearance to mount the larger oil pressure sender directly. You can build an extension out of hardware store fittings to be able to install the sender at an angle in this area. Alternatively, the SC engine had an adapter fitting for the oil pressure sensor that can be installed on the 3.8NA or 5.0 engines to allow the larger sender to fit.

2) Now you need to locate and bypass the 20ohm resistor on the back of the instrument cluster.
Here's how to take the cluster off without breaking the plastic tabs:
Note: photos are of a 94-96 style dash. 89-93 is similar.
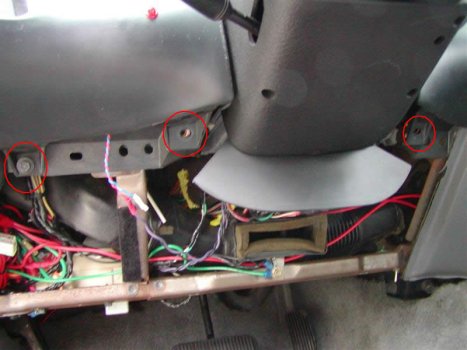
Remove these three bolts - 8mm
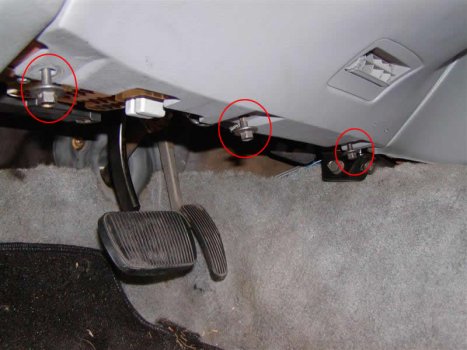
The bottom trim panel will pull right off. There are three spring clips holding the top on. Once this trim panel is down, on 94+ cars I highly recommend removing the upper 2 bolts holding the steering column to the dash, and slightly loosening the lower 2. This will make removal of the cluster surround much easier, and reduce the chance of breaking or cracking it. Since these cars are getting older, the plastic is getting more brittle, and good condition cluster surrounds are getting harder to find. Better to spend a little time now dropping the column than spending $100+ on a replacement cluster surround because you wanted to save 5 minutes.
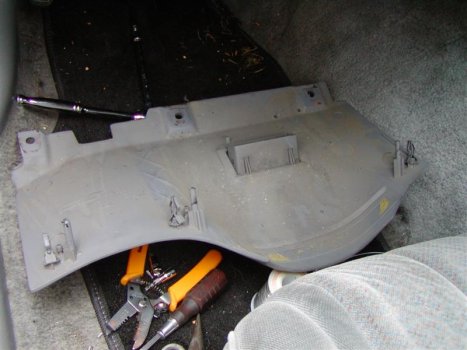
At the bottom of the cluster surround will be 3 screws (7 or 8mm)
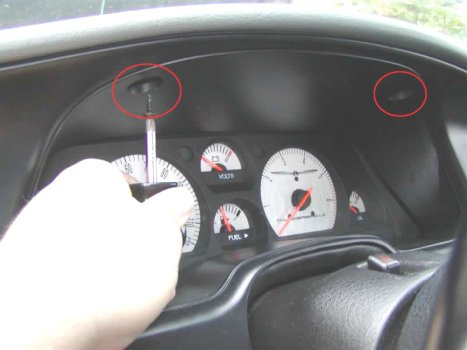
And at the top of the cluster surround are 2 Phillips screws
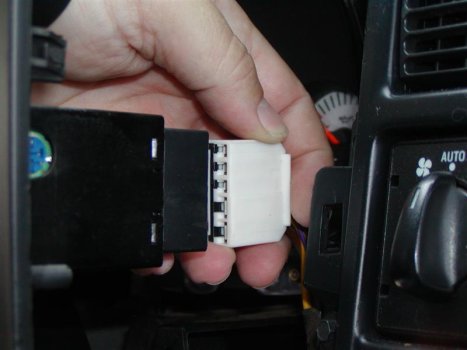
The surround can then be pulled straight back. It's also being held on by spring clips. Bring it back enough to unhook the rear defroster plug.
Make sure the steering column is down far enough out of the way to not interfere, and carefully work the surround out. Be careful when removing it as the plastic is brittle and easily cracks.
The cluster is held on by four 7mm bolts in the four corners.
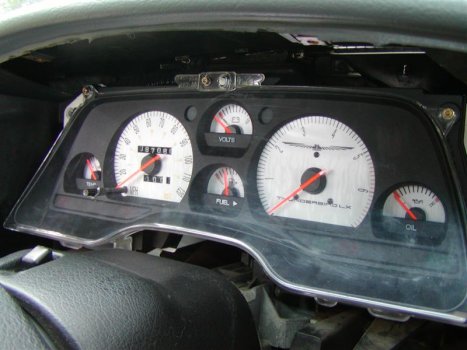
The cluster has 2 wiring harness connectors. You need to move the right-hand side out first to get at the one on the right side. This will give you access to get at the one on the left side. You press the tabs on the sides in and pull.
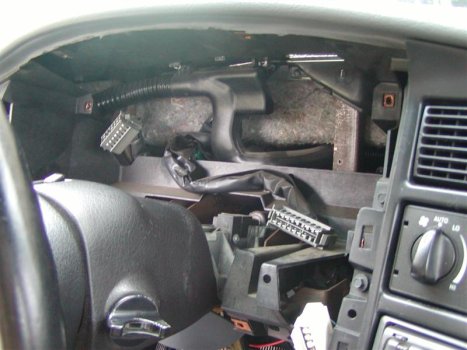
Reverse the above to put it back together again. Just remember you are dealing with plastic here. No need to crank down on the bolts.
This is the 20ohm resistor you're looking for. It will be located basically right behind the oil pressure gauge. Work quickly so you don't melt the blue plastic. Take a piece of insulated wire and wrap the legs of the resistor.
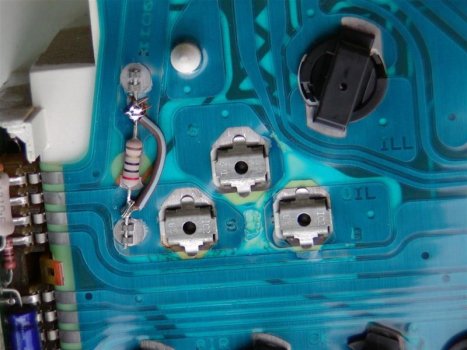
Not the greatest of soldering jobs but my butane iron was a little too hot for this job.
Start it up and check for leaks.
With the new pressure sender in place, you can expect the following readings depending on operating condition:
When cold: between M and top line.
When hot at speed: M
When hot in gear idle: between N and O
When hot in park: O
However, you can modify the gauge to display the actual oil pressure! All you need to do is replace the sending unit with one that gives a variable output depending on pressure, and bypass a resistor on the back of the cluster. No wiring changes needed!
There are 2 senders you can choose from:
Standard Motor Products: PS-60 Echlin: OP6091
Motorcraft: SW-1547-B, E4ZZ-9278-A
1) Remove the old oil pressure switch. There are sensor sockets that will grab that flange, however since this piece is not being re-used, if you don't have that socket, feel free to spin it off with a pair of vice grips or channel locks. It shouldn't be on there too tight.

Wrap teflon tape, about three turns, around the thread of the new sender. The Motorcraft one came with teflon tape already on the threads. Use an open end wrench to snug it down. It should be either 1/2" or 9/16".

Reattach the sender lead, shown in red.
Note: 4.6L engine is shown in photo. For 3.8L and 5.0L engines, the oil pressure switch is not on the oil filter adapter, but on the block near the timing cover, and there is insufficient clearance to mount the larger oil pressure sender directly. You can build an extension out of hardware store fittings to be able to install the sender at an angle in this area. Alternatively, the SC engine had an adapter fitting for the oil pressure sensor that can be installed on the 3.8NA or 5.0 engines to allow the larger sender to fit.
2) Now you need to locate and bypass the 20ohm resistor on the back of the instrument cluster.
Here's how to take the cluster off without breaking the plastic tabs:
Note: photos are of a 94-96 style dash. 89-93 is similar.
Remove these three bolts - 8mm

The bottom trim panel will pull right off. There are three spring clips holding the top on. Once this trim panel is down, on 94+ cars I highly recommend removing the upper 2 bolts holding the steering column to the dash, and slightly loosening the lower 2. This will make removal of the cluster surround much easier, and reduce the chance of breaking or cracking it. Since these cars are getting older, the plastic is getting more brittle, and good condition cluster surrounds are getting harder to find. Better to spend a little time now dropping the column than spending $100+ on a replacement cluster surround because you wanted to save 5 minutes.

At the bottom of the cluster surround will be 3 screws (7 or 8mm)

And at the top of the cluster surround are 2 Phillips screws

The surround can then be pulled straight back. It's also being held on by spring clips. Bring it back enough to unhook the rear defroster plug.

Make sure the steering column is down far enough out of the way to not interfere, and carefully work the surround out. Be careful when removing it as the plastic is brittle and easily cracks.
The cluster is held on by four 7mm bolts in the four corners.

The cluster has 2 wiring harness connectors. You need to move the right-hand side out first to get at the one on the right side. This will give you access to get at the one on the left side. You press the tabs on the sides in and pull.

Reverse the above to put it back together again. Just remember you are dealing with plastic here. No need to crank down on the bolts.
This is the 20ohm resistor you're looking for. It will be located basically right behind the oil pressure gauge. Work quickly so you don't melt the blue plastic. Take a piece of insulated wire and wrap the legs of the resistor.

Not the greatest of soldering jobs but my butane iron was a little too hot for this job.
Start it up and check for leaks.
With the new pressure sender in place, you can expect the following readings depending on operating condition:
When cold: between M and top line.
When hot at speed: M
When hot in gear idle: between N and O
When hot in park: O
Last edited:
