I messed up the steering wheel orientation, help me fix please!

GRWeldon

5th Gear Poster
Joined
Oct 5, 2023
Messages
380
Location
Alabama
Country flag
Good day y'all!

After replacing the steering rack in my 96 T-bird, I didn't attach the rag joint until the rack was in place (not bolted). After much pain and struggle, I got the rag joint on, but the steering wheel is 180 degrees out from being in the correct spot which means the rag joint won't fully go on due to a raised spot that supposed to go in the grove on the end of the shaft. Because I had to deflect the rag joint severely and just barely got it in the steering shaft, there is no possible way to remove it again without removing the rack completely, which I am going to try to avoid like the plague.

Please tell me that I can unbolt the steering shaft and move it back slightly to uncouple the rag joint and turn the wheel 180 degrees to correctly center it?

Also, if anybody knows if a clockspring can tolerate and out-of-center condition of 1 revolution in either direction, please let me know!

Thanks for your help! It is appreciated!
 
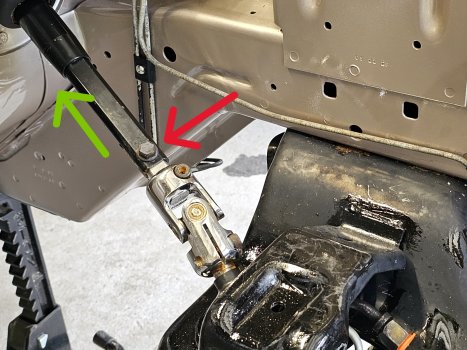
You can unbolt the rag joint and push the steering shaft up towards the firewall. Remove the upper bolt (red) and the lower shaft will collapse up into the upper shaft (green).

20230526_151133.jpg
 
Last edited:
If you jack up the car and come from behind the subframe you can easily detach the rag joint from the shaft as pictured above, or you can pull it away from the rack. Either way the steering shaft will collapse and extend back into place. No big deal.
 
If you turned the wheel while it was loose you can kill the 'clockspring" Which is the wiring for the airbag and cruise controls. There is a procedure written on the side for setting it right before you install it.
 
+1 Unless you know which direction the steering wheel turned to get 180 out you should pull the wheel/clockspring and reset its position before you drive the car lest you snap the ribbon at full lock.

Like others have said the steering shaft collapses so that's no big deal. You probably made the rack install a lot harder on yourself than it normally is not collapsing it to start with, disconnecting the joint and sliding it back is my step one.
 
Thank you ALL for your replies! First thing I want to mention is that I'm working on a rack. I have relatively easy access to the rag joint. Second is that I'm aware of the clockspring and it's issues. I believe I've kept the orientation intact except for the 180 it's out. If not, I'll know fairly soon I suppose. I'm assuming that new parts are available and it's not a total pain to replace one? I'll look for a procedure on this site and see what I can come up with.

jco1385--- I wasn't aware of the ability of the steering shaft to telescope in toward the firewall. Mine seemed pretty stout. I didn't really put a bunch of force on it in that direction because it didn't feel like it was going to move, however, if indeed it WILL move, that would be an easy solution to my issue. Thank you!
 
Seems like one end of that connection was a splined shaft, and could be off a tooth. I could be remembering another car, tho.
 
I got it! Got the rag joint back installed. Seems the telescoping part of the steering shaft was VERY stiff. Had to tap the telescoping section with more force than I would have thought necessary to get it to move back. Had to use a small hammer and a tool (a dandelion digger) in the slot on the shaft to tap it back. After steering wheel orientation, I had to clamp on to the shaft with a pair of hose pliers and tap on the pliers and tap it back. So relieved to get this back on! Thank you all.

As for the getting the orientation of the rag joint off by a tooth... if that's all it takes to screw up a clockspring, then I'm screwed!

BTW, I couldn't find a procedure to re-orient the clockspring. Anybody have a link?
 
LOL. The only instructions I've seen are on a sticker, On the side of the clockspring itself. IDK how to set it, but I remember doing it. You tighten it one way, then loosen it X number of turns. If you turn it too far backwards, it rips the end off, and it won't work again. It is made of a springy flat wire, 4 of them iirc, and if the end bends, it breaks off. Dorman makes one, you can see the sticker on the pic online, but I can't read it.
 
Here's a video about remove and replace, that's what I'd do if you're unsure if it got turned.
 
OK, I finally found it. You go full CCW until a bit of resistance if felt, then turn it 2.5 turns CW. That is supposed to be the neutral position.
 
Thank you Grog for your posts. I'm just now getting back to be able to check. Been way too busy working for others making a paycheck. I WAS retired for about 4 years and due to inflation, had to go back. It sucks, because now I only have a few hours a week to work on my cars when I used to be able to work dozens.

My clockspring is definitely toast. I don't know how it got broken, I thought I had it secured. Oh well. I have a 95 Cougar parts car with one that should be good. I guess I'll get practice taking it off before I break the plastic in the 96 T-Bird. I'm assuming that if you take them off when the wheel is in the neutral position that it will stay there while you put it back on?

put a piece of tape over the face and side of the clockspring to ensure it stays in the neutral centered position in tape when you have it installed.
 
Lock the steering wheel before you take the wheel off. That saves a lot of hassle.
 
So I took the latest acquired T-bird (Pearl White 96 LX 4.6 - the car I've been working on it this thread) for my first drive, about 2.5 miles. The tires are completely dry-rotted and they scare me, but I just had to see what it felt like. There are a number of electrical things that aren't working and I was wondering exactly what will not work because of a broken clockspring...
 
So I took the latest acquired T-bird (Pearl White 96 LX 4.6 - the car I've been working on it this thread) for my first drive, about 2.5 miles. The tires are completely dry-rotted and they scare me, but I just had to see what it felt like. There are a number of electrical things that aren't working and I was wondering exactly what will not work because of a broken clockspring...

Horn, airbag and cruise control
 
No, turn signals and brake lights are usually the mlps. The blinker arm. Remove it, take it apart carefully , sand the copper pieces, fill it with dielectric grease, and put it back together, and it will work for another 30 years. Use the signals, that keeps them clean.
If you get a replacement, they go bad much faster.
EDIT: Matt and I crossposted, lol. It's nice to have traffic again. :)
 
There's an idiot selling a new tbird for $80k, lol. On the old place.
 
No, turn signals and brake lights are usually the mlps. The blinker arm. Remove it, take it apart carefully , sand the copper pieces, fill it with dielectric grease, and put it back together, and it will work for another 30 years. Use the signals, that keeps them clean.
If you get a replacement, they go bad much faster.
EDIT: Matt and I crossposted, lol. It's nice to have traffic again. :)
Well, I might as well do that while I'm replacing the clockspring that I broke, even after taking precautions that I thought would keep it intact. I suppose it could have been broken already but with only 93K miles, I'm thinking I broke it. Thanks for the instructions...
 
No, he's saying 3.5 miles, never been titled;it's a scam, straight up.
 
No, turn signals and brake lights are usually the mlps. The blinker arm. Remove it, take it apart carefully , sand the copper pieces, fill it with dielectric grease, and put it back together, and it will work for another 30 years. Use the signals, that keeps them clean.
If you get a replacement, they go bad much faster.
EDIT: Matt and I crossposted, lol. It's nice to have traffic again. :)

*MFS :rofl:
 
OOPs! Wrong one. The mfs is easy to fix, if you have manual dexterity. There are two screws in the back of it, that allow you to disassemble the unit. it has a spring that has to go back in just like it is for the cancellation feature to work. There are a couple of sliders that move, and it's full of dielectric grease. use fine sandpaper, make all the contacts look like a shiny pennie, and refill with grease. There's also a slider for the hazard switch that gets dirty, hit it too while you're in there. Take a pic before you remove any of the parts, so you get it back together right.

 
Last edited:
Nope, that would be a multifunction switch issue, does anything else work on the stalk(wipers, hazards etc?)
Wipers do indeed work, but even on the fastest speed they work very slowly. I thought the hazards were on the steering column? In any case, I haven't checked them but will when it stops raining.
 
The hazards are part of the MFS, it wraps around the top of the column as an integrated unit. Here’s a link showing how to refurbish one including pics of how it looks

 
Last edited:
It's mounted right behind the mfs. It's part of the same assy.
 
The hazards are part of the MFS, it wraps around the top of the column as an integrated unit. Here’s a link showing how to refurbish one including pics of how it looks

That's a great link! Thanks! When I was getting the clockspring out of my donor 95 Cougar, I grabbed the MFS while I was there. The 95 Cougar has been sitting around with parts gradually being used for about 10 years. The MFS was working when I parked the car. I'm really not all that game to tear into one and clean it. I'll probably just replace it then actually fix the one that doesn't work.

Retrieving the clockspring from the donor was a fairly straight-forward job. I couldn't get the steering wheel to lock on the donor so it will be easier on the car where I'm replacing the clockspring. Thank you so much for the tip about putting tape on the donor clockspring before pulling it. Great idea!

I'm going to try to make time tomorrow to disassemble the car with the broken clockspring and install the donor part. Thank you Grog and XR7-4.6 for the assistance.
 

Similar threads

Back
Top