You are using an out of date browser. It may not display this or other websites correctly.
You should upgrade or use an alternative browser.
You should upgrade or use an alternative browser.
New Shift Knob (Automatic)
- Thread starter 1997ThunderbirdLXV6
- Start date
...plus that rectangle matches the color of the leather slider. I think it's fine!
89 TBIRD
2nd Gear Poster
- Joined
- Sep 22, 2023
- Messages
- 83
- Age
- 60
- Location
- Woodbridge, VA
- Vehicle Details
- 1989 Thunderbird Base N/A V6
That does look good. I think the clear rectangle would look better with rounded ends.
Another approach would be to apply masks for the characters on the back side of the panel and paint, then pull the masks. You'd have a solid black panel with PRND12 showing by itself. Like this only glossy.

Another approach would be to apply masks for the characters on the back side of the panel and paint, then pull the masks. You'd have a solid black panel with PRND12 showing by itself. Like this only glossy.
I think the clear rectangle would look better with rounded ends.
Another approach would be to apply masks for the characters
I decided against rounded ends because A. it was easier to mask and B. I wanted it to look different from the previous bezel with the cutout hole. I also felt it fit in better with other rectangular elements in the interior, such as radio display and buttons. Rounded would be fine, too though.
Masking just the letters, that's a great idea; I just wouldn't know how to execute that properly.
That does look good.
Thank you! I mean I can't stop gazing at it. What's wrong with me?
- Joined
- Sep 12, 2023
- Messages
- 5,716
- Location
- Roselle, IL
- Cars in Garage
- 1
- Vehicle Details
- 1994 Cougar XR7 DOHC TR3650
I like the idea...but I'd have to experiment a bit first with leftover parts to get comfortable with the procedure. To be honest, I fear superglue. Just the other day I accidentally spilled some all over my hand; that stuff is horrible.
It would be nice for it to blend in, but I think even with the rectangle this looks amazing! I mean sorry to toot my own horn...but this looks factory and then some!
Meanwhile, I made a small adjustment: I installed it over springs. This produces a nice snug fit with the rubber gasket of the console panel.
View attachment 7569
I spilled glue all over my hands to prove this point lol


This is by no means a well done execution( I didn’t even wait for the crappy enamel paint to dry) but with some care the results are very impressive. Gel style superglues may be better in the not getting all over your hands department.
Last edited:
Very cool! Thank you for that!
Generalee0527
4th Gear Poster
- Joined
- Jan 4, 2024
- Messages
- 283
- Location
- SW GA
- Vehicle Details
- 97 Tbird, pbr front brakes, Sport edition 4.6 w/ 369k total miles by me the one and only owner.
Kinda plain but it won't catch crap like our '97 ones that are lower than console.What does it look like?

- Joined
- Sep 12, 2023
- Messages
- 5,716
- Location
- Roselle, IL
- Cars in Garage
- 1
- Vehicle Details
- 1994 Cougar XR7 DOHC TR3650
Kinda plain but it won't catch crap like our '97 ones that are lower than console.View attachment 7596
Of all the classic car shifters that I think would fit…

It works for inspiration, but to actually fit such a shifter to our cars seems very complex unless the dimensions happen to be spot on.
Otherwise, I'd recommend the acrylic route in whatever finish you prefer. Or go with a leather shift boot if you're worried about small things falling through the cracks.
Otherwise, I'd recommend the acrylic route in whatever finish you prefer. Or go with a leather shift boot if you're worried about small things falling through the cracks.
89 TBIRD
2nd Gear Poster
- Joined
- Sep 22, 2023
- Messages
- 83
- Age
- 60
- Location
- Woodbridge, VA
- Vehicle Details
- 1989 Thunderbird Base N/A V6
Clear Goop or Liquid Nails works good and is a lot more pleasant to work with, and no risk of gluing your fingers together.Gel style superglues may be better in the not getting all over your hands department.
I think I should just enjoy what I have for a while...and not give in to my shift knob obsession again anytime soon.
Still, down the road there may be another genuine wood bezel, a completely custom gated shifter as in a 90s Mercedes, a leather boot, or a column shift conversion. I'm not lacking for ideas.
But for now, let's conclude this thread with a Before & After:


Still, down the road there may be another genuine wood bezel, a completely custom gated shifter as in a 90s Mercedes, a leather boot, or a column shift conversion. I'm not lacking for ideas.
But for now, let's conclude this thread with a Before & After:

The never-ending shift knob thread is back!
Well, I do love the look and feel of a wood shift knob, and I like the OEM look of the Lincoln LS unit. I didn't change anything structural, so I can always go back to that.
What I didn't like about it were the ergonomics of a fairly small/narrow knob that doesn't fit the natural shape of a hand, as well as the knob's symmetry which doesn't fit a distinctly asymmetrical dash.
I also felt I hadn't done any stitching in a long time. So I picked up a used shift knob and covered it with new leather. I asked in the Today thread which vehicle the knob came from, but nobody knew or cared... It's from a late 90s Eldorado/Seville, seen here in its original habitat:

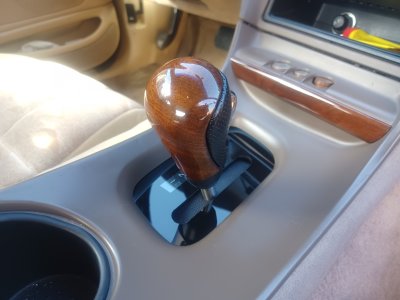
Not easy to see here, but this knob has a distinct asymmetrical shape, thinning/leaning towards the right.
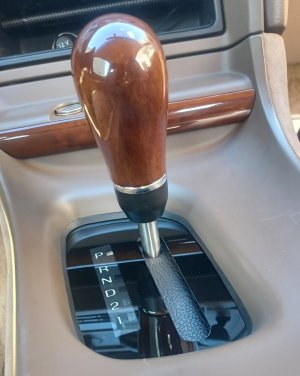
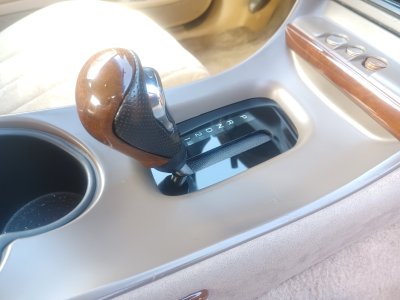
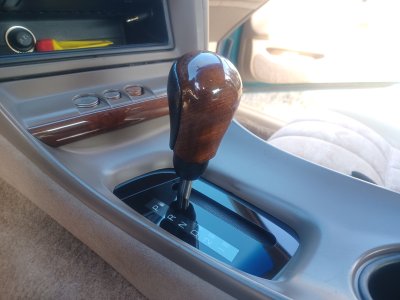
And here it is installed. I ended up painting the release in flat black after experimenting with gloss black and silver, and I added a single screw in the front to prevent it from rotating.

I think it matches the dash very well, and it feels great to the touch.


The top of the knob is actually padded with a thin layer of foam. Great because I usually rest my wrist on it when I use my phone's touchscreen.

Since the knob becomes really skinny towards the bottom, it matches the thin exposed metal lever nicely.

Well, I do love the look and feel of a wood shift knob, and I like the OEM look of the Lincoln LS unit. I didn't change anything structural, so I can always go back to that.
What I didn't like about it were the ergonomics of a fairly small/narrow knob that doesn't fit the natural shape of a hand, as well as the knob's symmetry which doesn't fit a distinctly asymmetrical dash.
I also felt I hadn't done any stitching in a long time. So I picked up a used shift knob and covered it with new leather. I asked in the Today thread which vehicle the knob came from, but nobody knew or cared... It's from a late 90s Eldorado/Seville, seen here in its original habitat:
Not easy to see here, but this knob has a distinct asymmetrical shape, thinning/leaning towards the right.
And here it is installed. I ended up painting the release in flat black after experimenting with gloss black and silver, and I added a single screw in the front to prevent it from rotating.
I think it matches the dash very well, and it feels great to the touch.
The top of the knob is actually padded with a thin layer of foam. Great because I usually rest my wrist on it when I use my phone's touchscreen.
Since the knob becomes really skinny towards the bottom, it matches the thin exposed metal lever nicely.
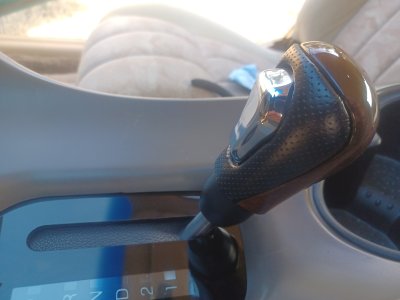
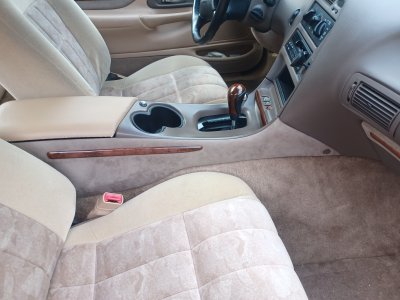
This view shows the angled shape of the shift knob, which really falls right into the "pilot's" hand!

Last edited:
Alright, so don't do this! Not that I fear anyone might...
The Eldorado/Seville shift knob was a fail, and I went back to the LS solid wood unit.
It was fully functional and securely installed. The issue was a design flaw!
Anytime I shifted, I pinched the underside of my fingers here:

And my fingers aren't that meaty! I had to be very deliberate to avoid the pinch. I didn't notice this in the junkyard because I was wearing gloves.
I also wrapped the knob exactly as factory, although my leather was a bit thicker.
Overall, no harm done. I'll file this under nice exercise.
The Eldorado/Seville shift knob was a fail, and I went back to the LS solid wood unit.
It was fully functional and securely installed. The issue was a design flaw!
Anytime I shifted, I pinched the underside of my fingers here:
And my fingers aren't that meaty! I had to be very deliberate to avoid the pinch. I didn't notice this in the junkyard because I was wearing gloves.
I also wrapped the knob exactly as factory, although my leather was a bit thicker.
Overall, no harm done. I'll file this under nice exercise.
To keep my shift knob thread current, two new pics of the bezel after eliminating the rubber gasket:


If i had 75 cents in my coin holder, my window would get smashed for it when I was in walmart. My blue car got the window smashed for a fox head hanging from the mirror that was actually a buckle for a purse strap.
VicRattlehead
2nd Gear Poster
sooooo I read this entire thread, and as much as I hate wood in cars, I like the wood one the best
just thinking outloud, the clear with black paint with the clear window, could you do some translucent smoke color on the window and the letters light up right?? its been so long since I've been in my car I forget.
just thinking outloud, the clear with black paint with the clear window, could you do some translucent smoke color on the window and the letters light up right?? its been so long since I've been in my car I forget.
sooooo I read this entire thread, and as much as I hate wood in cars, I like the wood one the best
See what I did there!
")
just thinking outloud, the clear with black paint with the clear window, could you do some translucent smoke color on the window and the letters light up right?? its been so long since I've been in my car I forget.
Not sure I understand. It lights up fine now. Generally speaking, even the most smoothly applied clear paint may not be perfectly even, which could distort the PRND21. If anything, the idea with the glue could provide a more factory look.
Really the next step up from this would be a laser-cut/engraved panel. Translucent acrylic, all painted black from underneath, then the PRND21 engraved from underneath using a laser such as a Glowforge.
- Joined
- Sep 12, 2023
- Messages
- 5,716
- Location
- Roselle, IL
- Cars in Garage
- 1
- Vehicle Details
- 1994 Cougar XR7 DOHC TR3650
See what I did there!
Not sure I understand. It lights up fine now. Generally speaking, even the most smoothly applied clear paint may not be perfectly even, which could distort the PRND21. If anything, the idea with the glue could provide a more factory look.
Really the next step up from this would be a laser-cut/engraved panel. Translucent acrylic, all painted black from underneath, then the PRND21 engraved from underneath using a laser such as a Glowforge.
You could get that effect with what you have and glue alone. It acts as a translucent filler, so as long as the border is the same color(black) it will blend seamlessly together, leaving only the lettering visible through the acrylic.
With Kieth’s idea you could do the same but with a tinted layer, you could also use glue to eliminate distortion. You’d have to wire up the lighting to be on at all times rather than only with headlights to see it though
You could get that effect with what you have and glue alone.
Yes, but laser-cut would be cooler.
. You’d have to wire up the lighting to be on at all times rather than only with headlights to see it though
That would be very easy as my instrument cluster illumination is wired that way. Bright with ignition; dimmable with headlights on.
Grog6
Moderator
- Joined
- Sep 22, 2023
- Messages
- 4,711
- Location
- Harriman, TN
- Cars in Garage
- 1
- Vehicle Details
- 2x 1996 Cougars, 1997 Tbird 4.6's all.
Acetone will remove ca glue; my buddy had a bottle break in his hand, due to it being in the sun for years.
The obsession continues...
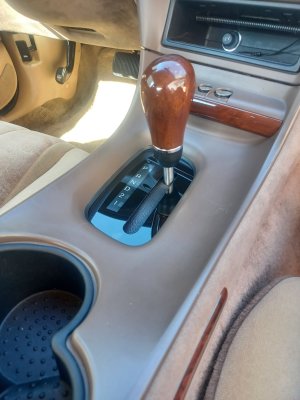
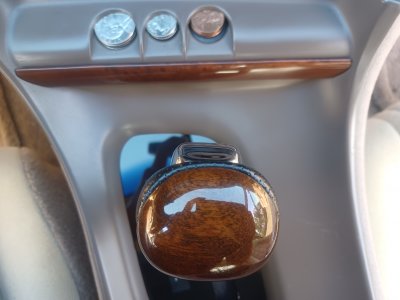
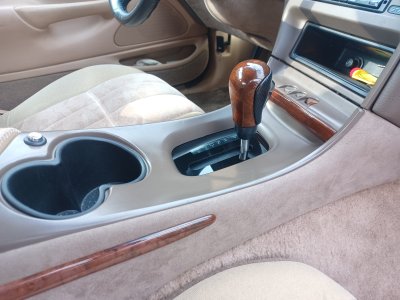
The latest: A wood and leather combination shift knob from a 1st generation Cadillac CTS. Installation is identical to the Lincoln LS knob; Ford and GM must have used the same supplier, because these are mostly identical on the inside.
A few notes:
The latest: A wood and leather combination shift knob from a 1st generation Cadillac CTS. Installation is identical to the Lincoln LS knob; Ford and GM must have used the same supplier, because these are mostly identical on the inside.
A few notes:
- Initially I wrapped the leather piece with new leather. It was a bit thick which messed with clearances, so I went with another stock CTS piece (perforated leather). I washed it thoroughly, then painted over it; any pee and cum stuck in the perforation should be gone or covered up.
- I angled the knob to be aligned with the center console, i.e., towards the driver. That was a big disadvantage of the LS knob, which faced straight ahead, making it less ergonomically natural. The LS knob's design doesn't lend itself to angling; it would just look crooked.
- The chrome release button was a major want; it feels much better to the touch than the textured plastic with the previous knob.
- The bottom shroud is repurposed from the LS knob. The Cadillac came with a boot, so I had to concoct something. I realize it's a round shroud on a squared off knob design, but I think it works just fine.
Attachments

Jae 'Bird
5th Gear Poster
- Joined
- Dec 11, 2023
- Messages
- 461
- Age
- 21
- Location
- Edmonton, Canada
- Vehicle Details
- 1990 Ford Thunderbird Base with PEP 151A, 3.8L NA V-6
This might be my favorite yet! Nicely done
any pee and cum stuck in the perforation should be gone or covered up

Junkyard parts. Always assume the worst.
...and now I grossed myself out and went back to the leather piece of my own manufacture:


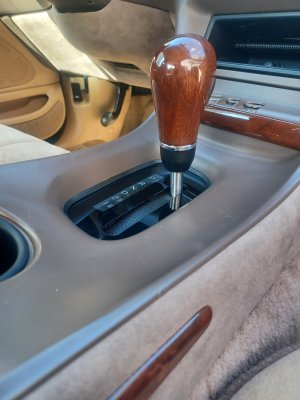
Minor update today:
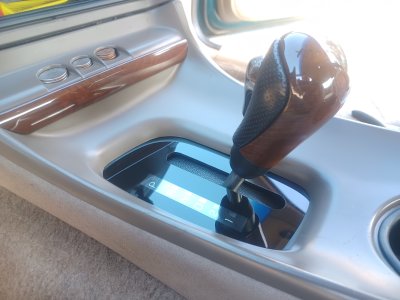
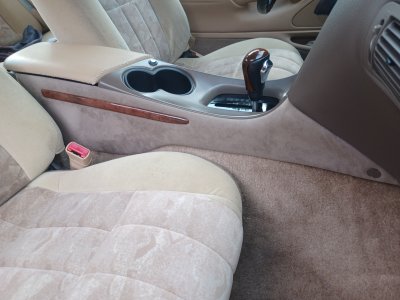
I found a different shroud. This one comes from a Pontiac G6. The chrome works better with my interior theme, the tapered shape produces a smoother transition to the metal post, and it's slightly ovaloid, fitting more naturally under the knob than the round shroud. It's a minor difference, yet a noticeable improvement in my opinion.

The final result:


I found a different shroud. This one comes from a Pontiac G6. The chrome works better with my interior theme, the tapered shape produces a smoother transition to the metal post, and it's slightly ovaloid, fitting more naturally under the knob than the round shroud. It's a minor difference, yet a noticeable improvement in my opinion.
The final result:
Similar threads
-

-
-
-
Automatic Shift knob assembly (Or shifter seal if that can be replaced)
- Started by owenmcculloch04
- Replies: 3
-
Sold FREE SHIPPING on Everything (with few exceptions)
- Started by 1997ThunderbirdLXV6
- Replies: 7