- Joined
- Sep 12, 2023
- Messages
- 2,408
- Location
- North Ridgeville, OH
- Cars in Garage
- 2
- Vehicle Details
- 1997 Thunderbird 4.6, 1998 Mark VIII LSC
All 89-95 3.8s (SC and NA), 91-93 5.0s as well as the 93-95 Mark VIIIs were equipped with the EEC-IV PCM and an OBD-I diagnostic system. Ford's EEC-IV PCM and OBD (often retroactively called OBD-I after OBD-II's introduction) system offers some useful tests to help both the the everyday or professional mechanic diagnose and narrow down potential problems. Unlike the OBD-II systems, a specialized code reader is not required to access these tests or read fault codes. A code reader can simpify the process, but for this article I will describe the process without one.
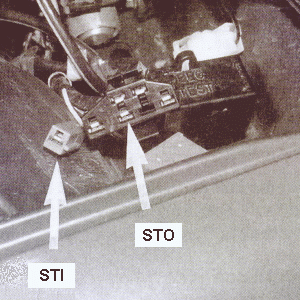
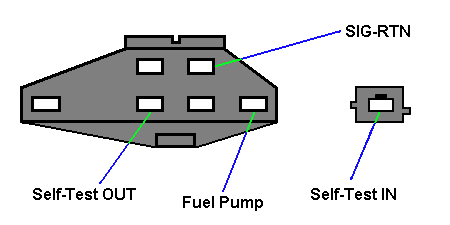
The key to running these tests or reading codes is grounding the self-test input (STI). The simplest way to do this is by jumping a wire or paper clip from the STI connector to the ground (SIG-RTN) on the OBD connector.


KOEO Test
The first test is the key on, engine off (KOEO) test. This test is most useful to verify the electrical components are operating within normal parameters prior to advancing to the engine running test, and retrieving any trouble codes from memory.
How To Count “Check Engine” Light Blinks
When the “Check Engine” light blinks during the test, you will get several different blinks. The separation time between blinks is used to indicate what information is being displayed.
You may catch a brief flickering of the light initially. This is a rapid code output that is used by OBD-I code readers. What we're interested in will be reading the codes, which will be given at a slower pace after a moment's time. Here's an example:
Blink – 2 sec – blink – 4 sec – blink – 2 sec – blink – 6 sec – blink – 6 sec – blink – 2 sec – blink – 4 sec – blink – 2 sec – blink
This translates into 11-11 current condition (KOEO) and 11-11 in the continues memory (CM); or SYSTEMPASS
This may seem hard to count; my recommendation is that you record codes with slashes and lump them all together. Sort them out into numerical codes later. Here is an example of what this might look like:

This would give you codes; 41, 83, 14 and 18. If you miss some of the codes or feel you are counting wrong, continue to count the remaining codes as practice and compare to the next test. When finished simply turn the key to OFF, wait 15 seconds, then back to RUN. The codes will be presented again.
KOER Test
A second, more thorough test is the key on, engine running (KOER) test. This test can reveal mechanical problems that the KOEO test is unable to reveal. If you're not familiar with how to record codes, read and run the KOEO tests first to get the procedure down.
Checking base timing
This only applies for distributor-equipped vehicles - in our case, 89-95 naturally aspirated 3.8 engines or the 91-93 5.0. While the computer controls when the coil fires (unlike an old-style vacuum-advance and points system), the base timing must still be calibrated to ensure the distributor is aligned perfectly. This way the actual spark delivery matches what the PCM is commanding.
Procedures and verbiage have been adapted from the long-deceased Ford Fuel Injection website.
The key to running these tests or reading codes is grounding the self-test input (STI). The simplest way to do this is by jumping a wire or paper clip from the STI connector to the ground (SIG-RTN) on the OBD connector.


KOEO Test
The first test is the key on, engine off (KOEO) test. This test is most useful to verify the electrical components are operating within normal parameters prior to advancing to the engine running test, and retrieving any trouble codes from memory.
- Turn key to OFF.
- Get a length of wire that can connect the STI to the negative battery terminal or body ground.
- Ground the Self-Test Input.
- Get some paper and a pen.
- Get comfortable in the driver's seat.
- Try to keep yourself from getting distracted from here on.
- Turn key to RUN.
- You will hear some relays engage and the fuel pump primes the system. This is the EEC beginning the test.
- When the fuel pump stops, be ready to count!
- Turn key to OFF.
- Get a length of wire that can connect the STI to the negative battery terminal or body ground.
- Ground the Self-Test Input.
- Attach one side of the test device to the Self-Test Output (STO).
- Attach the other lead to the positive side of the battery.
- If you are using a digital voltmeter, you'll want to use the continuity setting.
- If you are using an analog voltmeter, you'll be counting the meter make sweeps.
- If you are using a cheap light, you'll count like the rest of us.
- Get some paper and a pen.
- Get comfortable in the driver's seat.
- Try to keep yourself from getting distracted from here on.
- Turn key to RUN.
- You will hear some relays engage and the fuel pump primes the system. This is the EEC beginning the test.
- When the fuel pump stops be ready to count!
How To Count “Check Engine” Light Blinks
When the “Check Engine” light blinks during the test, you will get several different blinks. The separation time between blinks is used to indicate what information is being displayed.
You may catch a brief flickering of the light initially. This is a rapid code output that is used by OBD-I code readers. What we're interested in will be reading the codes, which will be given at a slower pace after a moment's time. Here's an example:
First digit of first KOEO code (1/2 second between blinks)
2 second pause
Second digit of first KOEO code (1/2 second between blinks)
4 second pause
Next KOEO code
Once all KOEO codes are read the EEC will repeat them
6 second pause
Single Separator Blink (this indicates the change from KOEO codes to codes stored in memory)
6 second pause
Codes from memory (uses same 1/2, 2, and 4 second timing as KOEO codes and also repeats them)
If nothing has been recorded by the EEC since last battery disconnect you will see:Blink – 2 sec – blink – 4 sec – blink – 2 sec – blink – 6 sec – blink – 6 sec – blink – 2 sec – blink – 4 sec – blink – 2 sec – blink
This translates into 11-11 current condition (KOEO) and 11-11 in the continues memory (CM); or SYSTEMPASS
This may seem hard to count; my recommendation is that you record codes with slashes and lump them all together. Sort them out into numerical codes later. Here is an example of what this might look like:

This would give you codes; 41, 83, 14 and 18. If you miss some of the codes or feel you are counting wrong, continue to count the remaining codes as practice and compare to the next test. When finished simply turn the key to OFF, wait 15 seconds, then back to RUN. The codes will be presented again.
KOER Test
A second, more thorough test is the key on, engine running (KOER) test. This test can reveal mechanical problems that the KOEO test is unable to reveal. If you're not familiar with how to record codes, read and run the KOEO tests first to get the procedure down.
- Start and run engine at 2,000 rpm for two minutes to bring the engine up to normal temps and warm up the oxygen sensors. The engine must be at least 180°F (82°C) to pass.
- Turn off engine and wait 10 seconds. Make sure the vehicle is safe:
- Transmission in PARK or NEUTRAL.
- Apply parking brake.
- Block the wheels, whatever it takes!
- Turn off electrical loads (A/C, heater, etc.)
- Check the base timing (see below) and make sure the computer is controlling the timing before continuing with test.
- Ground the STI, just like the KOEO test.
- Start the vehicle, and monitor the Check Engine light.
- The first set of flashes you will see is the engine ID code. For gasoline engines, the engine ID code equals half the number of cylinders (4 pulses = 8 cylinders). These codes are used to verify the proper PCM is installed and confirm that the KOER test has begun.
- After the engine ID code is output, you must do a few items manually for the computer.
- Depress the brake pedal for 1 second to test the brake on/off circuit.
- Quickly jerk the steering wheel 1/2 turn to test the power steering pressure switch.
- For 94/95 auto SC and 4.6 vehicles, press the O/D off button twice to engage, then disengage OD lockout.
- The computer will begin to test many components; you will hear the idle change as it cycles through the tests. During the cylinder balance/misfire tests, you will feel the engine running rough - this is normal. Watch the check engine light closely.
- After completing the majority of the tests, the Check Engine light will flash once, indicating it is time for the dynamic response test. Briefly snap the throttle wide open - don't over-rev the engine!
- The Check Engine light will start flashing codes at you after a few moments.
- After you've gotten all the codes, turn the engine off and remove the ground wire from the STI.
Checking base timing
This only applies for distributor-equipped vehicles - in our case, 89-95 naturally aspirated 3.8 engines or the 91-93 5.0. While the computer controls when the coil fires (unlike an old-style vacuum-advance and points system), the base timing must still be calibrated to ensure the distributor is aligned perfectly. This way the actual spark delivery matches what the PCM is commanding.
- Ensure the key is OFF
- Place transmission in PARK or NEUTRAL, A/C and heater in OFF position.
- Connect timing light.
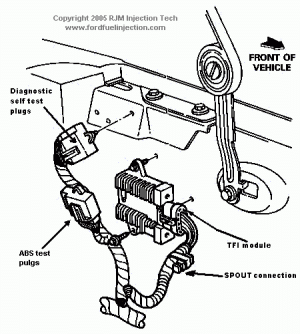
- Disconnect the single wire in-line spout connector or remove the shorting bar from the double wire SPOUT connector. Examples of the spout connector:

- Start the engine. To set timing correctly a remote starter should not be used. Use only the ignition key to start the vehicle. Attaching a remote starter might disable or initiate the start mode timing after the vehicle is started.
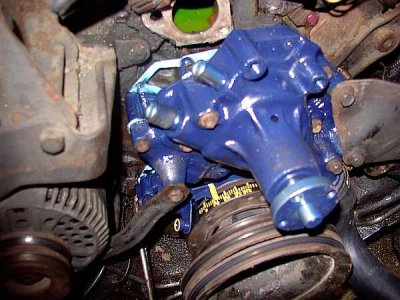
- Read the timing from the engine dampener on the crank.

- If the timing does not read 10° before TDC continue to step 8. If timing matches 10° before TDC skip to step 10.
- Shut engine OFF, and loosen distributor enough so you can twist it with your hand. Do not loosen it to the point where the engine vibrations move the distributor.
- Re-start engine and twist the distributor slightly until 10° of timing is read.
- Shut engine OFF, reconnect spout connector, and ensure the distributor hold down bolt is tight.
- Re-start engine.
- Check timing advance to verify distributor is advancing beyond the initial setting (this confirms computer control).
- Shut off engine and remove test instruments.
Procedures and verbiage have been adapted from the long-deceased Ford Fuel Injection website.
