NEURO
2nd Gear Poster
- Joined
- Sep 22, 2023
- Messages
- 117
- Location
- Las Vegas, NV
- Vehicle Details
- 1997 Ford Thunderbird LX Sport with 4.6L V8
1997 Thunderbird LX Sport
Issue:
Driver's power seat stopped moving forward; all other power positions work.
The following procedure can be applied to any of the power positions that have stopped working.
More photos & video of switch diagnosis on Google Photos:
https://photos.app.goo.gl/UzvUeqozvRz6Uwdz9
Details:
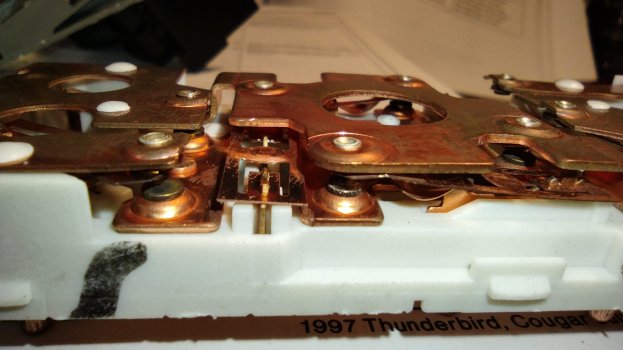
My driver's power seat stopped going forward...but all other power positions worked, so figured it wasn't an issue with the three motors. Tracked down issue to the copper contacts on the power seat switch having developed green corrosion on the contacts (like the Statue of Liberty's copper plating has), which impeded proper electrical contact.
After removing switch from seat, disassembling it, then reconnecting it, I used a plastic pick tool to manually trigger the tiny copper switch contacts and the forward motor worked perfectly to confirm it was a bad switch, not bad motor. But as expected, it was inconsistent because of the corroded contacts...sometimes it triggered the motor, sometimes not.
Solution:
Either a new power seat switch or a copper contact cleaner that can dissolve the green corrosion.
My notes to help you with the seat switch's removal & diagnosis:
Once you've chosen your solution, just reverse the procedure above to put everything back together, but with a couple notes:

Google Photos: https://photos.app.goo.gl/UzvUeqozvRz6Uwdz9
"We laughed, we cried, it changed our lives. The pointless life of this dilettante playboy & perverted genius continues to impress."
- Playboy Magazine, 03/2024


Issue:
Driver's power seat stopped moving forward; all other power positions work.
The following procedure can be applied to any of the power positions that have stopped working.
More photos & video of switch diagnosis on Google Photos:
https://photos.app.goo.gl/UzvUeqozvRz6Uwdz9
Details:
My driver's power seat stopped going forward...but all other power positions worked, so figured it wasn't an issue with the three motors. Tracked down issue to the copper contacts on the power seat switch having developed green corrosion on the contacts (like the Statue of Liberty's copper plating has), which impeded proper electrical contact.
After removing switch from seat, disassembling it, then reconnecting it, I used a plastic pick tool to manually trigger the tiny copper switch contacts and the forward motor worked perfectly to confirm it was a bad switch, not bad motor. But as expected, it was inconsistent because of the corroded contacts...sometimes it triggered the motor, sometimes not.
Solution:
Either a new power seat switch or a copper contact cleaner that can dissolve the green corrosion.
My notes to help you with the seat switch's removal & diagnosis:
- Take frequent photos to document what you're doing, in case you forget how some things go back together.
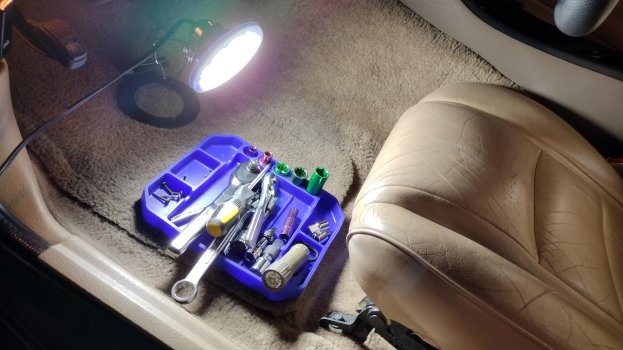
- Use a very bright worklight...it really helps seeing everything. Harbor Freight sells the one I used for $15...it is awesome.
- Remove the three Philips-head screws holding plastic side panel molding with switch to the seat, then unscrew switch assembly from back of panel.
- To disconnect the switch from the wiring harness under the seat, the seat needs to be unbolted from floorpan and tilted back or removed:
- Socket sizes needed: Front BOLTS = 13mm / Left-rear NUT = 13mm / Right-rear NUT = 18mm
- The seat's hold-down bolts & nuts are hidden under small plastic moldings that need to be popped off.
- If possible, power the seat backwards enough to clear front seat bolts for removal.
- Then, if possible, power the seat forward & up enough to clear rear seat bolt (left side) & nut (right side) for removal...especially for the right-rear nut that's tough to get to, unless the seat is far forward and power-adjusted up...then it's easy-peasy to get to.
- The straight panel molding at bottom of seat comes off next; the holes in the molding ends are hooked into capstans (for lack of better word) at bottom-inside of seat tracks.
- Lift seat off floorpan mountings and carefully lean & rest seat into backseat to give room to work on bottom of seat.
- BE VERY CAREFUL & ATTENTIVE not to rip wiring harnesses & connectors apart, as you position seat against backseat.
- I found it easier to disconnect the switch from the harness, then disassemble it at my worktable, then reconnect it to the seat harness to test it:
- Large brown connector that connects to power seat switch to harness - PITA to disconnect from harness. Helps to pull black connector off its peg in seat frame to give more clearance to disconnect switch from harness.
- Once disconnected, you can pull the switch & its wiring out through the side of the seat.
- Black connector is power.
- Gray connector is seat belt unlatched notification...annoying ding, ding, ding
- At worktable, take great care when removing the black switch cover off the white switch assembly:
- Inside the black cover are two tiny parts: a tiny spring and tiny white peg that fit into the switch's black joystick for seat adjustment. They will fall out and vanish forever, if you're not careful to capture them and set them aside.
- Use bright lighting & magnifying glass to inspect copper contacts for green corrosion (see photos).
- Test switch manually without black cover by reconnecting switch to seat harness, then use PLASTIC pick (not metal or you'll short the switch, maybe blow a fuse) to trigger the different copper contacts to verify that the motors work, but that the contacts are corroded.
- May work inconsistently due to corrosion...but as long as it works, it means the switch is the issue.
- Also inspect wiring into switch to verify the connections are solid/no broken wires.
- Once you've verified that the corroded contacts are the issue, you can either replace the switch or use copper contact cleaner to dissolve the green corrosion. I opted to replace the switch with a Motorcraft one, although there are several aftermarket makers that are cheaper.
Once you've chosen your solution, just reverse the procedure above to put everything back together, but with a couple notes:
- Take this opportunity to remove the seat from the car and thoroughly clean and re-lubricate the seat tracks that will be gunked up with years of all the crap that they collected. Also clean & vac the carpeting.
- Before putting everything back together, test new or cleaned switch's functions to verify all is good.
- The straight panel molding at bottom of seat that covers the tracks goes back on first and the holes in molding hook into capstans on the inside of the seat track. Might have to do this by feel.
- THEN reinstall seat switch into the other panel molding that affixes to side of seat, then screw this molding back into side of seat.
- Reconnect wiring harnesses.
- Bolt down seat according to torque specs.
Google Photos: https://photos.app.goo.gl/UzvUeqozvRz6Uwdz9
"We laughed, we cried, it changed our lives. The pointless life of this dilettante playboy & perverted genius continues to impress."
- Playboy Magazine, 03/2024


