You are using an out of date browser. It may not display this or other websites correctly.
You should upgrade or use an alternative browser.
You should upgrade or use an alternative browser.
Simple test of the return fuel line
- Thread starter White Lincoln
- Start date

- Joined
- Oct 2, 2023
- Messages
- 1,688
- Location
- New Mexico
- Cars in Garage
- 1
- Vehicle Details
- 1994 Mercury Cougar XR7, 3.8L, all stock
I realized last night that I have the cleaner fluid cannister upside down. Air is lighter than fluid so the solution has to be at the exit point, meaning the gravity has to play its part and the fluid needs to be at the bottom. I will hang the cannister upside down from the way it is in the pic so the fluid is at the bottom.Just make sure you’re smoking while you’re cleaning these.
But seriously, I like the set up.
- Joined
- Oct 2, 2023
- Messages
- 1,688
- Location
- New Mexico
- Cars in Garage
- 1
- Vehicle Details
- 1994 Mercury Cougar XR7, 3.8L, all stock
UPDATE: Lesson learned. Make sure that all components are clamped.
Things where going well... spraying water all over the floor as I watched the spray pattern of the injector (hard to see through the glass jar) and then POP... The injector popped off the cannister line and water went everywhere. Reminds me of the joke Tarantino told in Desperado....
Things where going well... spraying water all over the floor as I watched the spray pattern of the injector (hard to see through the glass jar) and then POP... The injector popped off the cannister line and water went everywhere. Reminds me of the joke Tarantino told in Desperado....
Grog6
Moderator
- Joined
- Sep 22, 2023
- Messages
- 4,701
- Location
- Harriman, TN
- Cars in Garage
- 1
- Vehicle Details
- 2x 1996 Cougars, 1997 Tbird 4.6's all.
Just don't forget the clamps on the gas version, lol. The fuel rail connections are critical.
- Joined
- Oct 2, 2023
- Messages
- 1,688
- Location
- New Mexico
- Cars in Garage
- 1
- Vehicle Details
- 1994 Mercury Cougar XR7, 3.8L, all stock
Well, I got 2 of the injectors flushed with Berryman's but on the 3rd one, the fitting to the canister blew and that was all she wrote. I need to go to the hardware store and get a new 1" fitting and make a new hole for the fitting. Or maybe just rethink the while design. I made this design from a YouTube I saw of a guy that flushed his intake with a similar setup. I have an old fuel rail I will never use and it is not worth much in eBay, so maybe i will see if I can use a piece of the injector mount and some super glue and... (just kidding). More to come.
Grog6
Moderator
- Joined
- Sep 22, 2023
- Messages
- 4,701
- Location
- Harriman, TN
- Cars in Garage
- 1
- Vehicle Details
- 2x 1996 Cougars, 1997 Tbird 4.6's all.
Just send your real name to a mod, That way if you earn a darwin, we'll be able to attribute it correctly.
T
T
- Joined
- Oct 2, 2023
- Messages
- 1,688
- Location
- New Mexico
- Cars in Garage
- 1
- Vehicle Details
- 1994 Mercury Cougar XR7, 3.8L, all stock
Check that and will do! I almost won the Darwin award once when I locked myself in a freezer for 10 days by accident.... or was it an accident? Last thing I remember is leaning over for some jerky and BAM and I woke up in the freezer, door locked. That crazy wife of mine! Always playing pranks on me.Just send your real name to a mod, That way if you earn a darwin, we'll be able to attribute it correctly.
T
(darwin award... isn't that for discovering we came from apes or something?)

Grog6
Moderator
- Joined
- Sep 22, 2023
- Messages
- 4,701
- Location
- Harriman, TN
- Cars in Garage
- 1
- Vehicle Details
- 2x 1996 Cougars, 1997 Tbird 4.6's all.
If you already have kids. its too late lol.
 darwinawards.com
Not as fun as chuck norris,but wtf.
darwinawards.com
Not as fun as chuck norris,but wtf.
Darwin Awards: Evolutionary Action
Darwin Awards: Vote for the Award Nominees! The Darwin Awards commemorate the (remains of) individuals who contribute to the improvement of our gene pool by removing themselves from it. Enter this portal for stories from the Darwin Awards.
Grog6
Moderator
- Joined
- Sep 22, 2023
- Messages
- 4,701
- Location
- Harriman, TN
- Cars in Garage
- 1
- Vehicle Details
- 2x 1996 Cougars, 1997 Tbird 4.6's all.
One of my dumbassed friends walked into my garage, as I'm mixing rocket propellant; It burns like magnesium."I have a gun. I will shoot you if you set me on fire!"Just make sure you’re smoking while you’re cleaning these.
But seriously, I like the set up.
- Joined
- Oct 2, 2023
- Messages
- 1,688
- Location
- New Mexico
- Cars in Garage
- 1
- Vehicle Details
- 1994 Mercury Cougar XR7, 3.8L, all stock
LMAO! Thank you, that was funny!One of my dumbassed friends walked into my garage, as I'm mixing rocket propellant; It burns like magnesium."I have a gun. I will shoot you if you set me on fire!"
Dang, how did you know? Like I always say to my wife "don't you understand physics?" when trying to describe something as simple as a dishwasher.White Lincoln must be an engineer, we tend to overthink things.
<chuckle> 9 volts works?I clean fuel injectors with brake clean and a 9v battery? This method seems overly complicated to me
9 volts is easier on the injector. You can use 12V, just don't leave them powered on for long periods of time. I'm all about DIYing stuff and being fully capable for any situation and I'm sure you are probably building this more for the fun of it, but there are plenty of places that will clean and flow test injectors for $18-$25. At least that way you know the spray pattern and flow rate is good.
- Joined
- Oct 2, 2023
- Messages
- 1,688
- Location
- New Mexico
- Cars in Garage
- 1
- Vehicle Details
- 1994 Mercury Cougar XR7, 3.8L, all stock
I paid less than that for my set of injectors. Anyway, I always wanted to do this, clean them with solvent, a voltage source and see it they are any better. I am on injector 3 after rebuilding my injector cleaning tool and after running the injectors through several test sprays, various voltages, spray patterns, they seem to be spraying really well. At lease much better than when I started.
Now to get the filter out.... should have got the filter puller tool.
Now to get the filter out.... should have got the filter puller tool.
- Joined
- Oct 2, 2023
- Messages
- 1,688
- Location
- New Mexico
- Cars in Garage
- 1
- Vehicle Details
- 1994 Mercury Cougar XR7, 3.8L, all stock
I got all 6 injectors flushed and came up with an easy way to remove the filters. What was interesting was watching the injectors hardly spray, spray weird and then go to spraying really well. The Berryman's does seem to work pretty well and rather quick. Imagine feeding that into the fuel rail.
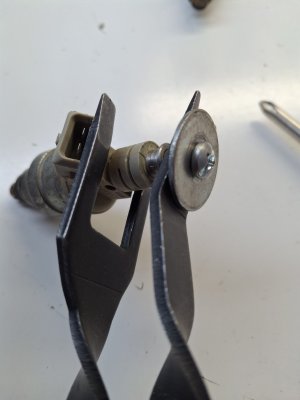
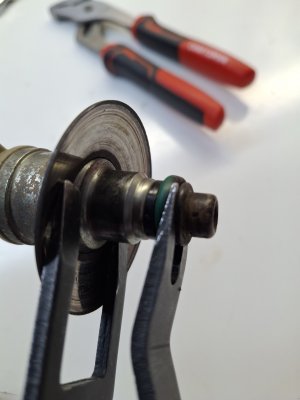
For the filter removal tool, AND the spray nozzle cover, you need Panel Clip Pliers, a screw, large washer and another large washer. Put the screw into the filer with the washer and press with the panel clip plyers and POP, its off. Easy peasy...
Oh, I forgot to show using a second big washer.... This large washer holds the plyers in place so you can pop the nozzle cover off.
Attachments
Last edited:
1997ThunderbirdLXV6
Seasoned PostWhore
So do you clean the filter separately? Or do you replace the filter with a new one?
- Joined
- Oct 2, 2023
- Messages
- 1,688
- Location
- New Mexico
- Cars in Garage
- 1
- Vehicle Details
- 1994 Mercury Cougar XR7, 3.8L, all stock
The kit comes with the filters, o-rings and washers. Everything to get it running like new. the old filters are usually crap anyway and do tend to get damaged when you pull them out.So do you clean the filter separately? Or do you replace the filter with a new one?
- Joined
- Oct 2, 2023
- Messages
- 1,688
- Location
- New Mexico
- Cars in Garage
- 1
- Vehicle Details
- 1994 Mercury Cougar XR7, 3.8L, all stock
Yes, the screw must be short and it needs to screw in snug or it will pop out under pressure or if too long, the tool will not enough force to pop the filter out. the older the injector is, the more the filter has become entrenched in the injector. I will see if I can get the screw thread size I used.I use a proper sized screw to remove the old filters
- Joined
- Oct 2, 2023
- Messages
- 1,688
- Location
- New Mexico
- Cars in Garage
- 1
- Vehicle Details
- 1994 Mercury Cougar XR7, 3.8L, all stock
Update: As one of the smarter moderators on this site told me, "use a #10 screw". I measured the screw I used for pulling the injector filters (I pulled out of my screw can) and I'll be a monkey's uncle, it was a #10 screw! 1/2" long, Phillips head.
If I do this again, I will include a few things:
1. A smaller canister to hold the cleaning fluid.
2. Fill hole, lever, something that I can open and poor fluid in.
3. Pressure release valve. I had gas all over me after trying to slowly release pressure by slowly removing the injector from the hose.
Other than that, the peanut butter jar with a hole in the lid and a rubber grommet for the hole, pressurized canister, air line pressure valve and the a fuel injector test cleaner kit worked great to see that the injectors were spraying correctly and got cleaned out. the ability to set various pressures for the sprays and how they spray was priceless. B-12 Chemtool Fuel Injector Cleaner is recommended for a cleaning agent but be careful, it will strip the paint of anything it sits on for less than a minute. The chemical is clear, but after spraying the injectors, the used Berryman's was yellow, like a dehydrated hiker...
I have a few more tricks I learned and I will share them, right here, same channel, same time (well maybe not the same time).
Attachments
![20240818_113611[1].jpg](/data/attachments/7/7164-30bfc3f1a3fae8ddf4b4b3d9fa5e7408.jpg?hash=ML_D8aP66N)
![20240818_124650[1].jpg](/data/attachments/7/7165-4ef119e043a9fa65c042a21492b798b1.jpg?hash=TvEZ4EOp-m)
- Joined
- Oct 2, 2023
- Messages
- 1,688
- Location
- New Mexico
- Cars in Garage
- 1
- Vehicle Details
- 1994 Mercury Cougar XR7, 3.8L, all stock
I mentioned earlier about some tricks I found helpful. There are lots of ways to assemble injectors, but this is the way I found worked for me with the items I had in my garage.
1. When putting on the new filter and Pintle cap, first assemble the spacer and O-rings, then press the filter in with your finger so it won't fall on the floor. Press the Pintle cap on with your finger as well, tight enough so it does not fall on the floor.

2. Use a piece of rubber from an innertube or other type of material that covers the injector from top to bottom to protect the parts.
3. Using a large (I mean LARGE) pair of plyers, place the injector with the top and bottom covered in the rubber and slightly press the filter and Pintle cap on. DO NOT press too hard, just enough to press the parts into place.

![20240818_152129[1].jpg](https://forum.birdcats.com/data/attachments/7/7179-3ab1bc1c507a8eead83f3ecc05dede4f.jpg?hash=OrG8HFB6ju "20240818_152129[1].jpg")
4. Check for equal install and if either part is uneven, you can press again with the plyers or use a small ball-peen hammer (4 oz) and tap the remaining part into place.
5. Using a magnifying glass (or, if you have 20/20 vision) inspect the top of the filter ring for damage and equal seating. Do the same for the Pintle.
It is wise to test the injector again to test for spray patterns to see if the injector has changed spray patterns after installing the Pintle and filter.
I did try a vice, but felt it did not give the same results as a pair of plyers. I also tried the small hammer and did not like the results. It does not take much to get the parts on, but pressing them with your hand / fingers may not be enough pressure to seat them correctly.

Hope this helps someone down the way.
1. When putting on the new filter and Pintle cap, first assemble the spacer and O-rings, then press the filter in with your finger so it won't fall on the floor. Press the Pintle cap on with your finger as well, tight enough so it does not fall on the floor.
2. Use a piece of rubber from an innertube or other type of material that covers the injector from top to bottom to protect the parts.
3. Using a large (I mean LARGE) pair of plyers, place the injector with the top and bottom covered in the rubber and slightly press the filter and Pintle cap on. DO NOT press too hard, just enough to press the parts into place.
4. Check for equal install and if either part is uneven, you can press again with the plyers or use a small ball-peen hammer (4 oz) and tap the remaining part into place.
5. Using a magnifying glass (or, if you have 20/20 vision) inspect the top of the filter ring for damage and equal seating. Do the same for the Pintle.
It is wise to test the injector again to test for spray patterns to see if the injector has changed spray patterns after installing the Pintle and filter.
I did try a vice, but felt it did not give the same results as a pair of plyers. I also tried the small hammer and did not like the results. It does not take much to get the parts on, but pressing them with your hand / fingers may not be enough pressure to seat them correctly.
Hope this helps someone down the way.
Why does the screw need to be short?Yes, the screw must be short and it needs to screw in snug or it will pop out under pressure or if too long, the tool will not enough force to pop the filter out. the older the injector is, the more the filter has become entrenched in the injector. I will see if I can get the screw thread size I used.
- Joined
- Oct 2, 2023
- Messages
- 1,688
- Location
- New Mexico
- Cars in Garage
- 1
- Vehicle Details
- 1994 Mercury Cougar XR7, 3.8L, all stock
In the pic above of the injector with the screw and washer with a Panel Clip Plier, the distance the two parts of the Panel Clip PlierWhy does the screw need to be short
In the pic above of the injector with the screw and washer with a Panel Clip Plier, see the distance between the electrical connector of the injector and the large washer? The shorter that distance is, the more force you can apply on the plier to pop the filter out. They are stuck in there, believe me. When you put new ones, you have to press them in, they don't just pop in.
Hope that helps.
Grog6
Moderator
- Joined
- Sep 22, 2023
- Messages
- 4,701
- Location
- Harriman, TN
- Cars in Garage
- 1
- Vehicle Details
- 2x 1996 Cougars, 1997 Tbird 4.6's all.
A #10 sheet metal screw has coarse treads, and you're hooking a thread under the metal ring at the top of the filter, and popping it out of the groove it snaps into. Putting them in, I press them on a table.
Last edited:
- Joined
- Oct 2, 2023
- Messages
- 1,688
- Location
- New Mexico
- Cars in Garage
- 1
- Vehicle Details
- 1994 Mercury Cougar XR7, 3.8L, all stock
Yeah, you must be stronger than I am and braver that you won't screw up the table top...A 310 sheet metal screw has coarse treads, and you're hooking a thread under the metal ring at the top of the filter, and popping it out of the groove it snaps into. Putting them in, I press them on a table.
I was able to use a screw and pull it out by hand. Longer screw helps in that situation. Whatever way works man as long as you got them outIn the pic above of the injector with the screw and washer with a Panel Clip Plier, the distance the two parts of the Panel Clip Plier
In the pic above of the injector with the screw and washer with a Panel Clip Plier, see the distance between the electrical connector of the injector and the large washer? The shorter that distance is, the more force you can apply on the plier to pop the filter out. They are stuck in there, believe me. When you put new ones, you have to press them in, they don't just pop in.
Hope that helps.
- Joined
- Oct 2, 2023
- Messages
- 1,688
- Location
- New Mexico
- Cars in Garage
- 1
- Vehicle Details
- 1994 Mercury Cougar XR7, 3.8L, all stock
Amen brother....I was able to use a screw and pull it out by hand. Longer screw helps in that situation. Whatever way works man as long as you got them out
- Joined
- Oct 2, 2023
- Messages
- 1,688
- Location
- New Mexico
- Cars in Garage
- 1
- Vehicle Details
- 1994 Mercury Cougar XR7, 3.8L, all stock
"Well... I'll be dipped!"
Last night after I warmed up the car, I put the tester on it. I cleared the codes, ran the key on, engine running test and got the same dame codes. The only that changed since I started getting these codes where the injectors.
I did some more research on my injectors, the ones in the car and the ones I pulled from a 94 3.8l Cougar.

The Denso 195500-2630/ FordF3DZ-9F593 injectors pulled from 94 Cougar
The Ford F1ZE-B4C are in my Cougar now.
Hmmm... could this be the cause of my 137 / 173 rich fuel codes? I would think with a lack of fuel it would be lean. But if the injector is being pumped with more fuel, then wouldn't the PCM read from the injector that it is too much fuel?
Last night after I warmed up the car, I put the tester on it. I cleared the codes, ran the key on, engine running test and got the same dame codes. The only that changed since I started getting these codes where the injectors.
I did some more research on my injectors, the ones in the car and the ones I pulled from a 94 3.8l Cougar.
The Denso 195500-2630/ FordF3DZ-9F593 injectors pulled from 94 Cougar
The Ford F1ZE-B4C are in my Cougar now.
Hmmm... could this be the cause of my 137 / 173 rich fuel codes? I would think with a lack of fuel it would be lean. But if the injector is being pumped with more fuel, then wouldn't the PCM read from the injector that it is too much fuel?
Last edited:
Grog6
Moderator
- Joined
- Sep 22, 2023
- Messages
- 4,701
- Location
- Harriman, TN
- Cars in Garage
- 1
- Vehicle Details
- 2x 1996 Cougars, 1997 Tbird 4.6's all.
24 pound injectors would make a stock 4.6 run rich, but idk on a 3.8. everything I see says 19 lb, which are orange.
- Joined
- Oct 2, 2023
- Messages
- 1,688
- Location
- New Mexico
- Cars in Garage
- 1
- Vehicle Details
- 1994 Mercury Cougar XR7, 3.8L, all stock
But even the current injector is not 19lbs. Damn hard to find good info on the OEM injectors for that car. Yeah, it would seem the current injectors at 14lbs would run lean, but then again, not a that knowledgeable in injector and fuel flow.
What I read about the 137/173 is the PCM is not getting the information that the engine is warmed up and the TB is open. I thought i would start checking with the wiring for the air charge temp sensor and AGAIN go over the TPS and IAC. To check the wiring, I would need to pull the upper intake. The O2's are working, they are reporting the engine is running rich. Everything else has been replaced over the last couple of years. I don't believe it is the MAF because if I disconnect it, it runs like crap, so it is sending signal to the PCM. A real head banger. No mis-fire, no idiot light, no rough idle (just a bit, but it has 150k on this engine), none of the problems associated with the codes I am getting. It runs fine, and has power warm or cold. AARRGGGHHHH!!!!! Maybe I am expecting too much out of an old car. But I really want to fix those codes.
What I read about the 137/173 is the PCM is not getting the information that the engine is warmed up and the TB is open. I thought i would start checking with the wiring for the air charge temp sensor and AGAIN go over the TPS and IAC. To check the wiring, I would need to pull the upper intake. The O2's are working, they are reporting the engine is running rich. Everything else has been replaced over the last couple of years. I don't believe it is the MAF because if I disconnect it, it runs like crap, so it is sending signal to the PCM. A real head banger. No mis-fire, no idiot light, no rough idle (just a bit, but it has 150k on this engine), none of the problems associated with the codes I am getting. It runs fine, and has power warm or cold. AARRGGGHHHH!!!!! Maybe I am expecting too much out of an old car. But I really want to fix those codes.
Last edited: