You are using an out of date browser. It may not display this or other websites correctly.
You should upgrade or use an alternative browser.
You should upgrade or use an alternative browser.
What did you do with your Thunderbird Today?
- Thread starter Trunk Monkey
- Start date
MadMikeyL
Administrator
Got a link to the bulbs you used? What was involved in wiring it up?
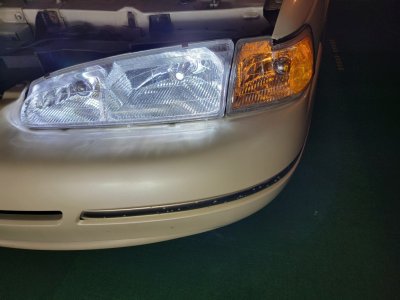
Switchback bulb I used for the inner -
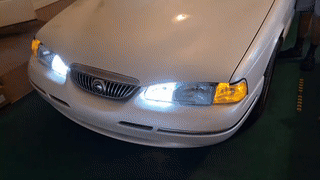
The switchbacks are set up to turn off the white running lights when the amber bulb side is fed voltage.
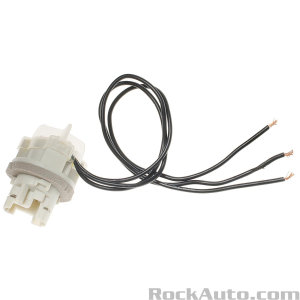
Only other thing I had to do is get a 3-wire harness for the bulb. I tapped off the corner lights with a quick splice for the turn signal input. It's a pretty simple setup
Headlight bulbs are HID retrofits from 2015..... I'd get LEDs these days but they still work fine so I am keeping them for now
Amazon.com: 3157 3057 3357 4157 Turn Signal White Yellow Amber Switchback Led Light Bulbs 22 SMD with Projector, for Standard Socket, Not CK, Pair of 2 : Automotive
Buy 3157 3057 3357 4157 Turn Signal White Yellow Amber Switchback Led Light Bulbs 22 SMD with Projector, for Standard Socket, Not CK, Pair of 2: Turn Signal Bulbs - Amazon.com ✓ FREE DELIVERY possible on eligible purchases
www.amazon.com

Only other thing I had to do is get a 3-wire harness for the bulb. I tapped off the corner lights with a quick splice for the turn signal input. It's a pretty simple setup
Headlight bulbs are HID retrofits from 2015..... I'd get LEDs these days but they still work fine so I am keeping them for now
LukesCougar
3rd Gear Poster
- Joined
- Dec 27, 2023
- Messages
- 172
- Location
- Olney Illinois
- Vehicle Details
- 1997 Thunderbird LX 4.6 Limited edtion - 1996 Cougar Xr7 4.6
Delivered some pizzas. Lol. not too exciting. Did install some led interior lamps and try to clean up the seats and interior best i could.
LukesCougar
3rd Gear Poster
- Joined
- Dec 27, 2023
- Messages
- 172
- Location
- Olney Illinois
- Vehicle Details
- 1997 Thunderbird LX 4.6 Limited edtion - 1996 Cougar Xr7 4.6
Those headlights look mint. Im gonna miss my cougar. Its got bad rust and might become a full time parts car. Then whatever a yard would give me for a beat up n empty shell.New headlights installed, and slight mod. The inner marker lights now have a switchback LED, and function the same as the turn signals. They are very close to the same color spectrum, 5000k.
1997ThunderbirdLXV6
Seasoned PostWhore
Ok, I love the look! But...
As I said, I'm concerned about the white inboard lights being tied to parking lights, because that's exactly what I had before I added a DRL relay. The result was that people constantly flashed their high beams at me at night.
To provide some background, back then I had white Zevo bulbs in there. I wanted some sort of DRL solution, so I swapped the minor feed in the two inboard sockets into the (unused) major slot, and I simply drove with parking lights on during the daytime. These bulbs produce a very bright white light, and I was happy with the DRL effect. Problem was, I had no way to deactivate them at night.
Then people on here explained to me how to wire a standard 5-pin relay, which I had never even heard of before.
My recommendation is:
Now...the keen reader will criticize me for powering the DRLs directly from that ignition feed without additional fuse. With the Zevo bulbs, I considered that a non-issue because they really are just that: bulbs, with an extremely low draw. Your switchbacks may be different.
By the way, which 9007s are those? I really need a bulb upgrade for my low/high beams.
As I said, I'm concerned about the white inboard lights being tied to parking lights, because that's exactly what I had before I added a DRL relay. The result was that people constantly flashed their high beams at me at night.
To provide some background, back then I had white Zevo bulbs in there. I wanted some sort of DRL solution, so I swapped the minor feed in the two inboard sockets into the (unused) major slot, and I simply drove with parking lights on during the daytime. These bulbs produce a very bright white light, and I was happy with the DRL effect. Problem was, I had no way to deactivate them at night.
Then people on here explained to me how to wire a standard 5-pin relay, which I had never even heard of before.
My recommendation is:
- Obtain a standard 5-pin relay
- Pin 30: For power-in, use an ignition feed, e.g., from the washer fluid level sensor or coolant level sensor
- Pin 87a: Wire power-out/relay not triggered to the minor input of the inboard sockets (=the old parking light feed)
- Pin 87: Leave the pin for power-out/relay triggered empty
- Pin 86: Wire the relay trigger as:
- Either parking light feed; this will turn off your DRLs when parking lights are on
- Or low beam feed; this will turn off your DRLs when low beams are on, but turn them back on as supplemental high beams, a neat touch
- Pin 85: Wire the relay to ground
Now...the keen reader will criticize me for powering the DRLs directly from that ignition feed without additional fuse. With the Zevo bulbs, I considered that a non-issue because they really are just that: bulbs, with an extremely low draw. Your switchbacks may be different.
By the way, which 9007s are those? I really need a bulb upgrade for my low/high beams.
1997ThunderbirdLXV6
Seasoned PostWhore
The switchbacks are set up to turn off the white running lights when the amber bulb side is fed voltage.
They also seem to have a delay feature of one second or so. Otherwise it would alternate between amber and white with every blink of the turn signal. Which is interesting because that's similar to the GM relay I ultimately went to, which gives me that delay with Zevo bulbs. Pretty cool that they put all that technology into the bulb.
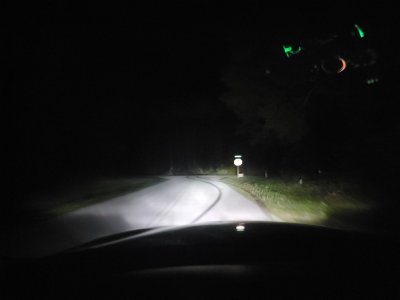
That's defiantly a downside to this setup, it appears that the high beams are on with the headlights.
Where I live in the wild west of Florida, it's not an issue. People drive around here with light bars on, and all sort of weird spectrum bulbs.. no one cares including the police. lol
The 9007s are an old HID kit. I don't know if they make them anymore, they were not as common. They have a solenoid in the bulb which pushes the bulb out a bit farther for the high beams. It actually makes a clicking noise when turning on high beams or flashing them.
HIDs are/were kind of unpopular because of glare, but I adjusted the headlights down a bit and haven't had issues. They are overall much brighter than any bulb I have used.
If I were to get new bulbs I would look into LEDs. They have some with very close patterns to the original 9007 design, and have high beam built in as well.
I was planing to go back to SilverStar's but I couldn't do it. They just don't have anywhere near the brightness or white color of modern HID or LEDs
Where I live in the wild west of Florida, it's not an issue. People drive around here with light bars on, and all sort of weird spectrum bulbs.. no one cares including the police. lol
By the way, which 9007s are those? I really need a bulb upgrade for my low/high beams.
The 9007s are an old HID kit. I don't know if they make them anymore, they were not as common. They have a solenoid in the bulb which pushes the bulb out a bit farther for the high beams. It actually makes a clicking noise when turning on high beams or flashing them.
HIDs are/were kind of unpopular because of glare, but I adjusted the headlights down a bit and haven't had issues. They are overall much brighter than any bulb I have used.
If I were to get new bulbs I would look into LEDs. They have some with very close patterns to the original 9007 design, and have high beam built in as well.
I was planing to go back to SilverStar's but I couldn't do it. They just don't have anywhere near the brightness or white color of modern HID or LEDs
- Joined
- Sep 12, 2023
- Messages
- 5,213
- Location
- Roselle, IL
- Cars in Garage
- 1
- Vehicle Details
- 1994 Cougar XR7 DOHC TR3650
Whiteness =/= brightness. Whiteness = trendiness.
I went backwards with mine, ditched the LEDs, ditched the zevos and am back to incandescent/halogens.
I went backwards with mine, ditched the LEDs, ditched the zevos and am back to incandescent/halogens.
- Joined
- Sep 12, 2023
- Messages
- 2,460
- Location
- North Ridgeville, OH
- Cars in Garage
- 2
- Vehicle Details
- 1997 Thunderbird 4.6, 1998 Mark VIII LSC
Still rockin' my 4300k HIDs. 

1997ThunderbirdLXV6
Seasoned PostWhore
Whiteness =/= brightness. Whiteness = trendiness.
I went backwards with mine, ditched the LEDs, ditched the zevos and am back to incandescent/halogens.
I was actually considering that, but the power draw would be too much for my current DRL setup.
For the 9007s, you may have a point though. I'm not entirely convinced any LED can properly replicate an incandescent beam pattern.
- Joined
- Sep 12, 2023
- Messages
- 2,460
- Location
- North Ridgeville, OH
- Cars in Garage
- 2
- Vehicle Details
- 1997 Thunderbird 4.6, 1998 Mark VIII LSC
That's a huge reason why I never went with "brighter" bulbs. When I found projectors that fit the factory housings, it was night vision nirvana.
1997ThunderbirdLXV6
Seasoned PostWhore
That's a huge reason why I never went with "brighter" bulbs.
Well, I still think I'm due for some bulb upgrade, and I'm open to trying LEDs.
My bulbs are General Electric, presumably standard bulbs, and I wouldn't be surprised if they were the factory bulbs.
Last edited:
Generalee0527
4th Gear Poster
- Joined
- Jan 4, 2024
- Messages
- 262
- Location
- SW GA
- Vehicle Details
- 97 Tbird, pbr front brakes, Sport edition 4.6 w/ 369k total miles by me the one and only owner.
I'm intrigued in what projectors you have. I don't think I have enough of the original lens to sand clear again. I am looking for something-even a light bar for the chin knowing that is for airflow.That's a huge reason why I never went with "brighter" bulbs. When I found projectors that fit the factory housings, it was night vision nirvana.
- Joined
- Sep 12, 2023
- Messages
- 2,460
- Location
- North Ridgeville, OH
- Cars in Garage
- 2
- Vehicle Details
- 1997 Thunderbird 4.6, 1998 Mark VIII LSC
I bought them off feeBay in 2009, then they vanished from all storefronts until a few years later and I picked up a spare set. The second kit I bought went by the model G1, but it seems there are knockoffs of that even nowadays which might make it tricky to find exactly the right casting that fits. With LEDs largely supplanting the HID fad, they will probably be harder to find.
Some photos of the install from WBW...
I will say that the first kit I bought was 6000k because at the time I read somewhere it was the "purest" white. Not so; I switched out for 4300k not long after, and was (and have been) much more pleased with that color temp.
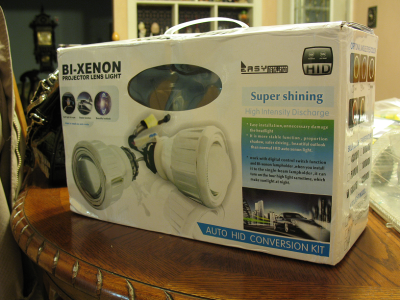
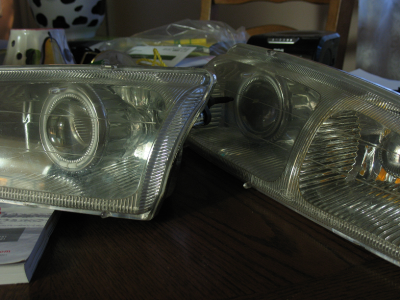
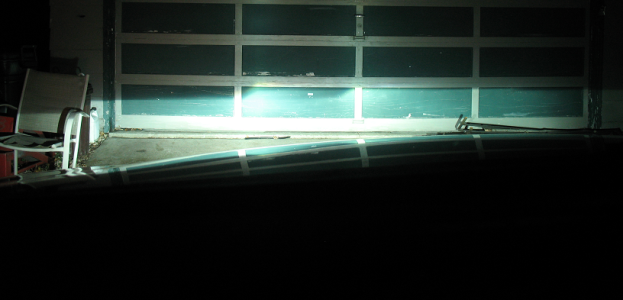
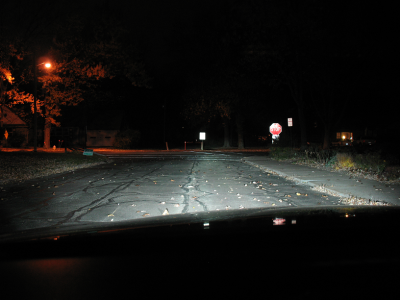
Some photos of the install from WBW...
I will say that the first kit I bought was 6000k because at the time I read somewhere it was the "purest" white. Not so; I switched out for 4300k not long after, and was (and have been) much more pleased with that color temp.


1997ThunderbirdLXV6
Seasoned PostWhore
Super Shining!!
Right!
Before doing something more than a simple drop-in bulb replacement, I'd recommend new Eagle Eyes (ideally Depo if those are still available, but I consider Eagle Eyes to be a good aftermarket brand as well) or professionally refurbished OEM Ford housings, which is what I got. Otherwise, you're just directing the output of bright bulbs through cloudy housings that will scatter the light and produce suboptimal results. At some point, repeated polishing will have removed so much material and no longer be smooth on a microscopic level that it's better to get new housings.
Also, apply clear headlight film to the housings so the lenses on the new housings don't get sandblasted and cloudy over time. As you would do with PPF, replace the film every 5-10 years so you have a fresh new wear layer while your headlights still look new underneath. Headlight film is basically PPF but thicker and with UV protection. I've had my retro since 2017 and the housing lenses still look immaculate.
I wouldn't count on LED projectors as an option. I haven't paid much attention to how that technology has progressed, but Morimoto definitely doesn't have anything that fits in the '96-97 headlight housing, and most LED bulbs are too cool of a color temperature for my liking anyway. The M LED 2.0 is 6300K. I prefer to stay in the 5000-5500K range, which is a benefit of HID bulbs because you have more flexibility to pick bulbs in your desired color temperature.
Higher-end LED drop-in bulbs are probably fine these days, but I still don't really trust them for low beam use. They'll never perform as well as a projector retrofit in terms of total lux output.
My HID projectors are the Morimoto Mini H1 7.0. The current version is the 8.0. I can easily find its dimensions at The Retrofit Source, but I'm not having as easy of a time looking up the dimensions of the 7.0 for comparison. TRS doesn't list the 7.0 anymore, but it's supposedly 6 mm shorter overall. However, the difference should be in the collar depth, because the housing depth is listed as the same as the 8.0 (115 mm).
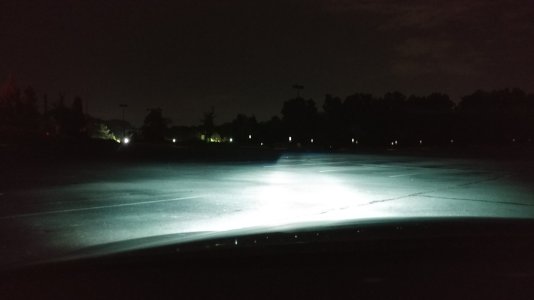

- Joined
- Sep 12, 2023
- Messages
- 5,213
- Location
- Roselle, IL
- Cars in Garage
- 1
- Vehicle Details
- 1994 Cougar XR7 DOHC TR3650
Before doing something more than a simple drop-in bulb replacement, I'd recommend new Eagle Eyes (ideally Depo if those are still available, but I consider Eagle Eyes to be a good aftermarket brand as well) or professionally refurbished OEM Ford housings, which is what I got. Otherwise, you're just directing the output of bright bulbs through cloudy housings that will scatter the light and produce suboptimal results. At some point, repeated polishing will have removed so much material and no longer be smooth on a microscopic level that it's better to get new housings.
Also, apply clear headlight film to the housings so the lenses on the new housings don't get sandblasted and cloudy over time. As you would do with PPF, replace the film every 5-10 years so you have a fresh new wear layer while your headlights still look new underneath. Headlight film is basically PPF but thicker and with UV protection. I've had my retro since 2017 and the housing lenses still look immaculate.
I wouldn't count on LED projectors as an option. I haven't paid much attention to how that technology has progressed, but Morimoto definitely doesn't have anything that fits in the '96-97 headlight housing, and most LED bulbs are too cool of a color temperature for my liking anyway. The M LED 2.0 is 6300K. I prefer to stay in the 5000-5500K range, which is a benefit of HID bulbs because you have more flexibility to pick bulbs in your desired color temperature.
Higher-end LED drop-in bulbs are probably fine these days, but I still don't really trust them for low beam use. They'll never perform as well as a projector retrofit in terms of total lux output.
My HID projectors are the Morimoto Mini H1 7.0. The current version is the 8.0. I can easily find its dimensions at The Retrofit Source, but I'm not having as easy of a time looking up the dimensions of the 7.0 for comparison. TRS doesn't list the 7.0 anymore, but it's supposedly 6 mm shorter overall. However, the difference should be in the collar depth, because the housing depth is listed as the same as the 8.0 (115 mm).
View attachment 11161
Does that film have enough flex to go over the alignment nubs or do they need to be ground down first? My new GM lights are eagle eyes and haven’t yet seen daylight so I’d like to put something on them. I planned to use 2k clear but I’d way rather use something removable
You'd probably want to punch a hole in the film like a camera cutout on a phone screen protector to have the nubs poke through, or grind down the nubs. The refurbished OEM housings I got had them completely chopped off and smoothed out so you wouldn't have known they were ever part of the stock housings.Does that film have enough flex to go over the alignment nubs or do they need to be ground down first? My new GM lights are eagle eyes and haven’t yet seen daylight so I’d like to put something on them. I planned to use 2k clear but I’d way rather use something removable
- Joined
- Sep 12, 2023
- Messages
- 5,213
- Location
- Roselle, IL
- Cars in Garage
- 1
- Vehicle Details
- 1994 Cougar XR7 DOHC TR3650
1997ThunderbirdLXV6
Seasoned PostWhore
Took it in for its annual safety inspection, and it passed. Yay!
- Joined
- Sep 13, 2023
- Messages
- 1,351
- Location
- Franklin, MA
- Cars in Garage
- 1
- Vehicle Details
- 1997 Thunderbird LX 3.8L/4.2 Wannabe
Took it out of the cocoon yesterday and it started right up. Not evidence of unwanted visitors over the winter months! 
Swapped the Sport rims back on it today. Needs a good cleaning too.
Joe

Swapped the Sport rims back on it today. Needs a good cleaning too.
Joe
Grog6
Moderator
- Joined
- Sep 22, 2023
- Messages
- 4,426
- Location
- Harriman, TN
- Vehicle Details
- 2x 1996 Cougars, 1997 Tbird 4.6's all.
I'm out pumping gas. Can #3, lol. This one seems less syrupy ,lol.
- Joined
- Sep 13, 2023
- Messages
- 1,351
- Location
- Franklin, MA
- Cars in Garage
- 1
- Vehicle Details
- 1997 Thunderbird LX 3.8L/4.2 Wannabe
Greg,
Have you emptied the tank yet? Seems like you've been at this for a while!
Joe
Have you emptied the tank yet? Seems like you've been at this for a while!
Joe
Chingon1
5th Gear Poster
@XR7-4.6 what you got going on?? Looks dope. Your running coil packs??
Got the bird running today, finally got the correct BOV spring and grounded the coil pack to the starter. Runs waaaay better. Still needs tune tho.
Question, i somewhat remember you guys sayin it’s better to tune one thing at a time? Like tune mad first then install injectors and tune for that after. On the SCT program it has value files for both the MAF and 47lb injectors.
1997ThunderbirdLXV6
Seasoned PostWhore
Oil change. The 4th with Valvoline Restore & Protect. It continues to come out very dirty, which I suppose means is working as designed.
Instead of using the usual Motorcraft filter, I went for the blue Fram, which is their highest end filter. They're currently $5 at Walmart, apparently because Walmart will stop carrying the blue line (?).
Instead of using the usual Motorcraft filter, I went for the blue Fram, which is their highest end filter. They're currently $5 at Walmart, apparently because Walmart will stop carrying the blue line (?).

