The Unofficial "Ask a Stupid Question" Thread

Are with Matt on this one. I think if you routered the edges and then painted in plasti-dip, you'd have a close match to the stock black. The difficult part might be how to attach it
 
I think this should qualify as a stupid question:

Can you bleed the brakes one side at a time?

The maintenance manual specifies to bleed RR>FL>RL>FR.

...but I don't have stands, just ramps.

So my plan was to do it during my tire rotation, which I can do with two jacks, mine and my roommate's. But I'd bleed RR>FR>RL>FL.

I know, I should get stands. Remember, this is a budget operation.

There aren't any adverse braking symptoms, but the fluid is quite dark.
 
Can you? Sure. But there's a greater risk of not getting stubborn air bubbles out of the system if you don't do it in the order of furthest-closest.

I typically go RR, LR, RF, LF (shortest to closest to the MC).
 
I think this should qualify as a stupid question:

Can you bleed the brakes one side at a time?

The maintenance manual specifies to bleed RR>FL>RL>FR.

...but I don't have stands, just ramps.

So my plan was to do it during my tire rotation, which I can do with two jacks, mine and my roommate's. But I'd bleed RR>FR>RL>FL.

I know, I should get stands. Remember, this is a budget operation.

There aren't any adverse braking symptoms, but the fluid is quite dark.
Well I'm sure others will have their opinion. But it wouldn't bother me to do it in the order you want to.
Quite frankly when I open up a brake system and have to bleed it like when doing master cylinders. I usually try to bleed the driver front side first to get the bulk of the air and old fluid out there. That way I'm not trying to flush the capacity of the master cylinder all the way to the rear.
 
Can you? Sure. But there's a greater risk of not getting stubborn air bubbles out of the system if you don't do it in the order of furthest-closest.

I typically go RR, LR, RF, LF (shortest to closest to the MC).

Yeah, but...

The Ford workshop manual doesn't go furthest to closest. Instead it says that there are two circuits, one being rear/right+front/left, the other being rear/left+front/right. They want you to bleed one circuit, then the other.

At least that's how I understood it.
 
Also, since you are only flushing the old brake fluid and not replacing calipers or master cylinder. You aren't going to be trying to get a bunch of air bubbles out anyway. You are simply trying to get from dirty to clean. Along with no air bubbles.
 
I bleed and flush lots of brakes regularly. I like to use a clear plastic soda or water bottle to catch the fluid. Use some vacuum hose or you can get clear hose from Lowes/HomeDepot so you can see the fluid stream going from the caliper into the bottle. The dirty old fluid and new fluid doesn't really mix in the bottle so you can see when it is all clean. I put a little fresh fluid in the bottom of the clear bottle stick the hose in the fluid. Then crack open the bleeder then gently pump the brakes. When you are doing this do not pump the shit out of the brake pedal. Don't pump to the floor. Gentle pumps like you are just slowly stopping the car.
 
Retorquing lug nuts...

The other day, I did my first ever tire rotation on my own. Manual calls for 85-105 lb-ft. I settled for 90.

Today, about 900 miles later, I retorqued the nuts, again with torque wrench set to 90.

I didn't notice any movement of the nuts except on the front left wheel, where at least two nuts gave a couple of degrees before the wrench clicked.

I mean I guess that's why retorquing is a thing in the first place. Still worries me a bit.

Should I go higher? Generally when a torque range is provided, I tend to settle for the low end, so not to put unnecessary stress on the components.
 
Don’t overthink it too much, click type torque wrenches don’t really register inertia so a few degrees could just be you putting a little more oomph into your push. I do 90 as well, better that than the assholes who use impacts on lugnuts
 
I stopped a guy once as he was going to do that, without looking to see if anyone was looking. I went the fuck off!
 
Yes, overtorquing can cause warped rotors and even bent wheels or even breaking studs. Then you can damage lugnuts trying to remove them, especially if they've been on there for a while.
 
I guess this isn’t really a stupid question, but does anyone here do 3D printing? I’d like to make some sort of aftermarket gauge holder under the radio cubby spot.
I suppose I could just glue a piece of abs plastic to the cubby, but I’m too ocd for that kind of tackiness. 😅
If you want to try this, check your local library.
A lot of them have 3D Printers you can check out time on and just bring the necessary file to print.
Then you get some basic CAD SW, like SketchUp, maybe starting with a model you want from thingiverse, and go to town.
I have a friend who is really into it (for a whole year he was the top seller of coronavirus christmas ornaments on etsy.com) who prints stuff up for me when I need it. The product, made out of PLA, is kind of useful for toys but IMO, isn't the right solution for your project. Resin printing is better (harder plastic so better suited to knobs and whatnot), but the machine is a bit more expensive and the process itself is quite smelly (you want to run it under ventilation). You also need to store a pretty big jug of IPA to use as a print cleaner.

Suggested Alternative: CAD up what you want (same suggestion as above) and send the design to sendcutsend.com for actual manufacturing.
They can cut the design out of all sorts of materials including ABS (likely the best material for your cubby) or even carbon fiber and the price is quite affordable.

Side benefit: If you know your design exactly matches your cubby, make a few extra and you can offer up the extras for sale since gauges are pretty std sizes. Even if you only make one, the cost is pretty cheap.

This is how I had the steel brackets I needed to make my motor engine mounts for my current car project. Apparently sendcutsend.com can even drill holes, counter sink and tap holes, and even bend steel as well.
 
Anyone got good recommendations for a sun blocker on the windshield when parking in the sun? (LSC, not sure if theres a difference)
 
OK...so for us ignorants: what is the problem with an impact wrench? Overtorquing?

Aside from the overtorquing it's also the uneven torque on the nuts. Either one of these by itself is enough to turn rotors into bacon, but both makes it a guarantee. :)
 
I have some custom touch up paint I ordered for my Cougar about 9 years ago. It's a two part in little jars with a brush, base coat and the pearl top coat. Somehow it's still liquid but has gotten very thick.
Would putting in a bit of regular paint thinner and shaking it up thin it out again to make it usable?
 
Where should I put the jack stands when lifting up the rear? I use the jack on the center diff mount and then I used to put them on the forward sub-frame to body mounts, but one of them is rusted out and I can't put it there any more, any ideas?
 
Where should I put the jack stands when lifting up the rear? I use the jack on the center diff mount and then I used to put them on the forward sub-frame to body mounts, but one of them is rusted out and I can't put it there any more, any ideas?
Directly on the subframe where the lower control arms attach.
 
I usually jack up on either of those forward cups or the LCA under the spring perch. If your cups are rusted, try putting the stands a few inches forward under where it bolts to the torque box, just on the inside of the pinch for the rockers.
 
Thanks guys, I ended up doing what zep 5.0 said and with a slight modification to my jack, I got the jacks stand under the place where the lower control arms mount. Now to re-do the drums that I did last summer cause the wheel cylinders leaked over the winter smh, boy I hate rust
 
You can get new rebuilt rear calipers pretty cheap on RA. And pbr fronts are cheap too.
 
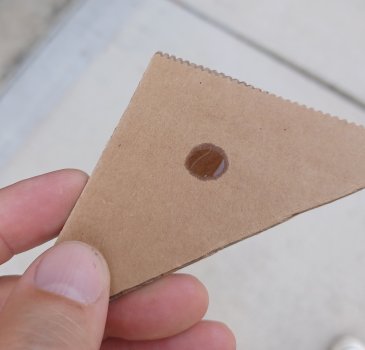
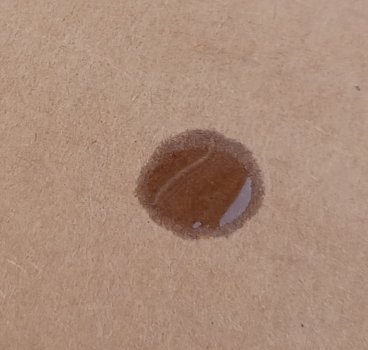
So I read on the internet about a "cardboard test" for fuel in the oil...

20240503_073036.jpg20240503_074615.jpg

One drop from dipstick. Allegedly this outer circle is fuel (?).


Reason I started reading about this test:

I'm observing one phenomenon that concerns me a bit. When running errands, i.e., consecutive very short trips, after restarting the already hot engine, especially in hot weather, I get some initial very rough idle. It can usually be cleared up quickly by revving the engine just slightly (~1,400 rpm) for a few seconds.

I had hoped that the new-to-me PCM might be a fix; alas no.

I'm reading that a leaky injector could cause such a symptom (?)

Suggestions?
 
I think you'd be able to smell it. Plus oil will soak in. Just not sure how fast. Gas would soak in quicker.

I always taste it if I'm not sure on smell. If it's a bit sweet there's antifreeze in it. Gas tastes like....gas

How has your fuel economy been? Overall power?
 
I'm observing one phenomenon that concerns me a bit. When running errands, i.e., consecutive very short trips, after restarting the already hot engine, especially in hot weather, I get some initial very rough idle. It can usually be cleared up quickly by revving the engine just slightly (~1,400 rpm) for a few seconds.
Did you have this issue before you swapped the PCM? Maybe swap the original back and see how it runs.

Joe
 

Similar threads

Back
Top