What did you do with your Thunderbird Today?

On a separate note, that video reminds me of how the amber 3157s behaved when stock, which mine haven't been for years now. The blinking behavior with the parking lights on was high-low because they were dual filament, not amber/high-off which is what I've gotten accustomed to and prefer.

I actually agree. Best turn/hazard visibility at night would be from a unit that is turn/hazard only, without parking light, i.e., bright>off>bright>off instead of bright>dim>bright>dim.

To accomplish that, I considered cutting the parking light feed from the inboard lights. But I haven't really made up my mind about it.
The outboard lights need the parking feed for the sidemarker function.

The Sylvania Zevos were generally good in that regard, but I hated how the Zevo's beam pattern caused a dark shadow in the middle of the red corner lens, which I called the black hole.

I solved the black hole issue by using an ever so slightly longer socket from a 90s Town Car taillight.

And that's why a separate amber rear blinker is preferable and the norm everywhere outside of the US.

Very true.
 
  • Like
Reactions: Irv
@XR7-4.6
I actually found it on my phone. Sorry, it's blurry, but you get the idea.

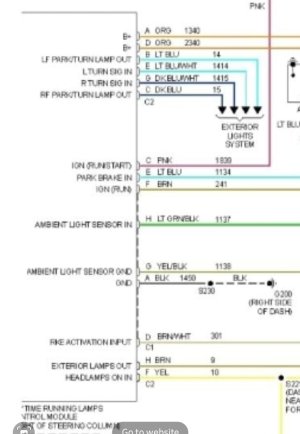
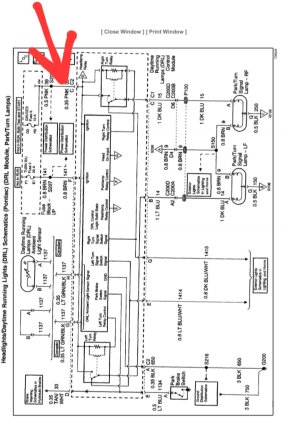
The module comes with two connectors, C1 and C2. Note that on this visual, the top six wires and the bottom two wires are C2; all others are C1. The diagram comes from a 2004 Chevy Venture.

Screenshot_20240819_010709_Gallery.jpg

Going from top to bottom:
  • Orange: not needed
  • Orange: not needed
  • Light blue: to one turn signal bulb
  • Light blue/white: from one turn signal feed from MFS
  • Dark blue/white: from other turn signal feed from MFS
  • Dark blue: to other turn signal bulb
  • Pink: Ignition feed (for DRL power)
  • Light blue: Ignition feed (to fool module into thinking parking brake is released; if you wanted, you could actually wire this to turn off DRLs when parking brake is on, but why bother?)
  • Brown: not needed
  • Light green/black AND yellow/black: connect to each other (to fool module into thinking that ambient light sensor is installed and sun is shining; this is how GM cars without automatic lights are actually wired.)
  • Black: ground
  • Brown/white: not needed
  • Brown: not needed
  • Yellow: headlights feed
 
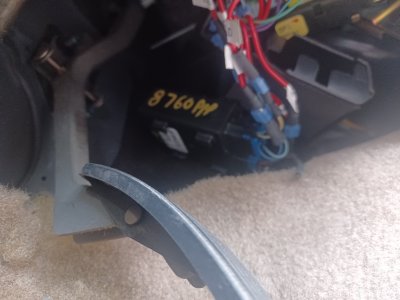
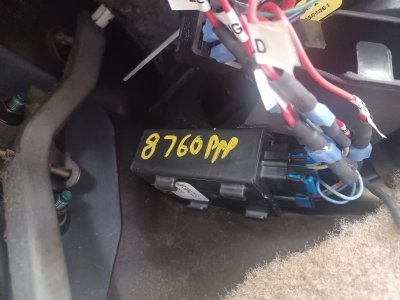
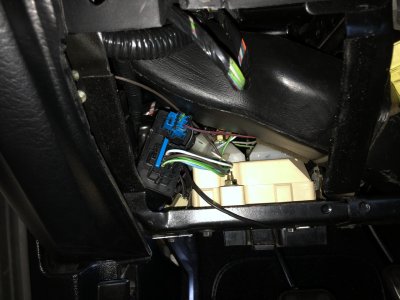
Here are pics to show where the unit lives. It's attached with velcro to the air duct. (Ignore the yellow writing; that's just junkyard warranty stuff.)

20240819_115120.jpg

The small relay you see top center in the pic below is unrelated to the DRLs. It controls the switch from always-on bright cluster backlighting to dimmable backlighting with headlights on.

Also visible on this pic is my half inch throttle cable spacer, for dramatically improved throttle response. 8-):LOL:

20240819_115130.jpg

The choice to install this in the cabin instead of under the hood came ultimately down to practicality. I needed a constant headlights feed (which stays on even when high beams are on), and I'm not sure if such a feed exists under the hood. I already had a channel through the firewall. And the unit is safe from the elements.
 
Yep didn’t even bring my tools!

So you cut the wires with your teeth?! Ewww. :p

The good thing is that they're right there under the dash. No tools needed.


Side note: same period Camaro/Firebird use a similar unit, but it may have some functional differences. It is located behind the radio head unit.
 
So you cut the wires with your teeth?! Ewww. :p

The good thing is that they're right there under the dash. No tools needed.


Side note: same period Camaro/Firebird use a similar unit, but it may have some functional differences. It is located behind the radio head unit
...the one thing to watch for: there are  two light blue wires. See my list above. Make sure not to mix them up.

I used my switchblade after I got tired of gnawing lol

The other light blue is the one on the smaller connector, I deduce? Edit I just noticed the alphabet printed on the connectors corresponding to the diagram, that makes things easy
 
Last edited:
"Funny thing happened on the way to an appointment today..."

The car was driving fine when I left the house. About a couple miles down the road, I noticed a slight studder in the engine. As drove it kept getting worse until I was able to pull into a Chevron station. I figured it had to with something I worked on the other day. I started pushing in on plug wires, and it still would barely start, like several plugs were disconnected and it lost a cam or something. So I called the wife to have her come get me then I would go home, get some tools and go back to work on it. I checked the wires one more time and felt a little pop in the cap, like a plug was just not quite connected. I went to move the car out of the way of customers and it started and ran fine. I drove it home after making a new appt on the phone.

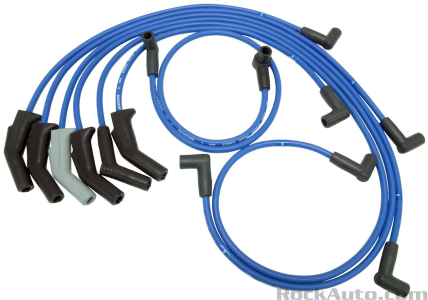
These plug wires I had in there was some POS mix n match from RockAuto close out. Like the had a box with a few wires mising and stuck some in from a chevy or something. I was looking in the two new boxes of wire sets I have and "I'll be dipped"... the box labeled NAPA plug wires turned out to be AutoLite plug wires... SCORE! New wires going NOW!
 
I just noticed the alphabet printed on the connectors corresponding to the diagram, that makes things easy

Correct!

If you want a really clean installation, instead of cutting the unneeded wires, pull out the little plastic tab, then use an eyeglass flathead to remove the entire pin from the connector.
 
Correct!

If you want a really clean installation, instead of cutting the unneeded wires, pull out the little plastic tab, then use an eyeglass flathead to remove the entire pin from the connector.

Oh yeah I know the trick haha. These GM connectors are tight! But I got them. A few weirdly were already not in them like the brown/white. Must have been an omitted option in this particular van(Pontiac Montana in this case)
 
"Funny thing happened on the way to an appointment today..."

The car was driving fine when I left the house. About a couple miles down the road, I noticed a slight studder in the engine. As drove it kept getting worse until I was able to pull into a Chevron station. I figured it had to with something I worked on the other day. I started pushing in on plug wires, and it still would barely start, like several plugs were disconnected and it lost a cam or something. So I called the wife to have her come get me then I would go home, get some tools and go back to work on it. I checked the wires one more time and felt a little pop in the cap, like a plug was just not quite connected. I went to move the car out of the way of customers and it started and ran fine. I drove it home after making a new appt on the phone.

These plug wires I had in there was some POS mix n match from RockAuto close out. Like the had a box with a few wires mising and stuck some in from a chevy or something. I was looking in the two new boxes of wire sets I have and "I'll be dipped"... the box labeled NAPA plug wires turned out to be AutoLite plug wires... SCORE! New wires going NOW!
You know I hate to leave a story without an ending.

So last night I went through the plug wires and found that with these plugs, the wire connector that connects to the spark plug was not connecting (snapping in place). No matter how far or hard you push the wire/boot into the spark plug, it is not going to make good contact. I found the #1 plug wire was not connected to the spark plug and though it was close enough to make spark, if I hit a bump, it knocks it off.

What I ended up doing (please, do not cringe, a man's gotta' do what man's gotta' do) is pull the plug wire out of the socket cover, grease the crap out of the inside of the boot with dielectric grease, push the wire back in until it comes out the other end, plug it into the spark plug so I know its connected, then slide the boot over the spark plug. I drove the Cougar to get groceries this morning and it drove fine.

Oh, the AutoLite plugs I found in a NAPA box I think they are my 2nd or 3rd set over the years and I replaced them when the spark plug boot cracked and was 'opened for sparkin'.

Long story short, WHO makes a good setup spark plug wire set that won't cost me $100? RockAuto had Motorcraft listed, but as usual, are not the ones for my car, but for distributor less ignition (clips on coil side).
 
I like the Standard Premium wires. NGK are also good. AC-Delco are probably decent too. Most manufacturers list with or without distributor. Some others list CA versus federal emissions. Did CA get DIS on the 3.8 before everyone else?
 
NGKwas the oem for the plugs,wires, and sensors, iirc.
 
Long story short, WHO makes a good setup spark plug wire set that won't cost me $100? RockAuto had Motorcraft listed, but as usual, are not the ones for my car, but for distributor less ignition (clips on coil side).
Are you looking for the 3.8 na? I did mine about five years ago, using Taylor wires meant for the Ford 302. I laid out the wires and used the six that fit the best with the least amount of slack. Been working great.

 
Are you looking for the 3.8 na? I did mine about five years ago, using Taylor wires meant for the Ford 302. I laid out the wires and used the six that fit the best with the least amount of slack. Been working great.

Excellent info, thank you. Yes, these are for the 3.8.

And thank you Grog and Kevin.

"Oh my God! They killed Kenny! YOU BASTARDS!"
 
I like the Standard Premium wires. NGK are also good. AC-Delco are probably decent too. Most manufacturers list with or without distributor. Some others list CA versus federal emissions. Did CA get DIS on the 3.8 before everyone else?
RockAuto has the Standard Premium on sale. I best get a set before they are all gone.

What I want to know is why the sets have one off colored wire, one weird shaped wire... "well... help me understand!"

1724196340201.png
 
It's the same with my set from Autozone. Weird.
And its the same for various brands! The first set I got from RockAuto, I thought they just threw pieces together from mis-matched boxes... But now I see that EVERYONE sells them this way.

What is the world coming too.... (I believe there is a reason, but I can't figure it out)
 
Took the Cougar out a few times today; she was running great... The gear shifts were crisp, trac-lok was holding tight when aggressive, and the engine sounded so smooth.
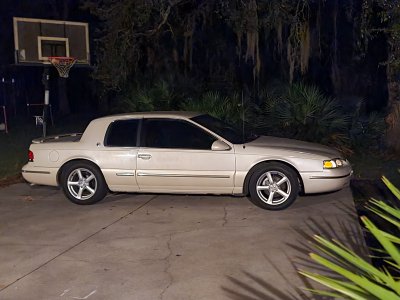
I took a picture when I went out tonight to park her back in the garage. The original paint is looking pretty nice for 28 years old. I love the way Cougars look with the notch back, so classic and unique.

cougar.jpg
 
:love: That door is so loooong. Nice ones like that, I come to realize I never see these out in the wild
 
Very nice picture! Beautiful car!

I actually love the Cougar roof line, too. But when I was shopping, none was available in my area, and frankly I love them both. The Thunderbird's lines have more of a distinct 90s beauty in my opinion, similar to Caprice Classic, Aurora, 1st generation Lexus LS, etc.

You can't argue with the practical advantages of the Cougar: better rear head room and a larger trunk opening.

@Vicinity , I actually see way more Cougars in the wild, at least twice as many as Thunderbirds. Nice ones...well, not really.

And no MN12 driver ever waves at me! >:(
 
It probably wasn’t intentional but the Cougars formal roofline on its sleek body reminds me of 58-66 Tbirds with their formal roofline and thick C pillars. I know the reality was Mercury was trying to get conquest sales from former GM G-body owners but the effect with the low aero body and raked back windshield with the formal roof is so much more distinctive than the various formal roof GMs of the 80s. Thunderbirds look great in their own right but there’s something a little too plain about the roofline, I always preferred the Fox Tbirds in that aspect
 
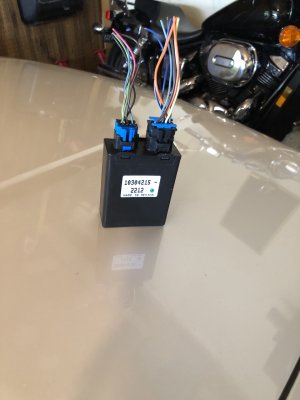
I forgot to post this last night; Done!

IMG_5647.jpeg

Had to change the run fuse to 10A since it kept blowing the 5. Probably because I’m still running the incandescent silverstars.
 
Had to change the run fuse to 10A since it kept blowing the 5. Probably because I’m still running the incandescent silverstars.

Hmmm. But you used them for turn signals, and they didn't blow a fuse.

Just to be on the safe side, I'd suggest you go back to 5A and run the unit say with just one bulb, just to make sure that it's not the module itself that's causing the fuse blow. I mean it is a 20+ year-old module after all.

Apart from that, everything works I suppose?

I used the run circuit(purple/orange), specifically I tapped into it from the EVO rotation sensor, that’s only a 5A fused circuit, where the factory turn signals and parking lights are 10A fused. I’ve got all four bulbs on DRL, and based on the way the module behaves with the ignition removed it uses that run circuit to power the bulbs, not just the module. When the fuse was blown the turn signals worked as normal.

Ultimately I plan to try LEDs again, at that point with the reduced current draw I’ll go back to the 5A fuse. For now though it works exactly the way it’s supposed to. Until then I’m not too worried about it, the wire gauge for run is the same as the stock wires going to the bulbs.
 
it uses that run circuit to power the bulbs, not just the module.

Correct.

Here's a schematic of the internals of the module. It's from a Camaro/Firebird manual, so it may not be entirely the same! But it shows how the run circuit (red arrow) directly powers the bulbs.

Screenshot_20240819_020620_Samsung Notes.jpg

I tapped into the purple/orange at the secondary junction block, which is that same 5A circuit. But I'm on LEDs, so current draw is far lower.

Well, I'm glad it worked out for you!
 

Similar threads

Back
Top