XR7-4.6's Disjointed Build Thread

If I started cleaning house in this thread, half the posts I'd be removing would be my own ?


I'm actually surprised to realize I never posted the fuel rails installed. They're 96-98 Cobra return rails, modified by the previous owner, using tabs welded on from a 99-04 returnless. I just left it as is other than jerry rigging my own mount on right rear corner one whose weld failed. Cobra rails use stock 96/7 lines.

37928


37930


37931
 
So how am I spending this unseasonably warm weekend? Doing nothing productive, of course! :D


Before

37817


After

37818
 
My final act for the heatwave. Buh bye ricer red :D

37211


37212


Should have done this in the first place, Duplicolor's cast iron engine paint is IDENTICAL to the factory finish used on these calipers new

37213


37214
 
but I like my red
Anyway, really like what you did with the shock towers. Lord knows I need to do mine, maybe this week end if the weather holds up.
I'm pretty well in the minority with my dislike for calipers painted any color in the rainbow, so don't take it personally. I don't even like it on Ferrari and Porsche. I just regretted red from day 1, and wished I could find that original grey color in a high temp variety even at the time - the closest I found to my needs on the shelfs at the time was semi-gloss black, which I tried, didn't like, and stripped off to do the red, since at least that was a factory combo(a theme in my build).


Before you start stripping undercoating from yours be sure that the undercoating is willing to come off like it was on mine, assuming not all applications are created equal(depends on dealership/shop who applied it in the first place, when it was applied and what they used), mine would chip away in chunks if I accidentally bumped it with my ratchet handle over the years, and had it been bedliner solid I wouldn't have even attempted this. Even going into it on Saturday my initial plan was to simply attempt making what's there more clean and uniform... chipping away at the "loose" areas, and painting over the remaining area with black paint. As it turned out 90% of it were loose areas and the paint underneath was perfect. :D

The tricky part, I found, is that the factory paint color coverage turns into light overspray the closer you get to the upper control arm/spring perch area, especially the driver side in my case, so the undercoating seemed to bond a lot better to the grey sealer the factory paint is applied over, than the paint itself, where it just chipped/scraped away with no chemical assistance for the majority of the project. It took me maybe 6-7 hours total to do the passenger side, and that's including the trial and error approaches, and expected maybe half that time would be taken to do the driver side, and indeed, I had the lower frame rail area fully stripped within an hour, but the stubbornness of the coating in the upper areas probably exceeded the time spent on the other side.


Have you finished your battery relocation wiring yet?
I'll post pics when it's done, I jump between tasks like whack a mole, so don't expect linear updates in this thread :tongue:
 
Most of this happened over the last few months since the last update. I've been lax on updates, but living up to the thread title a lot of these projects I'd start, move onto another and come around again to finish, which I can't imagine is satisfying to those of you reading through all of this expecting satisfactory conclusions lol

So to start in no particular order, I posted a teaser way the hell back showing my steering rack removed. Well, I had no particular idea what I was going to do there, I actually came very close to doing manual steering, but common sense told me otherwise and I decided to pursue one of my fantasy swaps

37219


I'm not sure how many of you know the significance of SPR ZM but this is a take-off low mile 03-04 Cobra Rack, the second best (first being 00 Cobra R) rack designed for SN95s, with a much stiffer torsion bar and better internal valving. A stiffer torsion bar in the pinion naturally reduces Assist by requiring more steering input to provide assist to the rack, and being a firmer link between the pinion and U joint provides more road feel. Neither of these benefits are possible by simply depowering the stock rack, whether it be by EVO or pump deletion.

37220


These racks are a bit hit or miss when it comes to remans depending on who you talk to. Cardone lists a SPR ZM rack at Rockauto, but you may get a rack with the correct body with the code, but the guts inside can be from any number of SN95 Mustangs. All Cardone promises you are the rack limiters that 03-04 Cobras have(not necessary for us, see below). I rolled the dice and went used for about the same cost just to be 100% sure. All I needed to do to mate it to the MN12 was change the bushings/sleeves to the MN12/Pinto style and use the MN12 tie rod ends - inners are exactly the same, MOOG EV127 - and the steering coupler is different - triangle shaped rather than splined (I will be posting a future update showing my changes there)

These are the rack limiters. They're simply slipped over the rack gear and stop the tie rod ends from hitting the main stops integral to the rack housing.


37221


37222


Installed

37223


Ooh, what is that shiny object lurking in the background? Perhaps another view is in order.


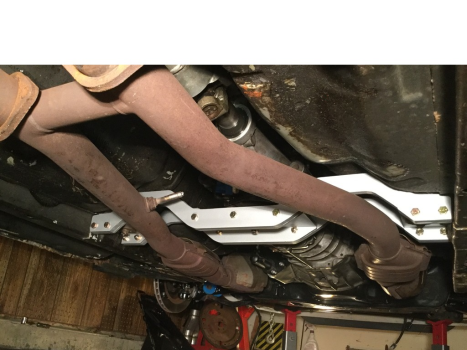
Oh yes, some of my finest sculpture to date, I don't mind saying. :) So I had this wild desire to use a Mustang midpipe assembly, because everyone says they don't fit. Well they don't, but it nearly does! And as you can guess the nearly is the factory stamped transmission crossmember. After thinking up all sorts of ways to modify it, I started googling looking for ideas and found this:

37225


X factor by American Powertrain, which are made for muscle cars with modern transmissions. I saw that they were made out of T6061 T6 aluminum, and then it occurred to me "hey I used that stuff for my K member spacers, I can make that!" And make it I did :D

37226


I basically made a cardboard template traced onto paper set up to hug the floor and mount directly to the frame without bushings(which killed two birds with one stone, my old ones were dry rotted). I forget the exact measurements but I used 1/2" T6061 T6, which seems to be thicker than the X factor but I'm not an engineer so overkill is the name of the game!

37227


37228


Suffice to say proper tools(a mill and/or a CNC machine) would have been a tad easier and maybe less messy, but I made due.

Since both sides are identical in dimension I bolted them together during the process


Once cut out came smoothing with my grinder(s)


Checking it lines up in the car


Next is the channel aluminum(also 6061 T6, 1/4" wall)


Going together like a beefy erector set

 
All this work to clear this damn pipe!


Painted and assembled with grade 8 hardware.


But wait there's more!

I had a good amount of scraps leftover, and to kill two birds with one stone I decided to make me a pair of rear caliper relocation brackets to finally use the Cobra Rotors I've had sitting around for several years.


While I was working on the back of the car taking dimensions for these I came to the quick realization that this 100K mile IRS was shot, toe comp boots were gone, UCAs had no resistance in them etc. I've been waiting for an opportunity to install my Mark VIII LCAs as well so, "when in Rome".

I finally practiced what I preached, going with Prothane LCA bushings and energy suspension knuckle bushings, and deleting the toe compensators.

Started with the knuckles, I wanted to add grease fittings and felt I should document it since there a few hacks worth sharing.


I use pieces of my harmonic balancer puller for everything, bushing removal is one of them. The energy suspension lower bushings are one piece and need assistance to install, so I put them in the same way. Slowly squeeze until the tip fully penetrates.


Btw I left the tap in the hole so the bushing won't squeeze through and tear when it passes by.

Once it eventually bottomed out on my puller, so to get it the rest of the way I used a C clamp and an old pulley on the other end.


Now with all the good suggestions to add grease fittings to these, grease distribution is often ignored. The bushings all have horizontal slats cut in already, but there's no way to distribute it. So what I did was cut a channel below the fitting into the sleeves with my expensive lathe ?


Same with the control arms, I cut wider deeper channels in these since the sleeves are much thicker, I don't want to cut so much material that they squash when torqued.


LCA and spindle bushing removal I used the balancer puller with 2-1/4" and 2-1/2" exhaust pipe sections. This is my legitimate pick for favorite tool, because it's been more useful for the dollar than anything else I own.


Grease holes being drilled and tapped


Bushings ready to go. The washers are to fill the gaps in the subframe when installed since the sleeves are longer than the bushings

Done


1694753693233.png

Ok, not done done ? Updates aplenty to come!
 
I couldn't come up with a better way to word it :D


Speaking of shafts, here's mine...


37233


So here's the thing with the Mustang Rack, the U joint can only be clocked in one direction, it's a triangle shape rather than spline. My initial steering shaft mod with a center U joint offsets the DD shafts on each end 90* from each other, which I was easily able to compensate for by turning the universal spline end at the rack 90* - Not happining with the Mustang rack and u joint.

So my solution was to buy a second 3/4 DD to 3/4 36 spline U joint(the black one) for the column end and use a splined shaft in between to completely replace the factory one, which will now allow for infinite adjustability

37234


Factory SN95 shaft/rag assembly on the left

37235


So in summary

-3/4 DD to 3/4 36 spline U joint x2 (the engine compartment one is stainless)
-Borgeson stainless steel shaft, 3/4" 36 spline x 13"
-Unisteer stainless steel DD to Ford Triangle joint

The collapsible DD shafts between the rack joint and pivot joint are recycled from the factory shaft.
 
First time in months my steering wheel has been connected to the steered wheels!

37346


37347


Rear UCAs rebuilt with the correct style bushings

37348


37349


Rear LCAs installed

37350


37351


37352


37353


Once again, big thanks to jco1835 for the rust free bolts. My stock ones came out like this :eek:

37354
 
(Edited continuing from above May 26th post above due to attachment limit)

Knuckles back on. I originally thought to just scrap the dust shields but decided to use them as they cleaned up pretty well. I did however cut off a good inch of threads from their notoriously PITA mounting bolts >:)

37335


And 11.65" rotors

37336


So much prettier

37337


Also started working on the inevitable airbox fitment issues. Believe it or not Lincoln Mark VIIIs have different core supports and aprons, earning their FN10 designation, so things are a wee bit tight when using their airbox in a MN12.

37338


Gotta go what you gotta do ?

37339


I'm going to need to embiggen the intake hole in the apron obviously, but oddly enough the speed nut mounting location actually lines right up.

37340


Started up on the very first try! :D


See less
 
Thanks! Having it warmup to temp and not hear it knocking like the old motor is quite the sense of relief and accomplishment, considering where I got this motor from.

Wheels are 20x8.5/20 x10 AMRs from American Muscle with 255/285 Sumitomos. I got a pretty good deal on them from an eBay auction.


Anyone care to guess what I did here? :)
img_1225-jpg.18322


img_1230-jpg.18330
 
Damnit, I really thought that it would take longer to figure out lol


I may as well put up a teaser...

img_1207-jpg.18346
 
I forgot a major update to this thread, the TruBendz exhaust.

Special thanks to Mike(97 30th) for going above and beyond tig welding it together for me over a weekend.

Since the front half is a stock Cobra H-pipe I decided not to run mufflers at all, because 4V:D The Pipes in the kit are 304 Stainless Steel and 2.5" in diameter, while the factory carted front half is 2.25".

As a bit of a review, the supplied hardware from Tru Bendz sucks, as the hangers they provide not only aren't a grade of stainless to match the pipes, they're also wrong for the factory rubber hangers, so I had to buy my own hardware, minus supplied clamps for the slip-on S bends. Also there is no metal supplied to join the pairs together - which is kind of necessary with duals sharing a single mount. The pipes themselves are of high quality and actually pretty light compared to my previous aluminized exhaust, but I'm am not fond of the routing/fit. I ran tailpipes straight from the S bends to the rear of the car, and naturally I wanted them positioned underneath the hangers. In order to do this I had to position the main pipes as far apart as I could in the minimal space these cars have, which required bending and beating the fuel tank shield to clear in a few spots, as well as trim some excess metal off an IRS pivot box to clear the left tube.

I'm thinking these kits are designed for offset mufflers, because put together the way it looks in pictures the pipes end up positioned very close to the diff, away from the IRS pivots, with the S bend outlets inboard, basically hugging the spare tire well. No way for straight mufflers or tailpipes to reach the hangers from there. Luckily being some assembly required, as these are notorious for, paid off in my case, since it just took some trial and error to mock it up in place before final welding.


Now for the build, front to back.

1. I use the flaired manifold ends and flanges off a factory exhaust to join to the H pipe. These are 2.25" stainless from the factory

2. Slipped over the flaired ends are a pair of slip fit 2.25" 409 stainless pipes, which are then slipped into the truebendz pipes

3. The Tru Bendz pipes are somewhat splayed out wider out front than rear for the aeformentioned figment issues. I temporarily joined them together with hanger straps and wood blocks for spacing, and welded them together using 1/8" stainless flatbar(no idea what grade, but they're non magnetic)

4. The S bends took some very careful positioning in terms of clocking so the tailpipes would be even. I used the supplied U bolts to hold them together, which will also allow possible readjustment in any future combination I may have

5. The tailpipes are 3" straight from the S bend ends, made by Magnaflow. These are welded to Pypes stainless steel hangers bolted to the factory hanger bracket studs
img_1351-jpg.23281


img_1434-jpg.23289


img_1439-jpg.23297


img_1441-jpg.23305
 
I'm not a big user of cruise but I can't live with non functional buttons for it any longer, so this became the weekend project.

The cable is from a Marauder, which surprisingly turned out to be a perfect fit despite completely different engine compartments and layout. This is of the snap in variety, just like the throttle cable, which required cutting the hole square with a file. The original bracket served as a direct template for the new one, and I simply left material in front where the cruise goes - I probably should have made the original one this way but I wasn't even sure any cable would clear the hood when I made it.
img_0775-jpg.23369


img_0776-jpg.23377


img_0777-jpg.23385


img_0778-jpg.23393
 

Similar threads

Back
Top