Ignition Lock Cylinder and assembly

FWIW that tooth missing on yours is 1/3 missing on my parts car's teeth. Maybe meant that way
You are correct Zep. That third tooth is cut halfway in and none of my teeth are damaged except some wear and tear from years gone by. The next culprit is the ignition switch. That is what sends electricity to what ever part you are using in the key (acc, off, on, run). Now that I have everything out i can inspect the wiring better.

What I kind of wondered was why the 4 bolts on the steering assembly were lose. I have never known factory bolts to be lose on anything unless they have been removed once before.

Pics to come.
 
Some stuff is either put together by Robots, or some beefy bastard that got it trouble once for a loose bolt.
Toyota's from the 80's and 90's had two brackets that were like that. You had to use the brackets to put an aftermarket deck in one. I got popeye forearms from turning screws.
 
I've never came across a steering column that wasn't secured tightly in the dozens of times I've done this to a Tbird / Mark. They shouldn't be loose unless it has been previously worked on, it wouldn't have came from the factory like that.

@Grog6 - in the 80s / early 90s, most "state of the art" manufacturers were using pneumatic air tools, not robots or the big dude with a hand tool .. for this type of work. The investment Ford made into the production of the MN12 included streamlining the assembly process. Components like the dash assembly would have been mostly assembled outside of the car - possibly at a remote location before installation at the factory.
 
I worked on an nec monitor in the 90's and had to take it apart for an adjustment, and it was behind 135 screws. :O. It was expensive. but it was a $4k monitor, and I knew how to line it up. 21"crt. Sony G550. 2800x1600, trinitron.35 years later, where I worked threw away a bunch of monitors, and I got two of the flatscreen crt versions of that monitor for $40 each. :) Of course, they both needed adjustment, lol.
 
I can assure you the bolts were anything but loose on the one I took apart to send you
No, no, no.... sorry Zep, I was referring to my assembly to my dash frame where loose.
 
I worked on an nec monitor in the 90's and had to take it apart for an adjustment, and it was behind 135 screws. :O. It was expensive. but it was a $4k monitor, and I knew how to line it up. 21"crt. Sony G550. 2800x1600, trinitron.35 years later, where I worked threw away a bunch of monitors, and I got two of the flatscreen crt versions of that monitor for $40 each. :) Of course, they both needed adjustment, lol.
The good old days! that was one nice monitor as i recall. I worked for Digital on the assembly line, night shift. It was fun, but then I got a position working for the state community College as a tech. Assembly line is not a bad job but tech work is fun'r.
 
I got a lot done on the assembly and will reveal some tips that may help others if they ever have to tear down the steering assembly. Hard to do on cell phone.
 
No, no, no.... sorry Zep, I was referring to my assembly to my dash frame where loose.
I know, I meant mine were really tight. Makes me wonder if yours had been messed with at some point
 
I worked on some DEC equipment over the years. We got a pdp-8 Donated to us in HS, because some jackass had ran a screwdriver thru the wirewrapped backplane. I rewired it from scratch. We had an old tty console for input, lol.
When I got to TEC, we had a pdp-11 that we used for testing, that I had to program with switches, lol.
 
I know, I meant mine were really tight. Makes me wonder if yours had been messed with at some point
*shew* glad we have that understanding. Yes, someone had been in here before. Whether it was the people that put in the alarm system or the guy that fixed it. Either way, its getting put together correctly now.
 
I worked on some DEC equipment over the years. We got a pdp-8 Donated to us in HS, because some jackass had ran a screwdriver thru the wirewrapped backplane. I rewired it from scratch. We had an old tty console for input, lol.
When I got to TEC, we had a pdp-11 that we used for testing, that I had to program with switches, lol.
I remember when we component fixed computer / monitor parts. That is a by-gone era, that is for sure.
 
Okay, here are the long awaited tips.

2 assemblies.jpg

1. Before you can assemble the two parts together, the steering assembly and the tilt wheel assembly, including the cylinder lock, you have to place something under the tilt wheel arms. I placed the tilt wheel arms (that press the tilt assembly up when released and restrict the down motion) in a vice, not clamped, but enough pressure to press them down or open, depending on how you are looking at the unit. Then place a ball bearing or something you can remove when you finally tilt the wheel up, will drop out.

tilt arms.jpg

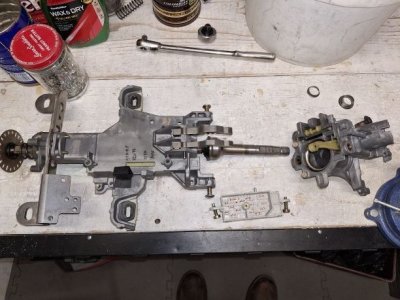
2. Put the assemblies loosely together, steering assembly that mounts to the dash and the tilt assembly. This includes the steering shaft, locking cylinder lock assembly and ignition switch. Make sure to install the locking cylinder gear and assembly in a the RUN position. Make sure the ignition switch is in the run position as well when mounting it to the steering assembly.

3. Place the tilt spring between the two parts at its mounting hole and mounting pin. Place the two parts as show in the pic below in a vice and slowly tighten the vice until the tilt assembly mounting holes align with the mounting pins and tighten the mounting pins (screws) into the mounting holes.

tilt spring3.jpg

spring in vice.jpg

mounting hole.jpg

Done! I highly recommend doing this a few times to get it down so you don't 1. Forget any parts, 2. understand how the to parts work together.

I need to take it apart again and see if I really need the part I ordered. Supposed to be here tomorrow. I got my white lithium grease and need to lube everything up again when I do a final assembly.

I learned a lot from doing this. The tilt wheel assembly is no longer a mystery and I understand the ignition system much better now.


I think the original problem is going to boil down to a bad ignition switch. The white box on the bottom of the steering assembly. I looked all over my sheds and garage for the OEM ignition box and never found it. Guess I shit-canned it a while back when I was cleaning out the garage.
 

Attachments

  • 20240707_144017.jpg
    20240707_144017.jpg
    70.5 KB · Views: 2
Last edited:
Greetings and good evening and all that happy .... yeah, i figured you knew what I was gonna say.

SOB... ever had one of those days? I am getting everything back together and putting on the steering column upper bearing spring retainer and could not figure out why it would not sink in the ring inlet on the column. Kept trying different methods using the "service manual" recommended way... come to find out the retainer was just thrashed, stretched and bent. I went to strengthen the ring and BOOOING! It went flying off the into the netherlands. Ah, it'll be fine.... no, it's not.

No i have to wait a few days for Amazon to deliver the kit. Might as well replace it all. Anyway... my work shop:

Work Shop.jpg
 
Tip #4,376...
1. Leave the swivel loose on the steering shaft side.
2. Use thick walled 3/4" PVC (cut to 2 3/8"), mount the pressure sleave, long sleave and ring and snap ring and put the PVC tube on.
3. Using an adequate washer and the steering wheel screw over the PVC, tighten the screw down till the snap ring pops in place.

I believe my snap ring would not pop on because the steering shaft needed to be another 1/8" forward and I had already mounted the swivel to the steering shaft. I tried the Doorman snap ring set from Autozone and the rings are not heavy enough to sustain the pressure of the spring. Off to order some parts.... have a good evening.
 
Update:
After receiving the new assembly this morning, turns out all I could use was the snap ring. After struggling with all the various parts trying to get the snap ring to pop in place, turns out I was right about the wall thickness of the PVC tubing to press the spring on as well as removing the bolt from union at the steering wheel shaft. I dug through my PVC parts and found a piece of a junction that was 3/4" and the same height as the thin walled one I was using.

While tightening the screw down, I heard the snap ring pop in place.

More to come.

PVC Size.jpg


Spring done.jpg
 
I remember when we component fixed computer / monitor parts. That is a by-gone era, that is for sure.
I made a 30+ year career out of component level repair, with 10 of those as a designer. If you've had a pet scan in a siemens pet/ct scanner, I probably designed the detector. The last job I had, when I had my stroke, was repairing medical gear; mostly electric scalpels, that I didn't know existed. :) They cut and cauterize at the same time. 400MHz rf, at amps of power.
 
Well, I put everything together, turned the key and NOTHING! Ugh. First thing I thougtht of was the ignition switch (white box under steering assembly). Since the mechanical part is working as it should and the dash lights, indicator lights, bells and buzzers all work as they should, I suspect the ignition switch or the wiring.

Since the Town Car has the same model ignition switch, I can pull the one from the Town Car and try it on the Cougar and see what happens.

More to come.
 
Just a thought: have you inspected the power cable from the battery to the starter? I had to replace that cable on my first Cougar b/c of corrosion, it would be a PIA to start sometimes.
 
Just a thought: have you inspected the power cable from the battery to the starter? I had to replace that cable on my first Cougar b/c of corrosion, it would be a PIA to start sometimes.
Hey Kidd,
I sure can take a peak, it would not hurt. But to my knowledge, that cable is like new to the starter.

Update:
I put the Town Car ignition switch in the Cougar and visa / versa. The Town Car started without issue with the Cougar ign switch. I then hooked up the battery on the Cougar after installing the Town Car Ign switch and it just cranked over and over.... then I remembered i unplugged the coil when I started the car without an lock cylinder and could not shut off the car.

Cougar started just fine.

Go figure.

No to put the bottom panel, steering wheel and horn/air bag back on and see if it consistent in starting.

Update to follow.
 
I made a 30+ year career out of component level repair, with 10 of those as a designer. If you've had a pet scan in a siemens pet/ct scanner, I probably designed the detector. The last job I had, when I had my stroke, was repairing medical gear; mostly electric scalpels, that I didn't know existed. :) They cut and cauterize at the same time. 400MHz rf, at amps of power.
Dude, you got me on this. I bounced around as a computer tech for several companies and went with the flow from component testing to "replace the whole board", which is what most computer manufactures due now.

I think they send the burned out boards to China where some family sits by the fire outside their shack and heats off the gold from the board.
 
Greetings and good evening and all that happy .... yeah, i figured you knew what I was gonna say.

SOB... ever had one of those days? I am getting everything back together and putting on the steering column upper bearing spring retainer and could not figure out why it would not sink in the ring inlet on the column. Kept trying different methods using the "service manual" recommended way... come to find out the retainer was just thrashed, stretched and bent. I went to strengthen the ring and BOOOING! It went flying off the into the netherlands. Ah, it'll be fine.... no, it's not.

No i have to wait a few days for Amazon to deliver the kit. Might as well replace it all. Anyway... my work shop:

View attachment 6509
In my industry we call those "Jesus screws/clips or retainer" because after the booking the next words are "oh Jesus where did that go!?"
 
In my industry we call those "Jesus screws/clips or retainer" because after the booking the next words are "oh Jesus where did that go!?"
Booking was supposed to say Booooing
 
Just a thought: have you inspected the power cable from the battery to the starter? I had to replace that cable on my first Cougar b/c of corrosion, it would be a PIA to start sometimes.
Well, after all of that "learning experience" the car still does the turn, click BS. Since I have weeded out the steering column parts, connections, electronics, the next step is to start tracing from the starter. I have an extra starter I have had sitting on a shelf for ... geez, I dunno, long time?

Will update more. I am going to check the transmission sensor as well while its up on a ramp.
 
I think this is the last for this post. The Cougar is starting every time now. I could not get it to act up. What I did find out is the ign switch that I pulled from the Cougar is bad in that it has issues in the Town Car where the car won't start. Ordering a new ign switch and leaving the one from the Town Car int he Cougar.

Thanks everyone that helped with this project. I satisfied my curiosity of what could be causing the problem and it turns out it was probably the ign switch all along. Just a cheap brand and did not last long.
 
I got so drenched in transmission fluid one time I prob could have rung out my shirt and had an extra 2 quarts
 
I got a drop in my eye once, while changing fluid, and jmodding the tbird. That trans died from the 127mph upshift bug. :)
 

Similar threads

Back
Top